Installation
Free version
- Download the plugin from wp.org – https://wordpress.org/plugins/role-and-customer-based-pricing-for-woocommerce.
- Go to WordPress Admin > Plugins > Add New, click Upload Plugin, and choose the file you downloaded in step 1.
- Click Install Now and then Activate Plugin.
- Double-check whether you have any other role-based pricing plugins activated; if so, disable them to avoid conflicts.
Premium version
- Download the premium plugin from the email you received after purchase, or visit https://users.freemius.com/login and enter your credentials to access the buyer dashboard, where you can find the premium version of the plugin and your license key.
- Before installing the premium version, please deactivate the free version if it is still running.
- Go to WordPress Admin > Plugins > Add New, click Upload Plugin, and choose the file you downloaded in step 1.
- Click Install Now and then Activate Plugin.
- Double-check whether you have any other role-based pricing plugins activated; if so, disable them to avoid conflicts.
If you see an error saying:
Fatal error: Cannot declare class ComposerAutoloaderInit00e8679be6824c83a88ea5e130babba2, because the name is already in useplease double-check whether the free version is still activated. Deactivate it, then try activating the premium plugin once more.
Configuration
Role & Customer Based Pricing by Meow Crew lets you configure pricing rules and set specific conditions for user groups and individual users.
Create a Custom User Role
Role & Customer Based Pricing extends the WordPress user management tool, allowing you to add and remove non-standard user roles.
Note: the plugin doesn’t let you manage individual role capabilities — you can only replicate capabilities from existing user roles. If you need a role with custom capabilities, use a dedicated roles plugin. Any WordPress role created with another plugin can still be used in role-based pricing rules.
To create a role, go to Users > Roles Management.
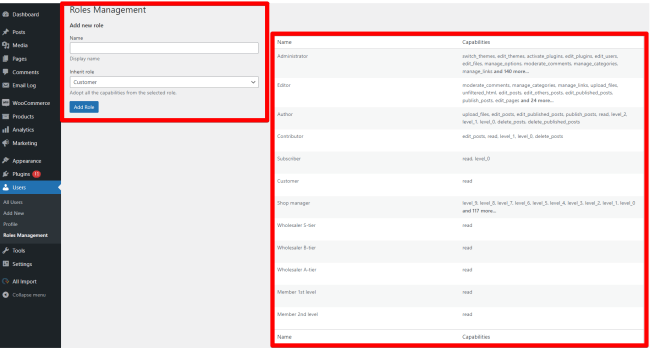
Enter the role name and select the existing role whose capabilities the newly created role will inherit.
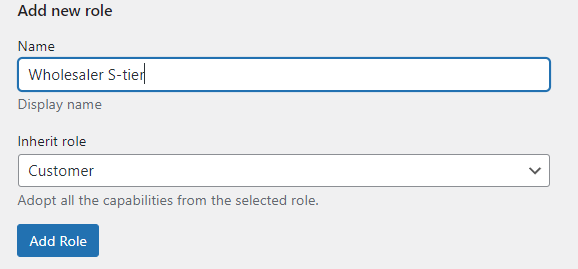
If the role doesn’t require any special capabilities (such as those of the administrator, editor, or contributor roles), choose Customer to apply the default capabilities.
Default and custom role capabilities are described in the table below.
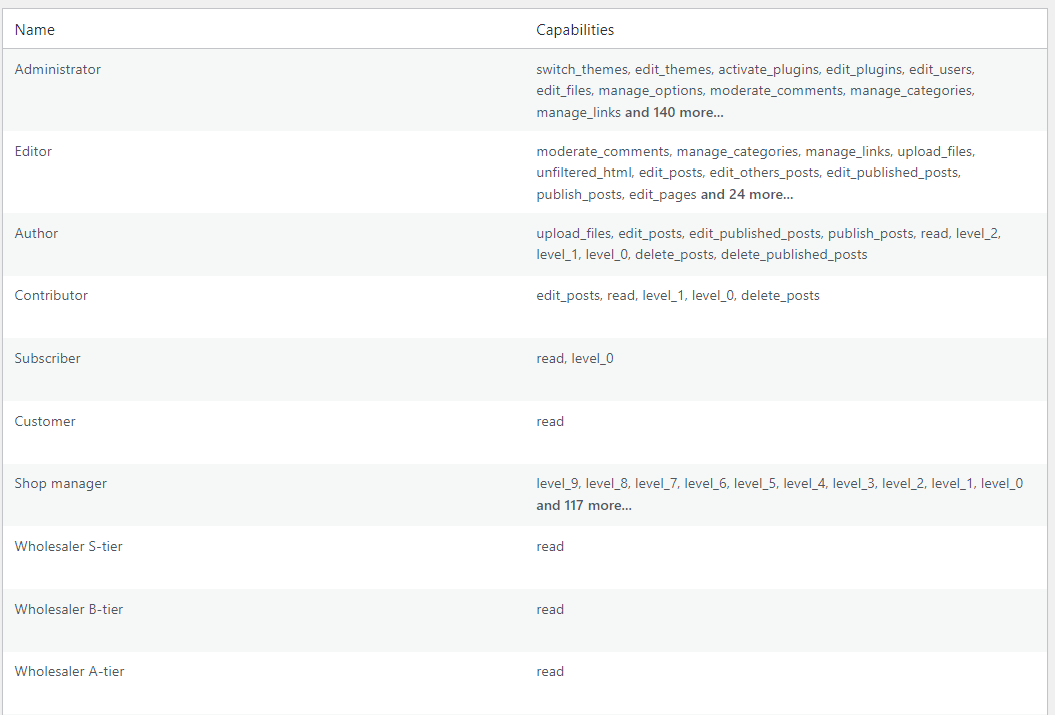
You can delete any custom role from the list. Default WordPress roles (administrator, editor, author, contributor, subscriber, customer, etc.) cannot be deleted.
Note: if you remove a role that is used in a pricing rule, the rule will remain active and apply to all users until the rule is updated.
Next, assign users to the appropriate role under Users > All Users > {choose user account}.

Create a General Pricing Rule
You can create role- or customer-based pricing on two levels:
- General rule – apply a rule to a selected group of products or entire categories, with the option to set general pricing and/or quantity rules.
- Product rule – apply a rule to individual products.
To create general role-based or customer-based pricing and quantity rules, go to WooCommerce > Pricing rules.
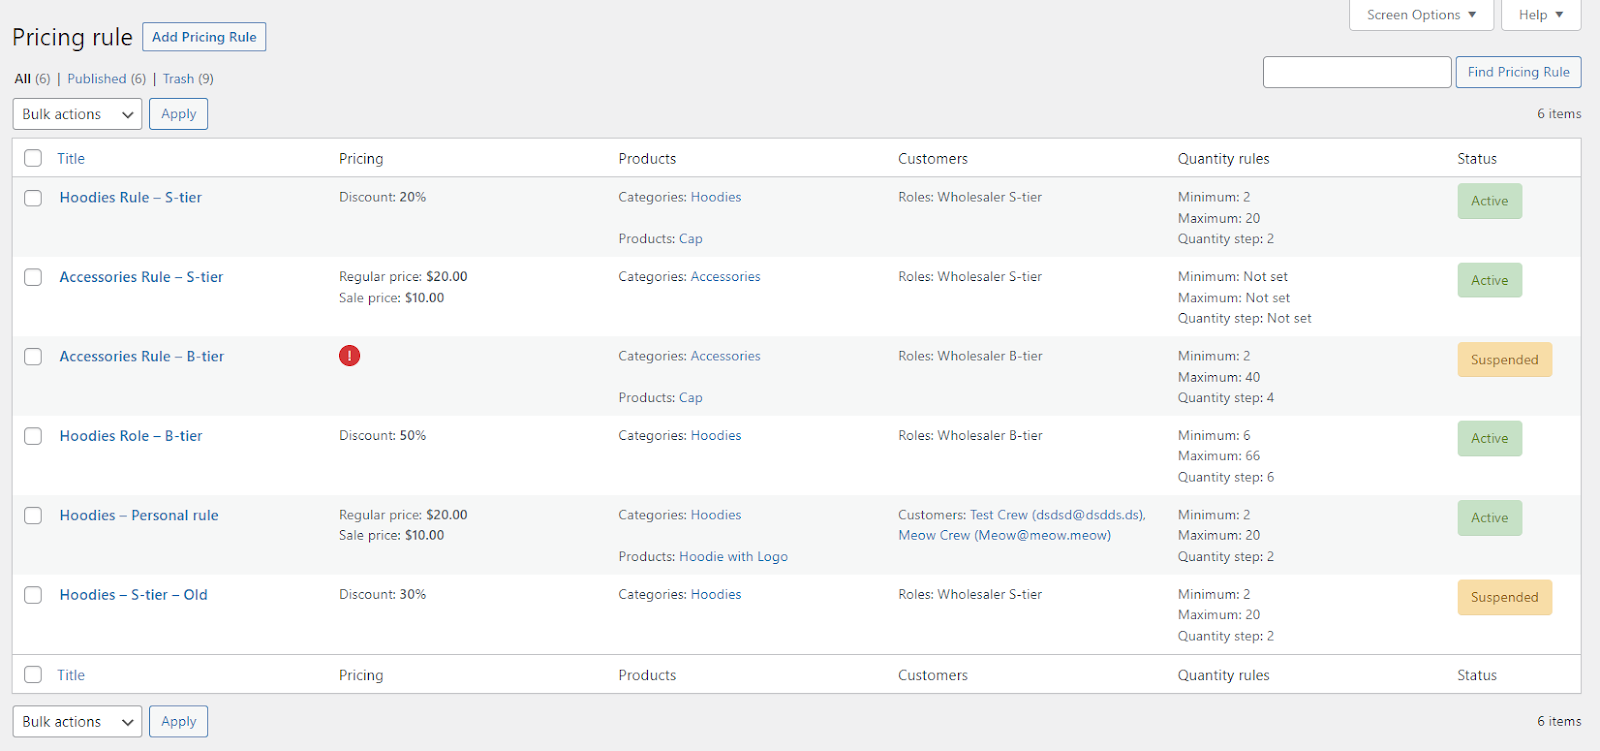
The Pricing rules table shows all created rules along with their status, applicable user role, discount value, and min/max quantity.
The statuses are:
- Active – the rule is operational.
- Suspended – the rule is paused (its settings are preserved).
- Deleted – the rule is trashed (its settings are lost).
If you need to disable a rule temporarily, it’s better to suspend it so that none of its settings are lost.
Note: newer rules (at the top of the list) take priority over older rules (at the bottom). For example, if the same product or category is used in two separate rules, the newer rule overrides the older one. Even if no pricing rule is set but a quantity rule is created, it still counts as the main rule — pricing and quantity conditions should be applied within the same rule.
Select users and products
To create a new role- or customer-based pricing rule, click the Add Pricing Rule button.
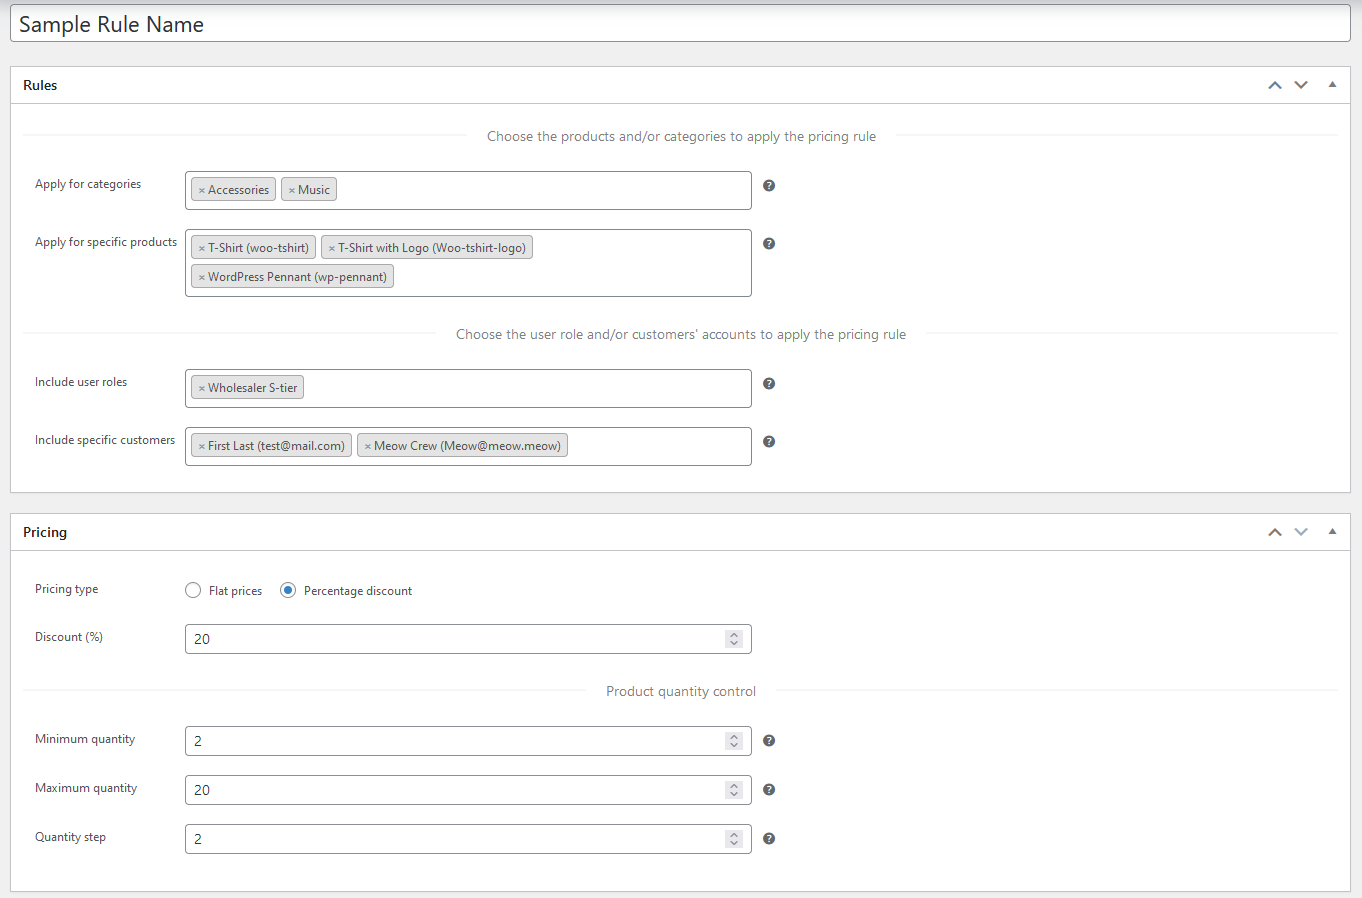
Complete the following fields:
- Rule Title – name your pricing rules so you can tell them apart.
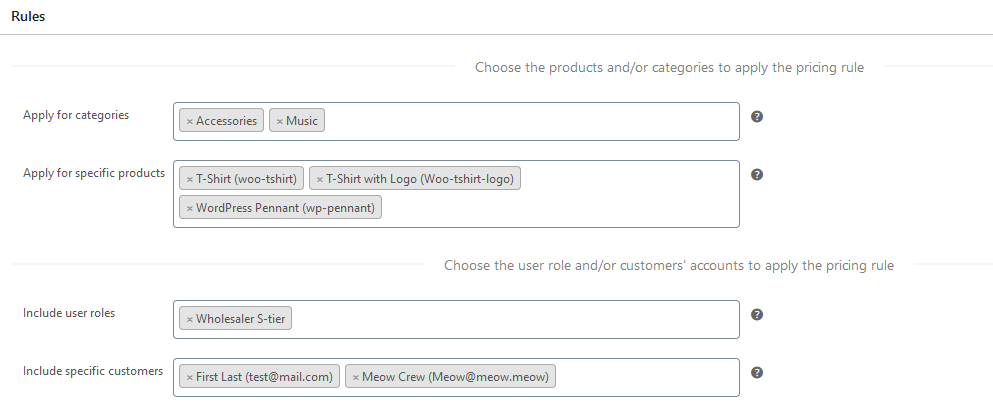
- Apply for categories – choose the categories this pricing rule will apply to. The rule applies to all products in the category.
- Apply for specific products – if you don’t want to set pricing for an entire category, or you need to add products on top of a category, search for product names here. There’s no need to select products that already belong to a category selected above.
- Include user roles – choose the user roles this rule will apply to. It applies to all users with those roles; you can pick newly created roles as well as default WordPress roles.
- Include specific customers – if the rule should apply only to certain customers, search for them here. If these users already have a role specified above, there’s no need to select them separately.
Determine price and quantity rules
After setting the relevant user roles and categories/products, you can set pricing and quantity rules (if applicable).
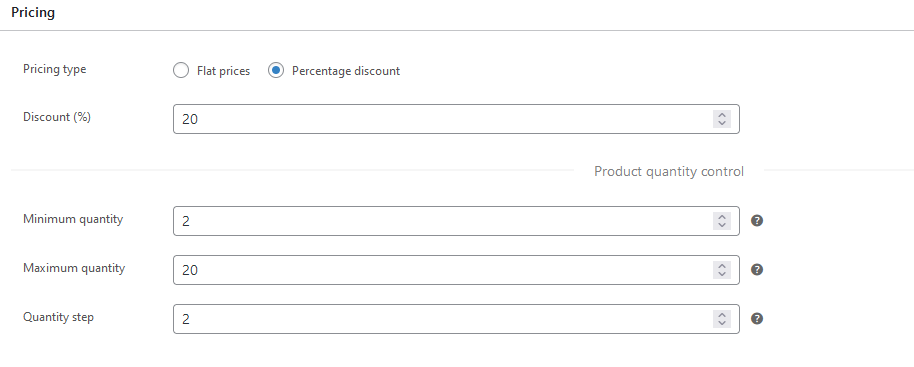
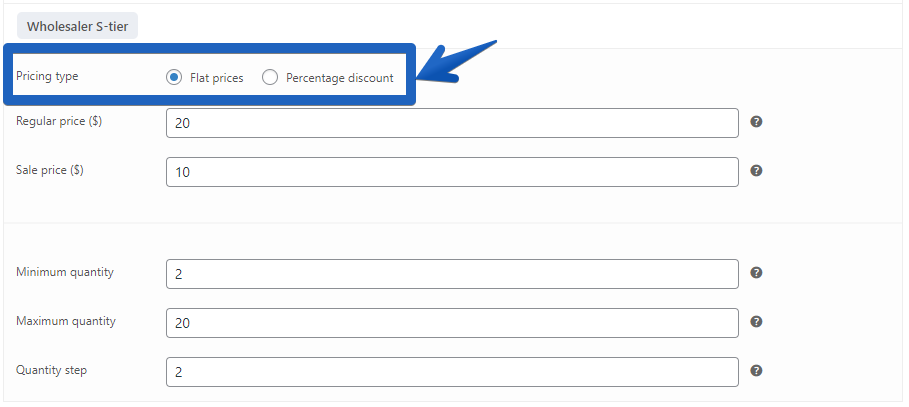
- Flat prices – set the exact prices to apply in the rule.
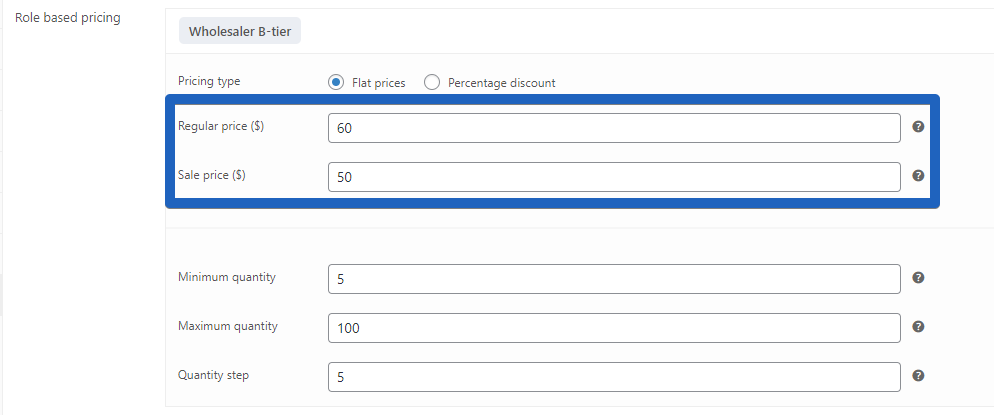
- Regular price ($) – set a specific price (leave blank to default to the standard product price).
- Sale price ($) – set a sale price (leave blank to default to the product’s sale price).
Or:
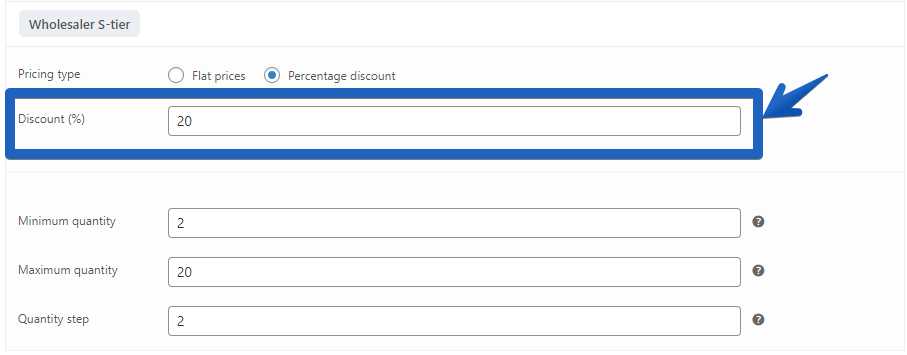
- Discount (%) – a percentage discount. Note: if the product has a sale price set (available to everyone), the discount is calculated from that price.
Please keep in mind that you are changing prices for the whole range of products or categories selected above.
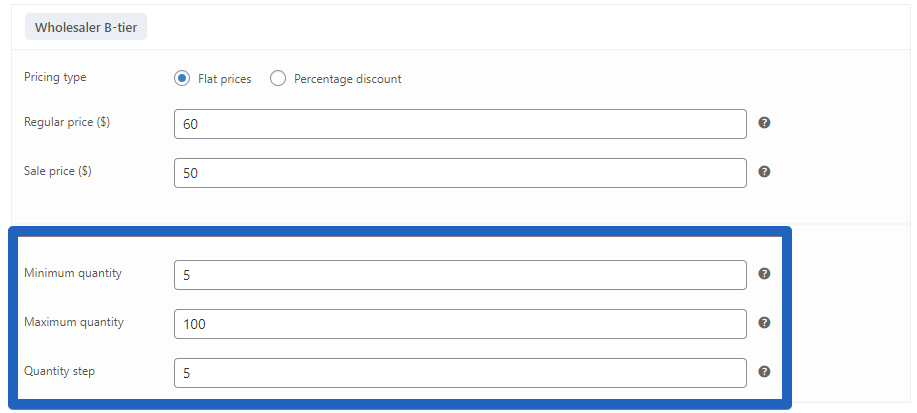
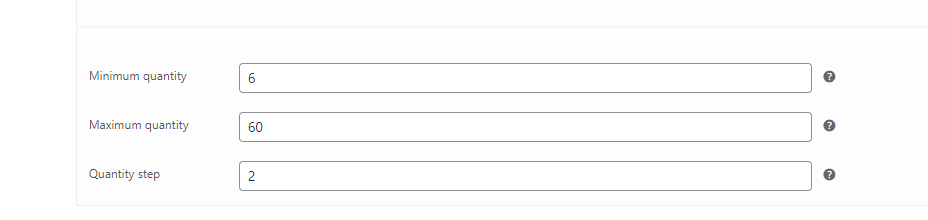
- Minimum quantity – the minimum number of products the selected users must purchase in a single order. If the minimum allowed amount is 1, you can leave the field blank.
- Maximum quantity – the maximum number of products the selected users can purchase in a single order. If you don’t want to apply a limit, leave the field blank.
- Quantity step – the increment in which customers can add the product to the cart.
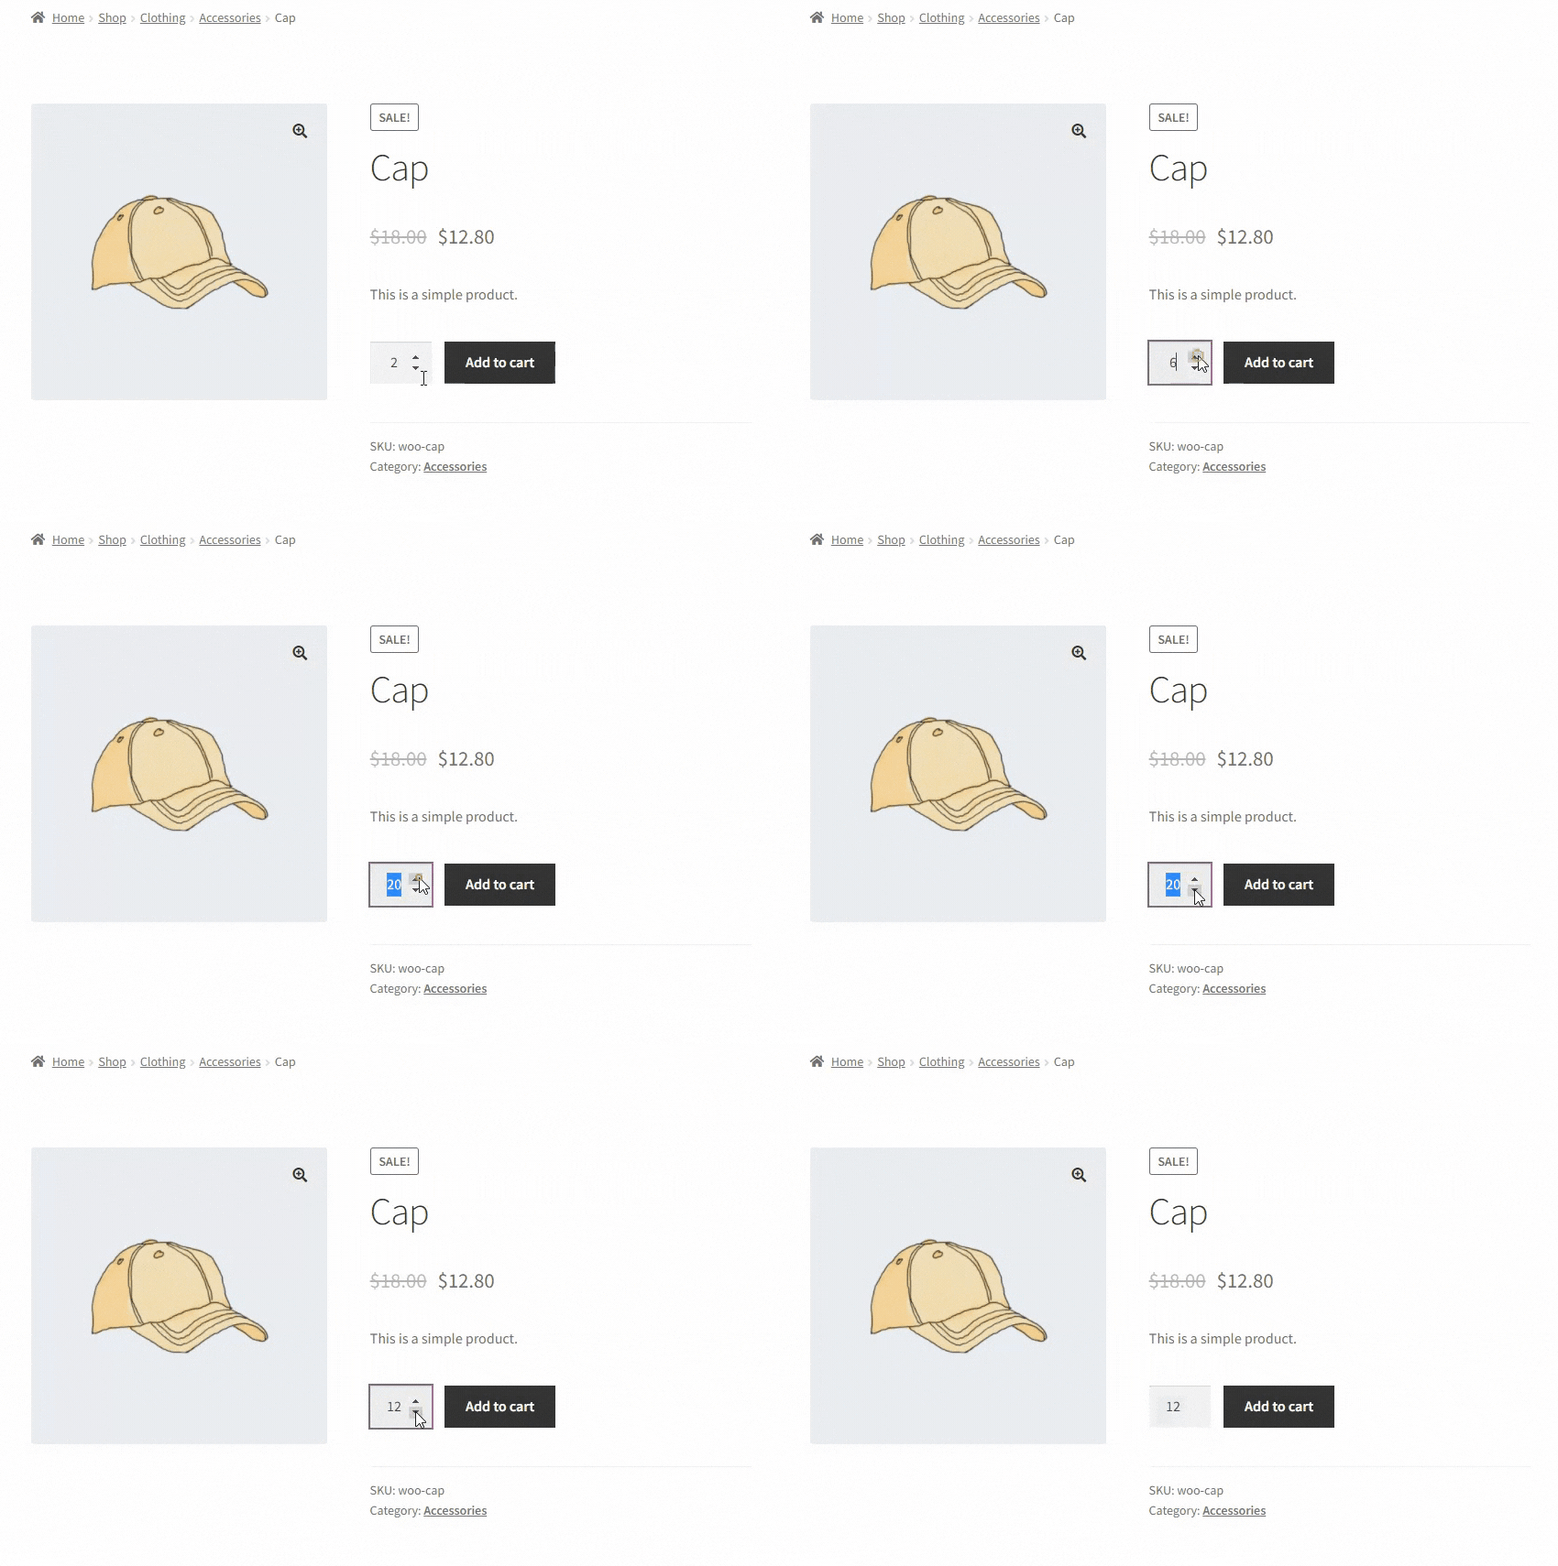
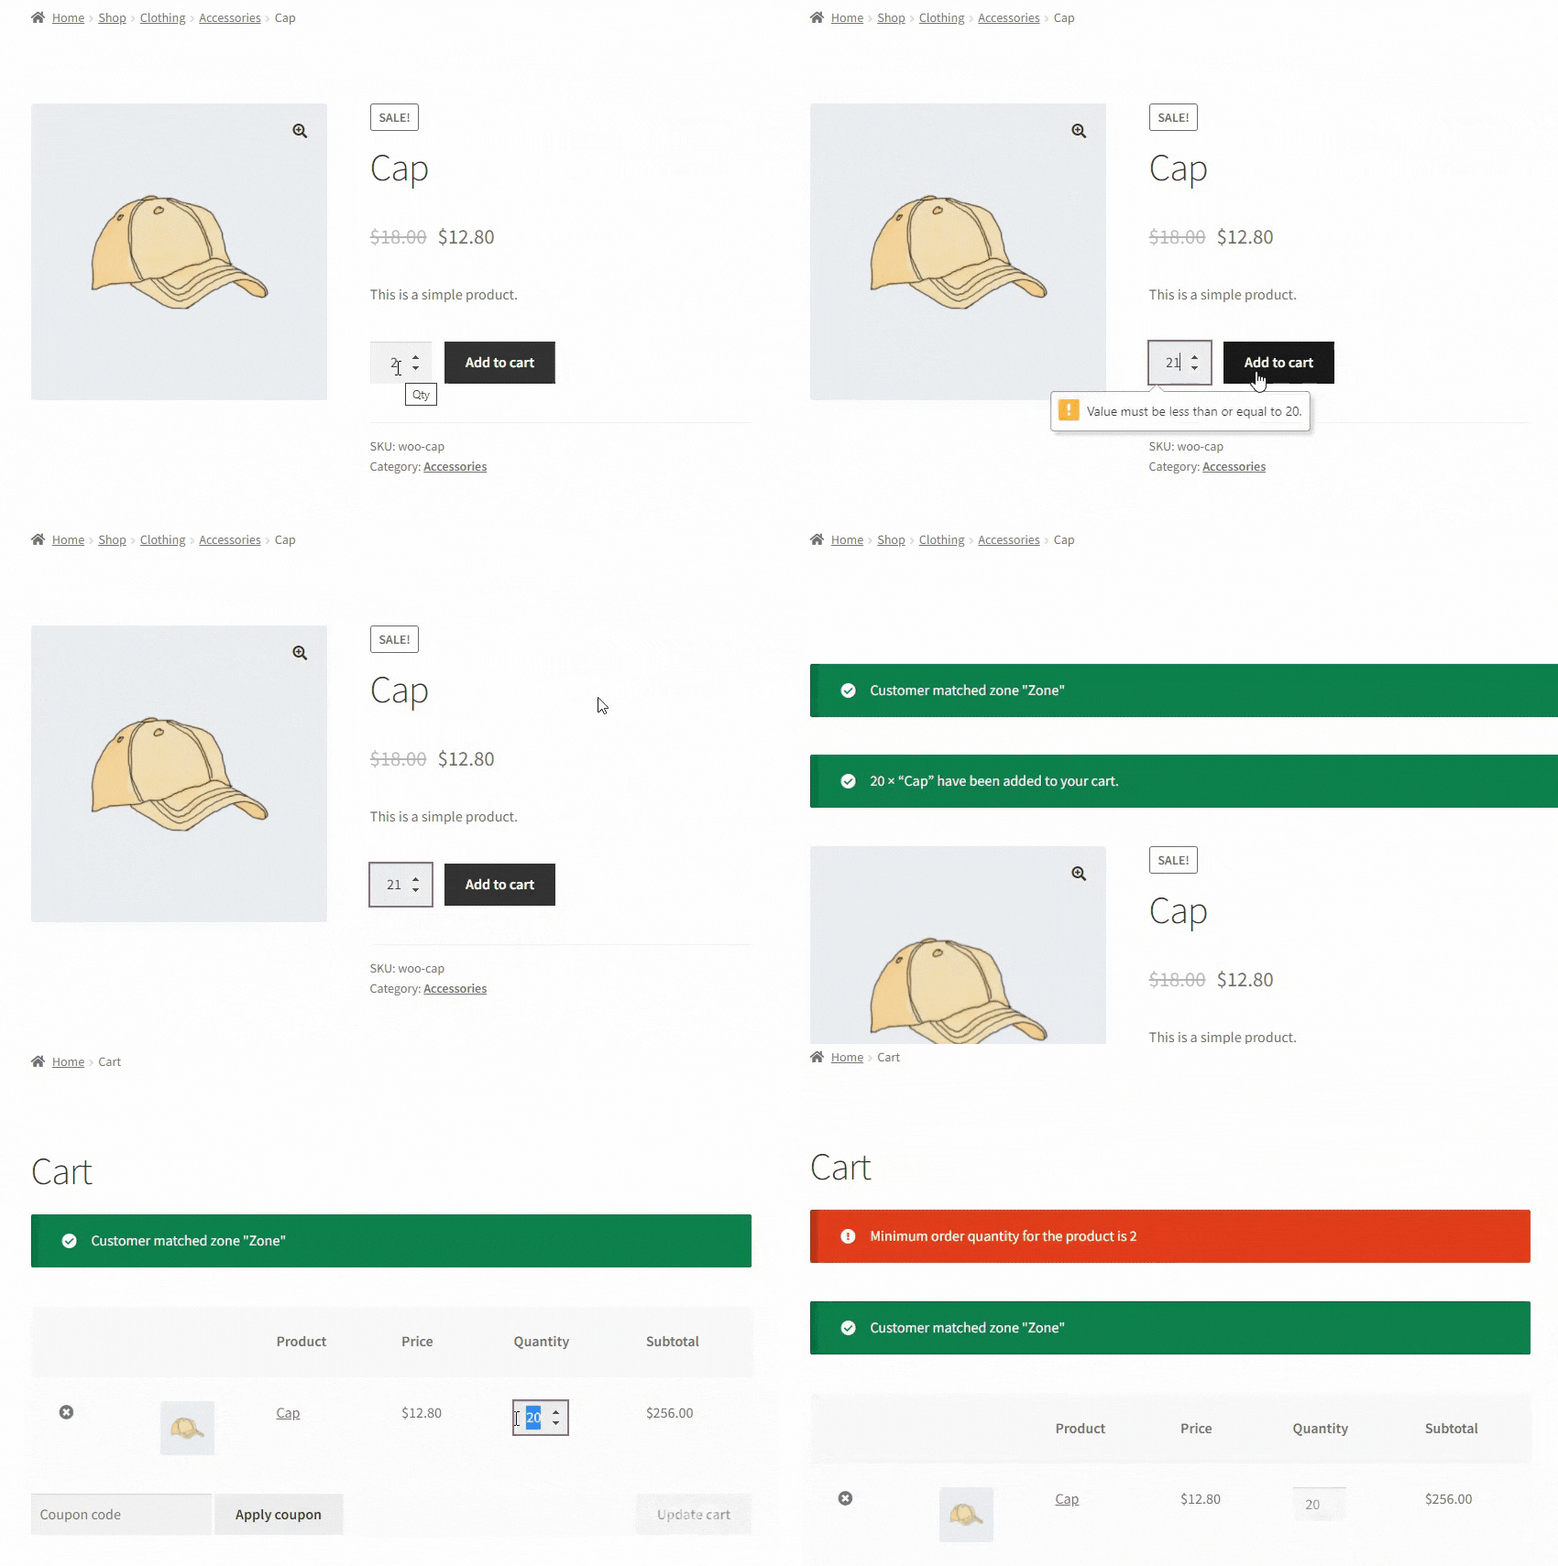
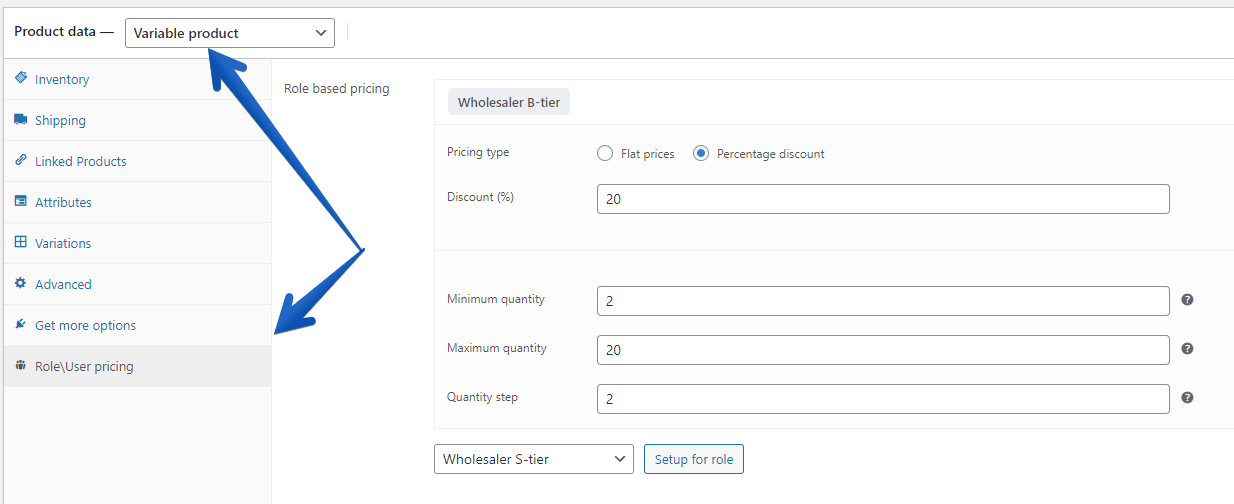
The screenshot below shows a setup where the minimum required amount is 2 (you cannot buy 1) and the maximum is 20 (you cannot buy 21), with a quantity step of 2 — so customers can purchase 2, 4, 6…18, 20 items, but not 3, 5, 7…17, 19.
The plugin also displays error messages if the user’s cart doesn’t meet the rule conditions.
Create a Separate Pricing Rule for Products
In addition to general rules for user groups (roles or individual users) and entire categories or product groups, you can set up role- or customer-based pricing on individual products.
Note: pricing rules applied at the product level override the general rule. For instance, if a general rule gives a 20% discount on the entire clothing category, but a product-level rule gives 10% off the hoodie product, the 10% discount (not 20%) applies to the hoodie.
Simple Product
Simple, Variable, Grouped, and Subscription products are configured identically. In the product metabox, you’ll find the Role User pricing tab for setting up role-based and customer-based pricing and quantity rules.
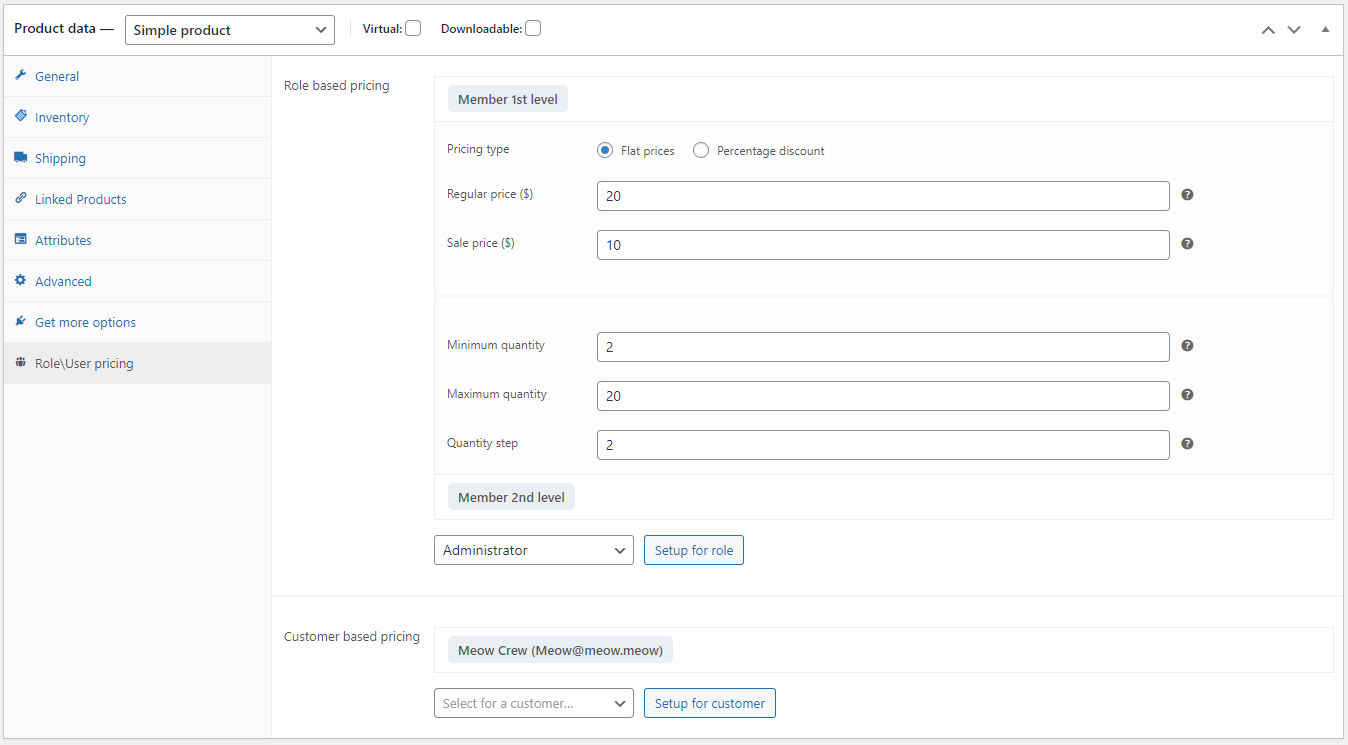
Role-based pricing
Here you can configure role-based pricing for any user role in your store. Note: you can create only one rule per user role.
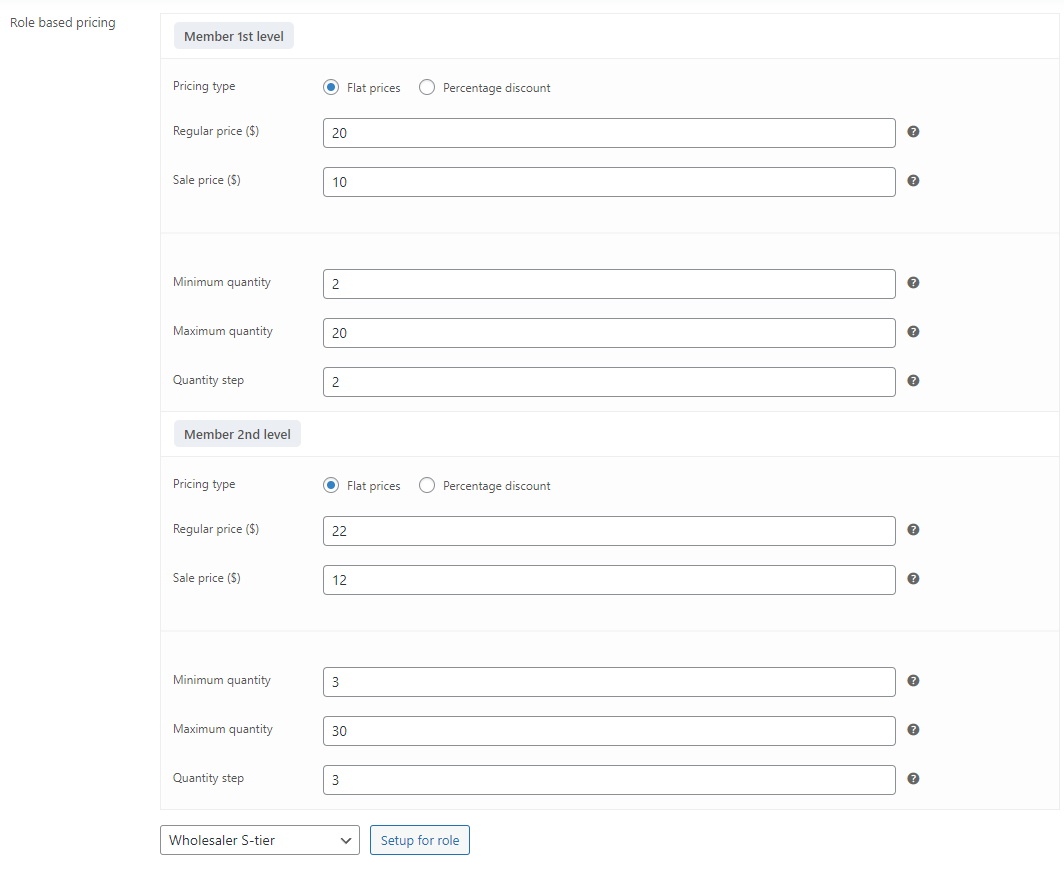
To set up role-based pricing, select the appropriate user role from the dropdown menu and click Setup for role.

Customer-based pricing
Here you can create pricing or quantity rules for individual users or user groups.
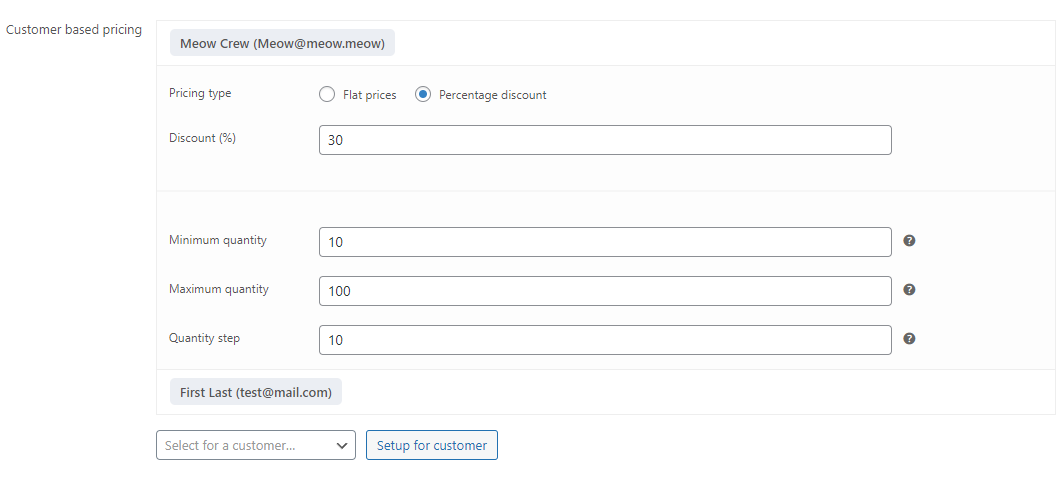
This feature lets you create completely independent pricing for each product and every customer.
The fields are the same as in the general rules section:
- Flat prices – set the exact prices to apply in the rule.
- Regular price ($) – set a specific price (leave blank to default to the standard product price).
- Sale price ($) – set a sale price (leave blank to default to the product’s sale price).
Or:
- Discount (%) – a percentage discount. Note: if the product has a sale price set (available to everyone), the discount is calculated from that price.
- Minimum quantity – the minimum number of products the selected user must purchase in a single order. If the minimum allowed amount is 1, you can leave the field blank.
- Maximum quantity – the maximum number of products the selected user can purchase in a single order. If you don’t want to apply a limit, leave the field blank.
- Quantity step – the increment in which the customer can add the product to the cart (for example, min 2, max 20, step 2 allows purchasing 2, 4, 6…18, 20 items, but not 3, 5, 7…17, 19).
Variable Product
Setting up role- and customer-based pricing for Variable products is similar to Simple products (above), except that pricing and quantity rules are configurable for each variation independently. To set rules at the variation level, go to Product > Variations > Choose Variation > Role or Customer-based metabox.
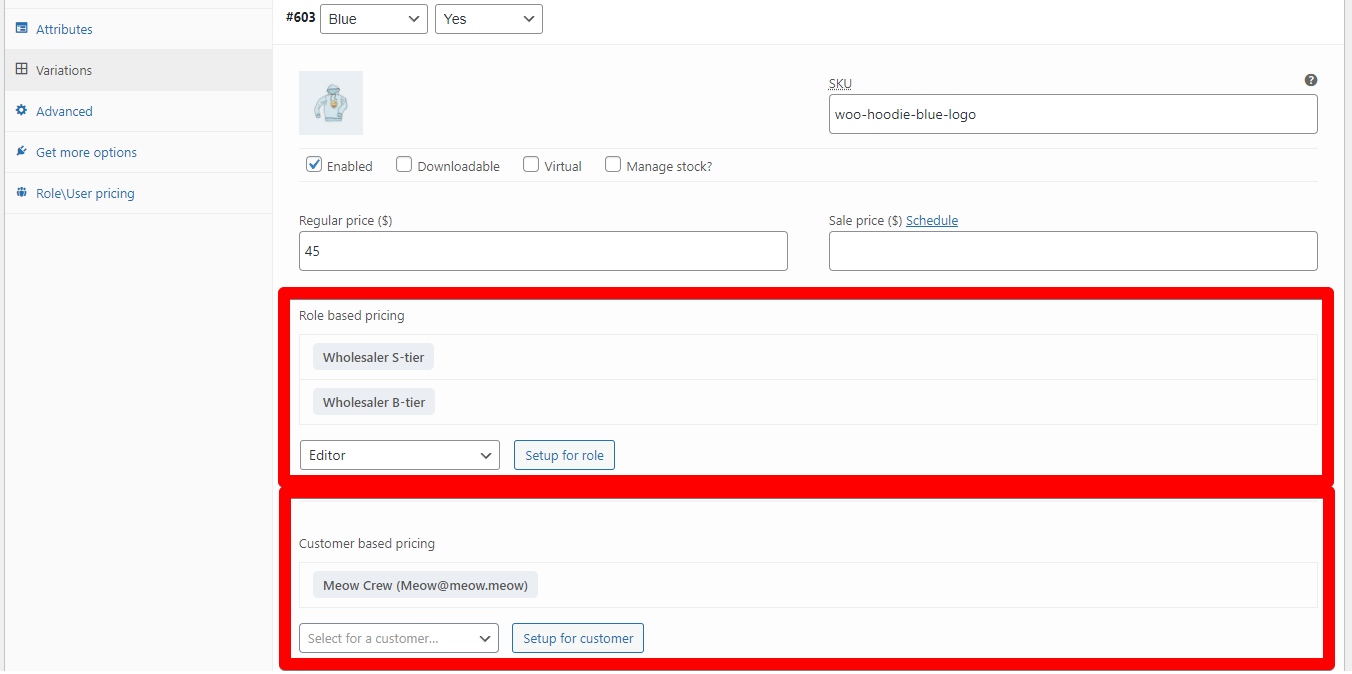
If you don’t need specific pricing for each variation, you can simply set up a general rule that applies to all variations of the product.
Pricing Display and Rules for Non-Logged-In Users
Role and Customer Based Pricing lets you control how prices are displayed to non-logged-in users. To configure this, go to WooCommerce > Settings > RoleCustomer Based Pricing.
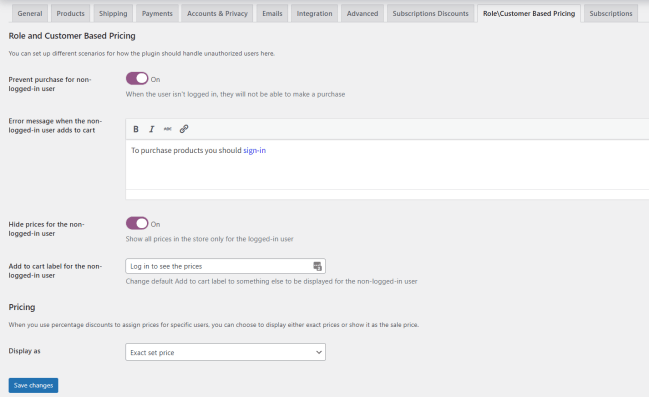
Prevent purchase for non-logged in users – restrict purchases to registered users. Enabling this option reveals the next setting:
Error message when non-logged in users add to cart – customize the message shown to non-logged-in users when they try to add a product to the cart.
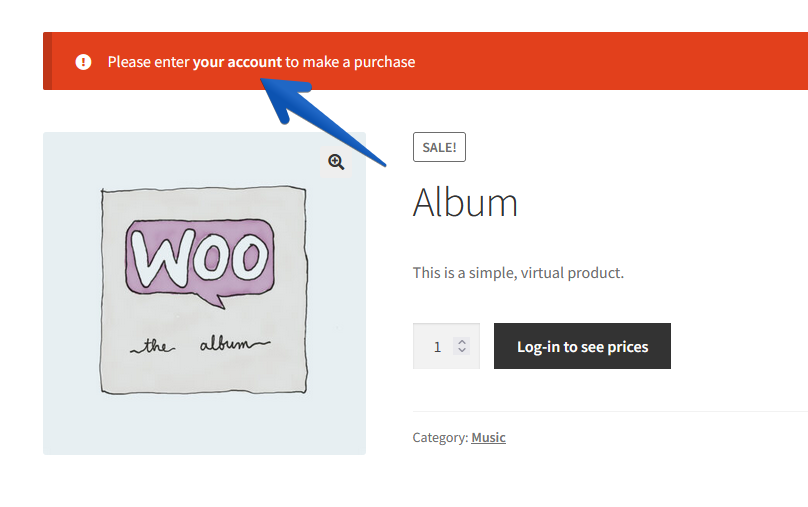
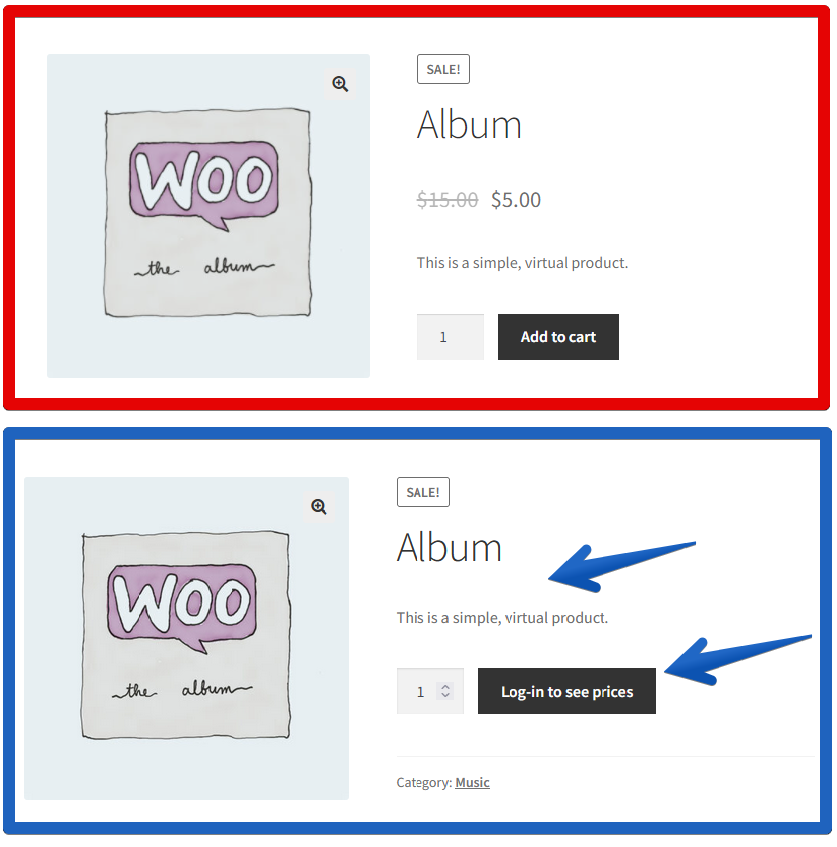
Hide prices for non-logged in users – show or hide regular shop prices from non-logged-in users.
Add-to-cart label for non-logged users – customize the Add-to-Cart button text for non-logged-in users.
Pricing: Display as – when the percentage discount pricing type is used, this option lets you display the discounted price either as a sale price or as the normal price for specific roles.
Import and Export
Role & Customer Based Pricing integrates with the default WooCommerce import/export tool, allowing you to bulk import and export role-based prices, customer-based prices, and quantity rules. Note: this feature works only for pricing rules on the product level — general rules cannot be created via import.
In addition, the plugin is compatible with WP All Import to facilitate importing role-based pricing rules.
WooCommerce default export/import
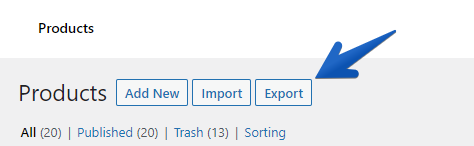
Before exporting with the default WooCommerce tool, we recommend first creating role-based or customer-based pricing rules for the applicable products. Next, go to Products > All Products > Export.
You can select the fields related to role- or customer-based pricing as well as quantity rules.
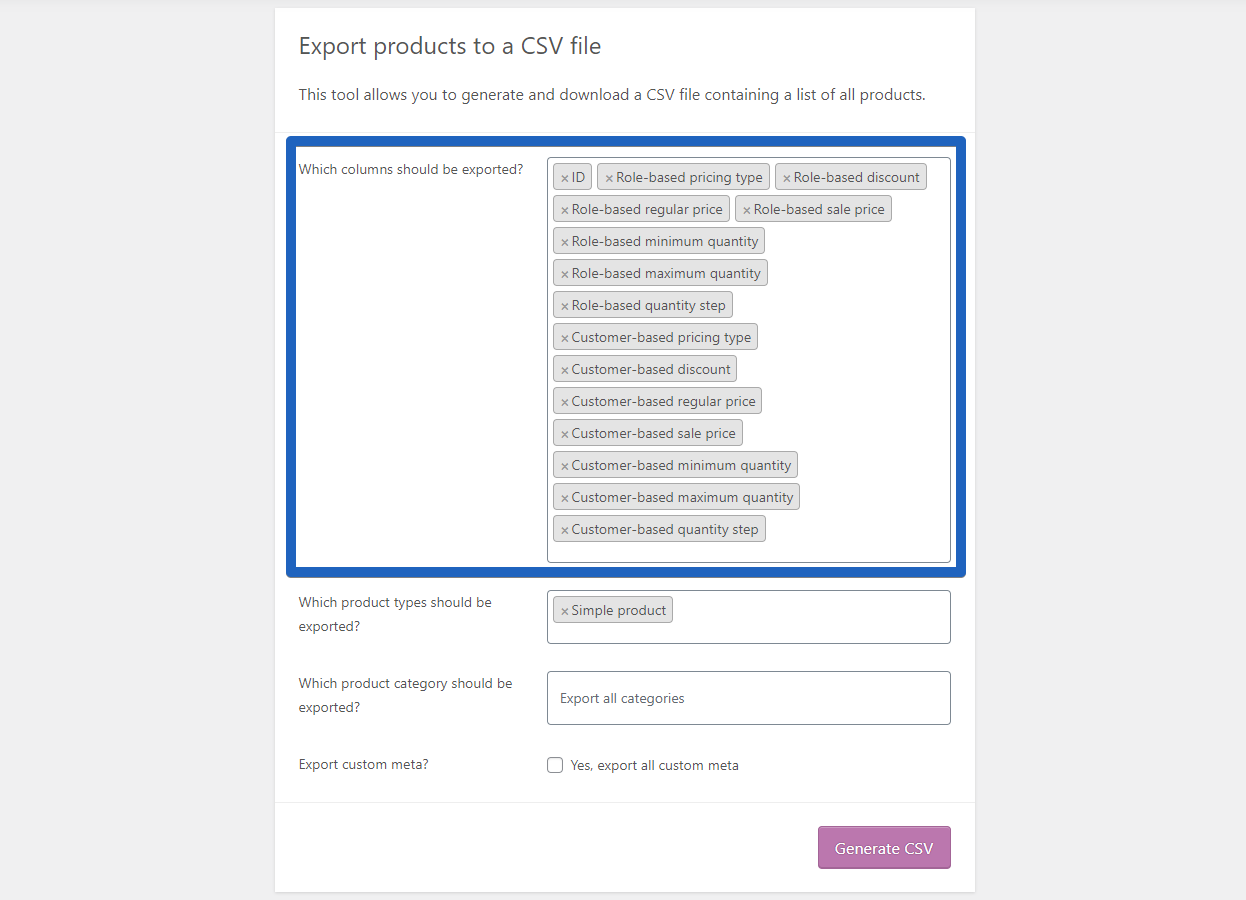
After exporting the relevant fields, you can use the file as a template for importing your prices and/or quantity rules. Don’t forget to export product identifiers (post ID, SKU, product title).
Your role-based pricing rules will look like this in the exported file:

Name: indicates the role the rule is created for. If you have several rules for different roles, use the ‘;’ separator to specify rules for two or more roles. The example above shows how to set the pricing type for two roles: ‘Wholesaler S tier:flat;Wholesaler B tier:flat’.
Role-based pricing type (required field): indicates the type of role-based pricing to use for this product. Two options are available:
- flat – manually set regular and sale prices.
- percentage – a percentage discount from the regular (or sale) product price.
Role-based discount: required when the percentage pricing option is selected. Enter any number between 1 and 100 matching the discount you want to assign to this role.
Role-based regular price (optional field): if the product uses the flat pricing option, indicate the regular price for the role here.
Role-based sale price (optional field): if the product uses the flat pricing option, you may also set a sale price in addition to the regular role-based price.
Quantity rules appear in the exported file as shown below (and, of course, you can upload them the same way):

Simply enter the role name and set quantity values to create quantity rules. All three options are available: minimum and maximum purchase quantities and the quantity step.
To import prices for customer-based rules (separate rules for each customer), you need to know the customer ID.
Since the customer ID isn’t shown on the user page, you can find it in the address bar on the Edit User page:

If you need to import in bulk, we recommend either the Reveal IDs plugin or exporting users with their IDs via WP All Export or any other user export plugin you’re comfortable with.
WP All Import integration
Role and Customer Based Pricing is integrated with WP All Import, allowing you to mass import role-based pricing rules for each product. You can only import pricing rules based on user roles this way — if you need to import prices for individual users, use the WooCommerce import tool (instructions in the section above).
Also note that the plugin isn’t integrated with WP All Export, so you cannot export role-based prices with it.
The first thing to do is create an appropriate file for the import.
The following fields are required in the file:
- a product identifier (product ID, for example);
- a role-based pricing type (‘flat’ or ‘percentage’) for each role and each product;
- for the percentage discount pricing type, the discount amount for each role and each product;
- if you use flat prices, the regular price for each role and each product;
- if you need sale prices in addition to regular prices, an additional sale price column for each role, filled in for each product with the ‘flat’ type (the regular role-based price should be set beforehand).
The pricing section of your import file may look like this:

The example shows an import file for two products and two roles (S-tier and B-tier). The first column is the product ID, which you need to create or update WooCommerce products. The next two columns represent the pricing type — you can mix them and even use two different pricing types for one product across different user roles. The next two columns are the discounts assigned to those roles (leave cells blank if you don’t use the percentage pricing type), and the last four contain the regular and sale prices for those products for each user role.
You can also include quantity rules in the file to import them along with pricing rules.
Quantity rules may look like this in your import file:

Filling in the quantity rule columns works the same way as for role-based pricing.
The resulting quantity rules for the designated user role will look like this:
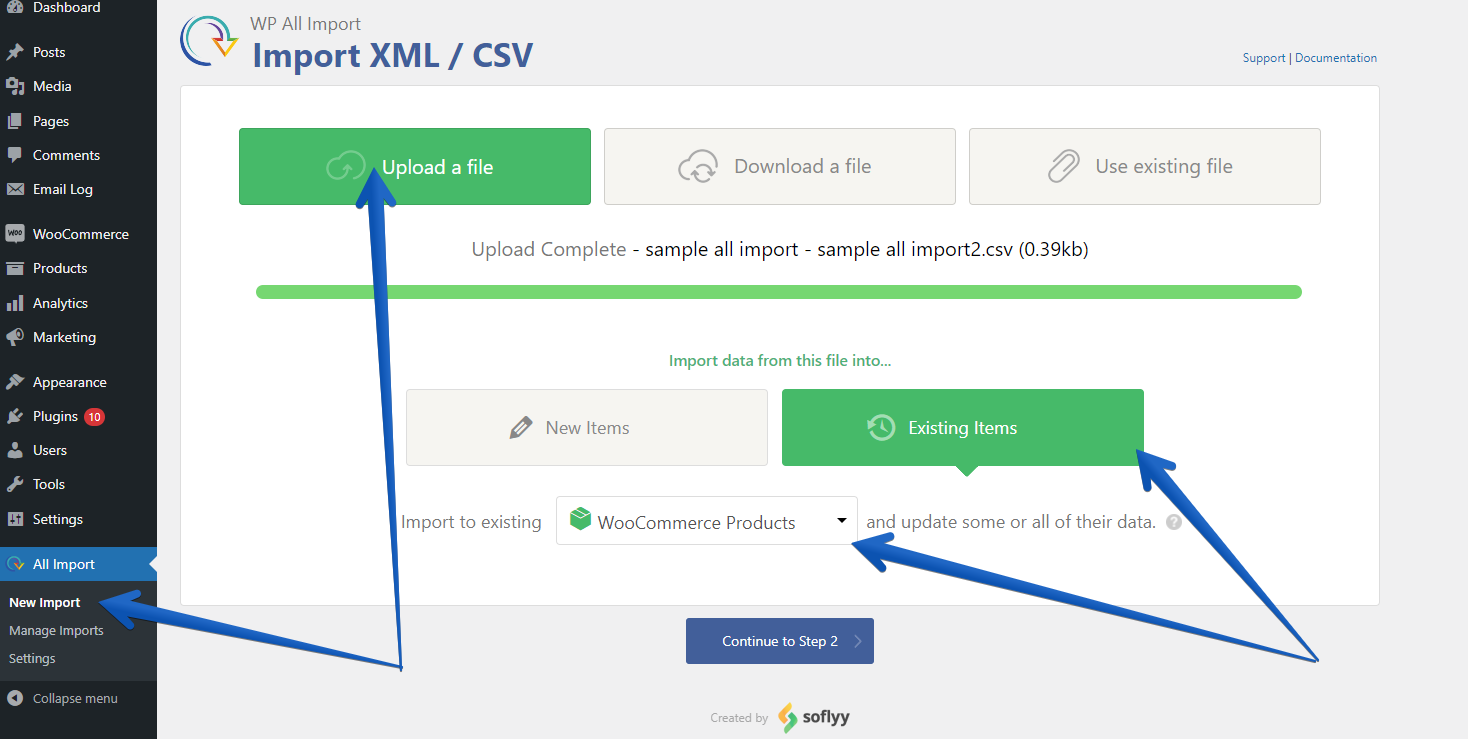
To import the file, go to All Import > New Import > Upload, then choose whether to create brand-new products or update existing ones, and select WooCommerce Products in the “Import to” option.
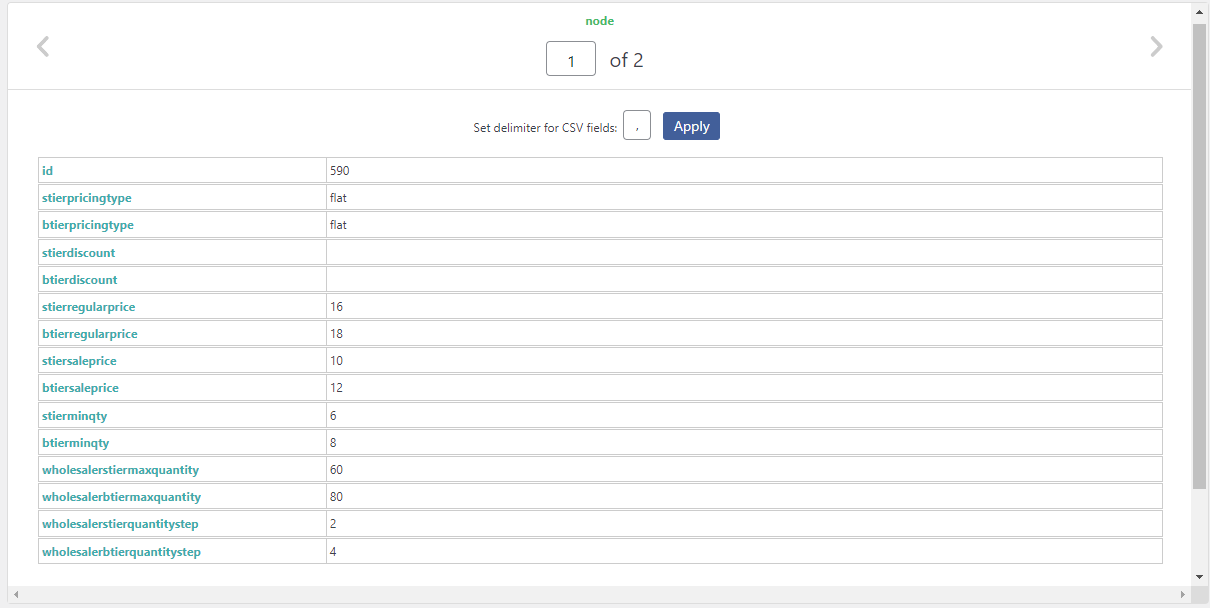
Carefully check which fields will be uploaded from your file:
You’ll find an additional block named Role and Customer based pricing, where all of your user roles are available to choose from:
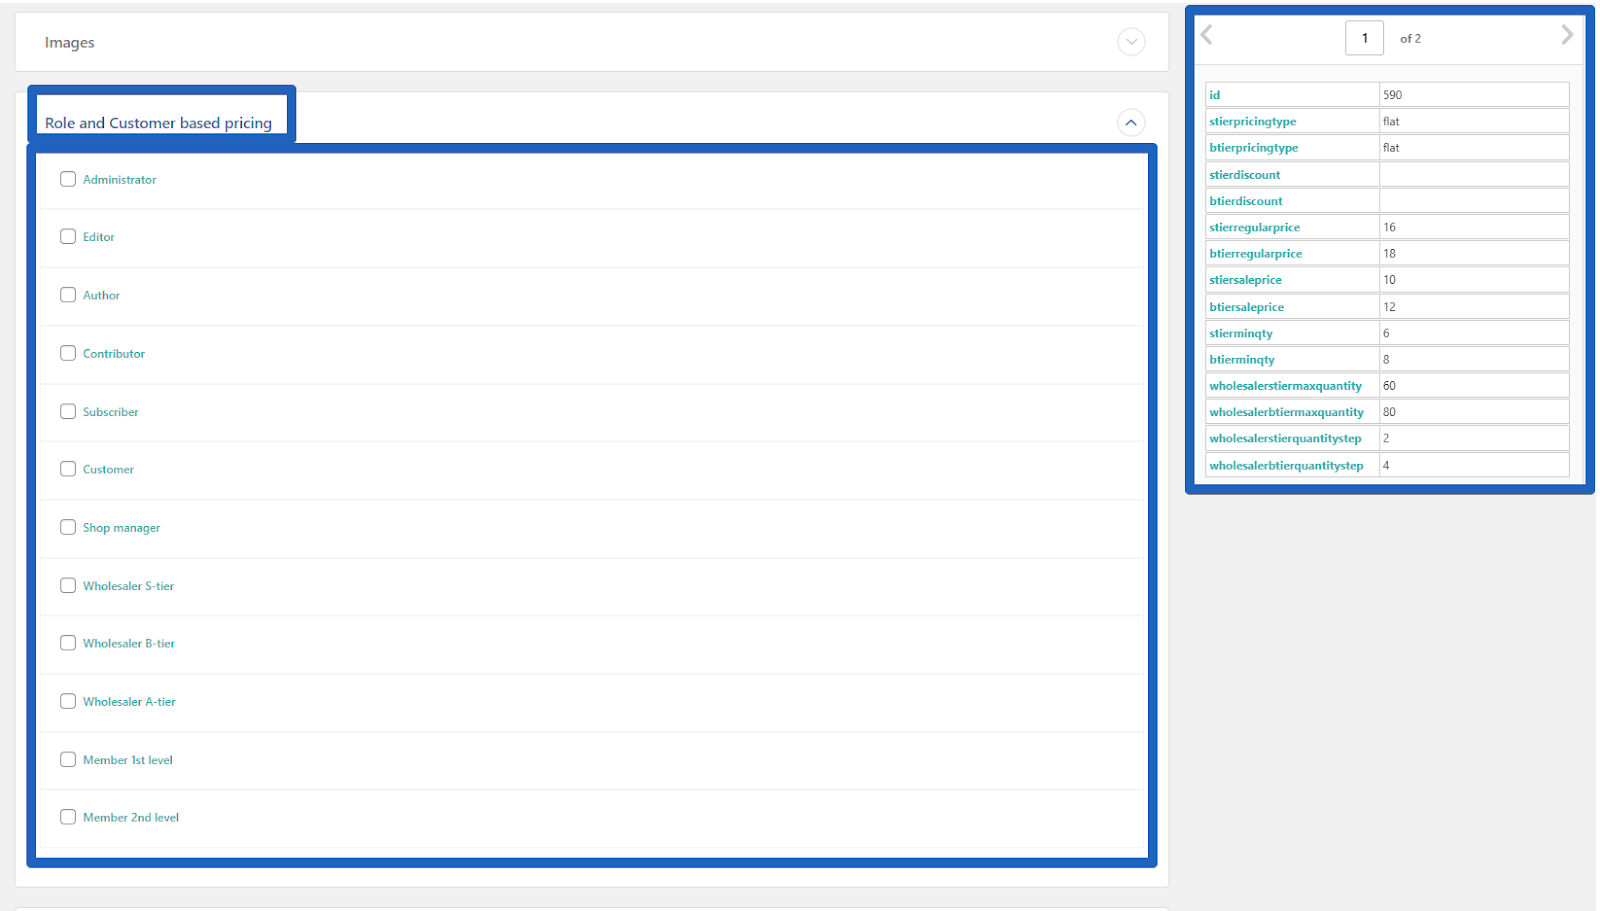
Next, select the role you wish to import role-based prices and quantity rules for. You can drag and drop the fields from your import file into the role setup. Example below:
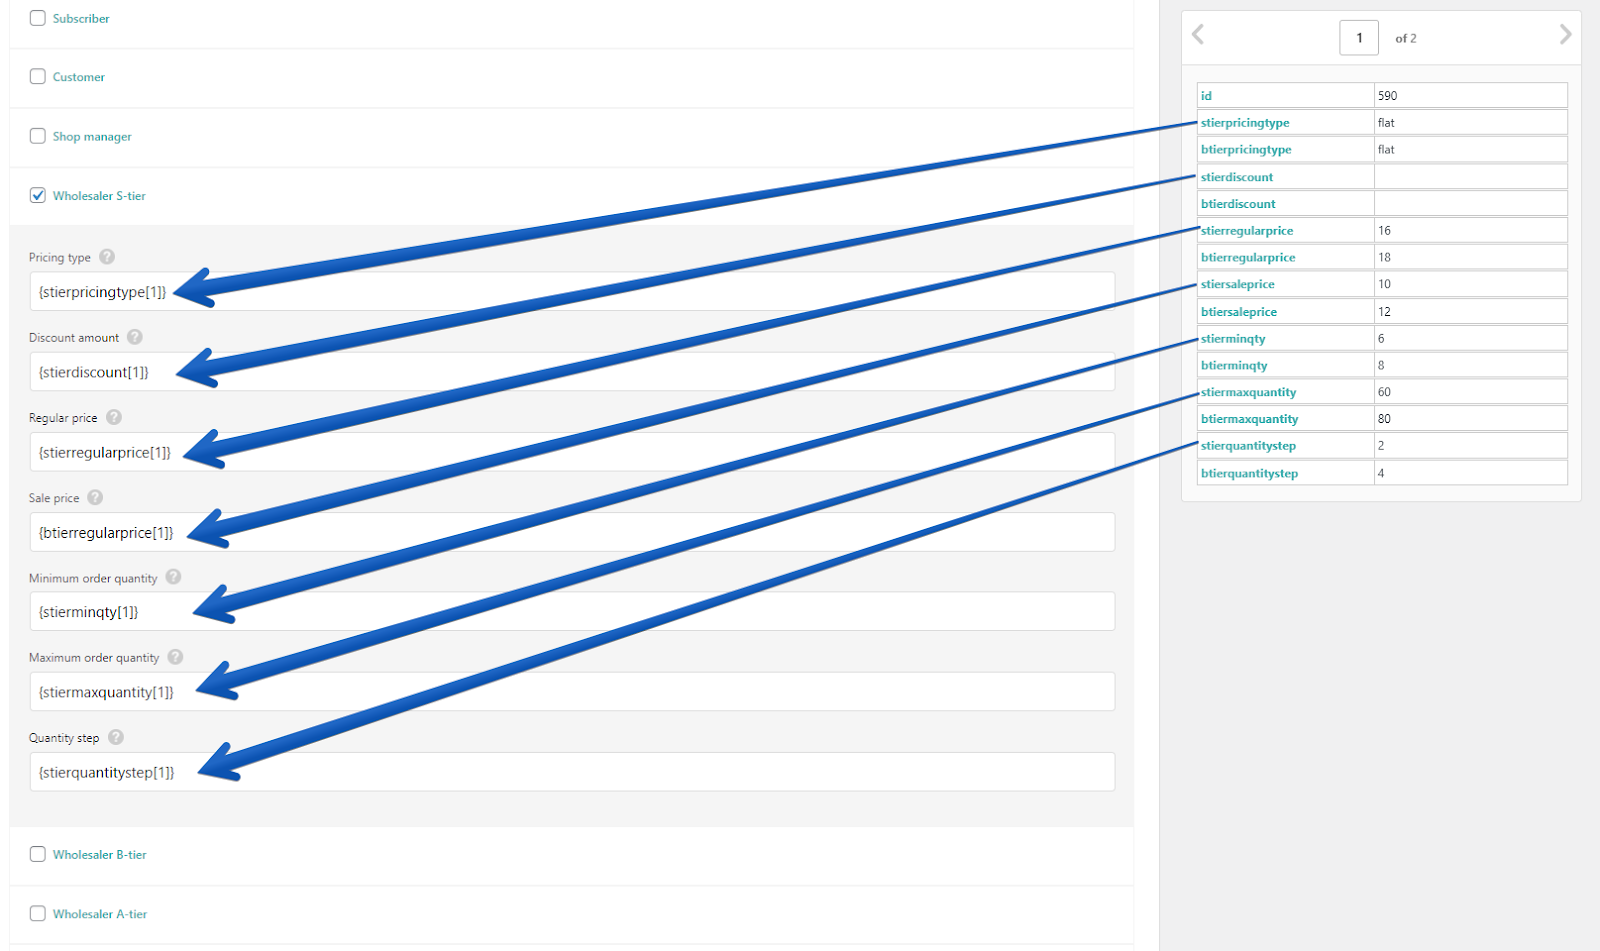
Don’t forget to repeat the process for each role you want to set up pricing and quantity rules for.
Read more detailed instructions on importing product prices here – How to import role-based product prices.
Troubleshooting
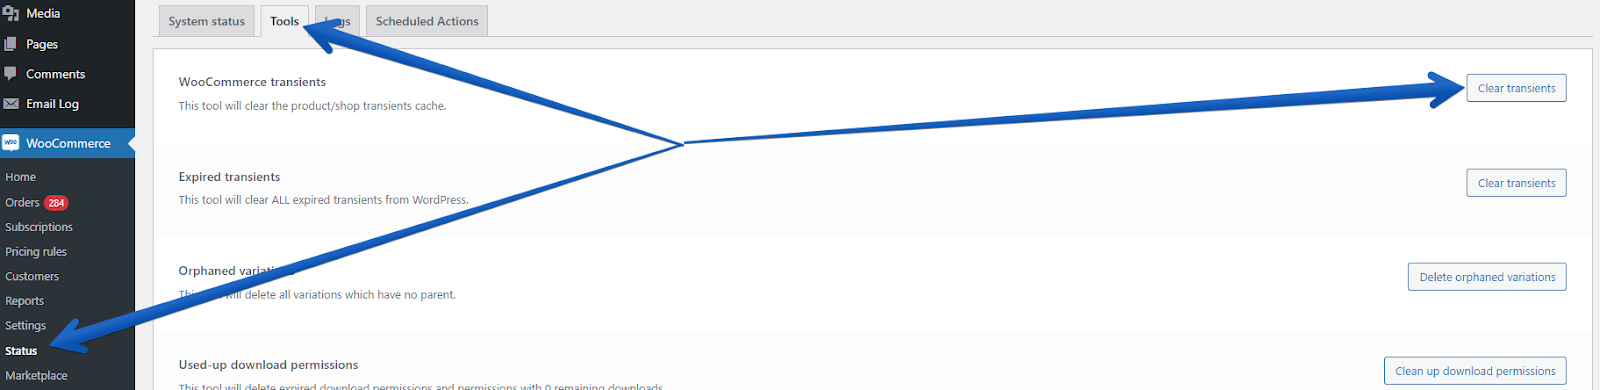
If pricing fields don’t update automatically after you make adjustments, it may be caused by caching. To clear the product price cache, go to WooCommerce > Status > Tools > WooCommerce transients > Clear transients. This clears the product/shop transients cache.