
The Cancellation Survey and Offers for WooCommerce Subscriptions plugin is designed to help you retain subscribers who are considering canceling their subscriptions. By understanding the reasons behind cancellations through surveys and offering targeted discounts, you can encourage subscribers to stay — reducing churn and increasing customer satisfaction.
You can watch a short video introduction to setting up the plugin:
Main Pages in the WooCommerce Menu
The extension adds pages to the WooCommerce menu where you can configure surveys and offers, and find all the answers to your surveys along with each offer’s status.
1. Offers and Surveys:
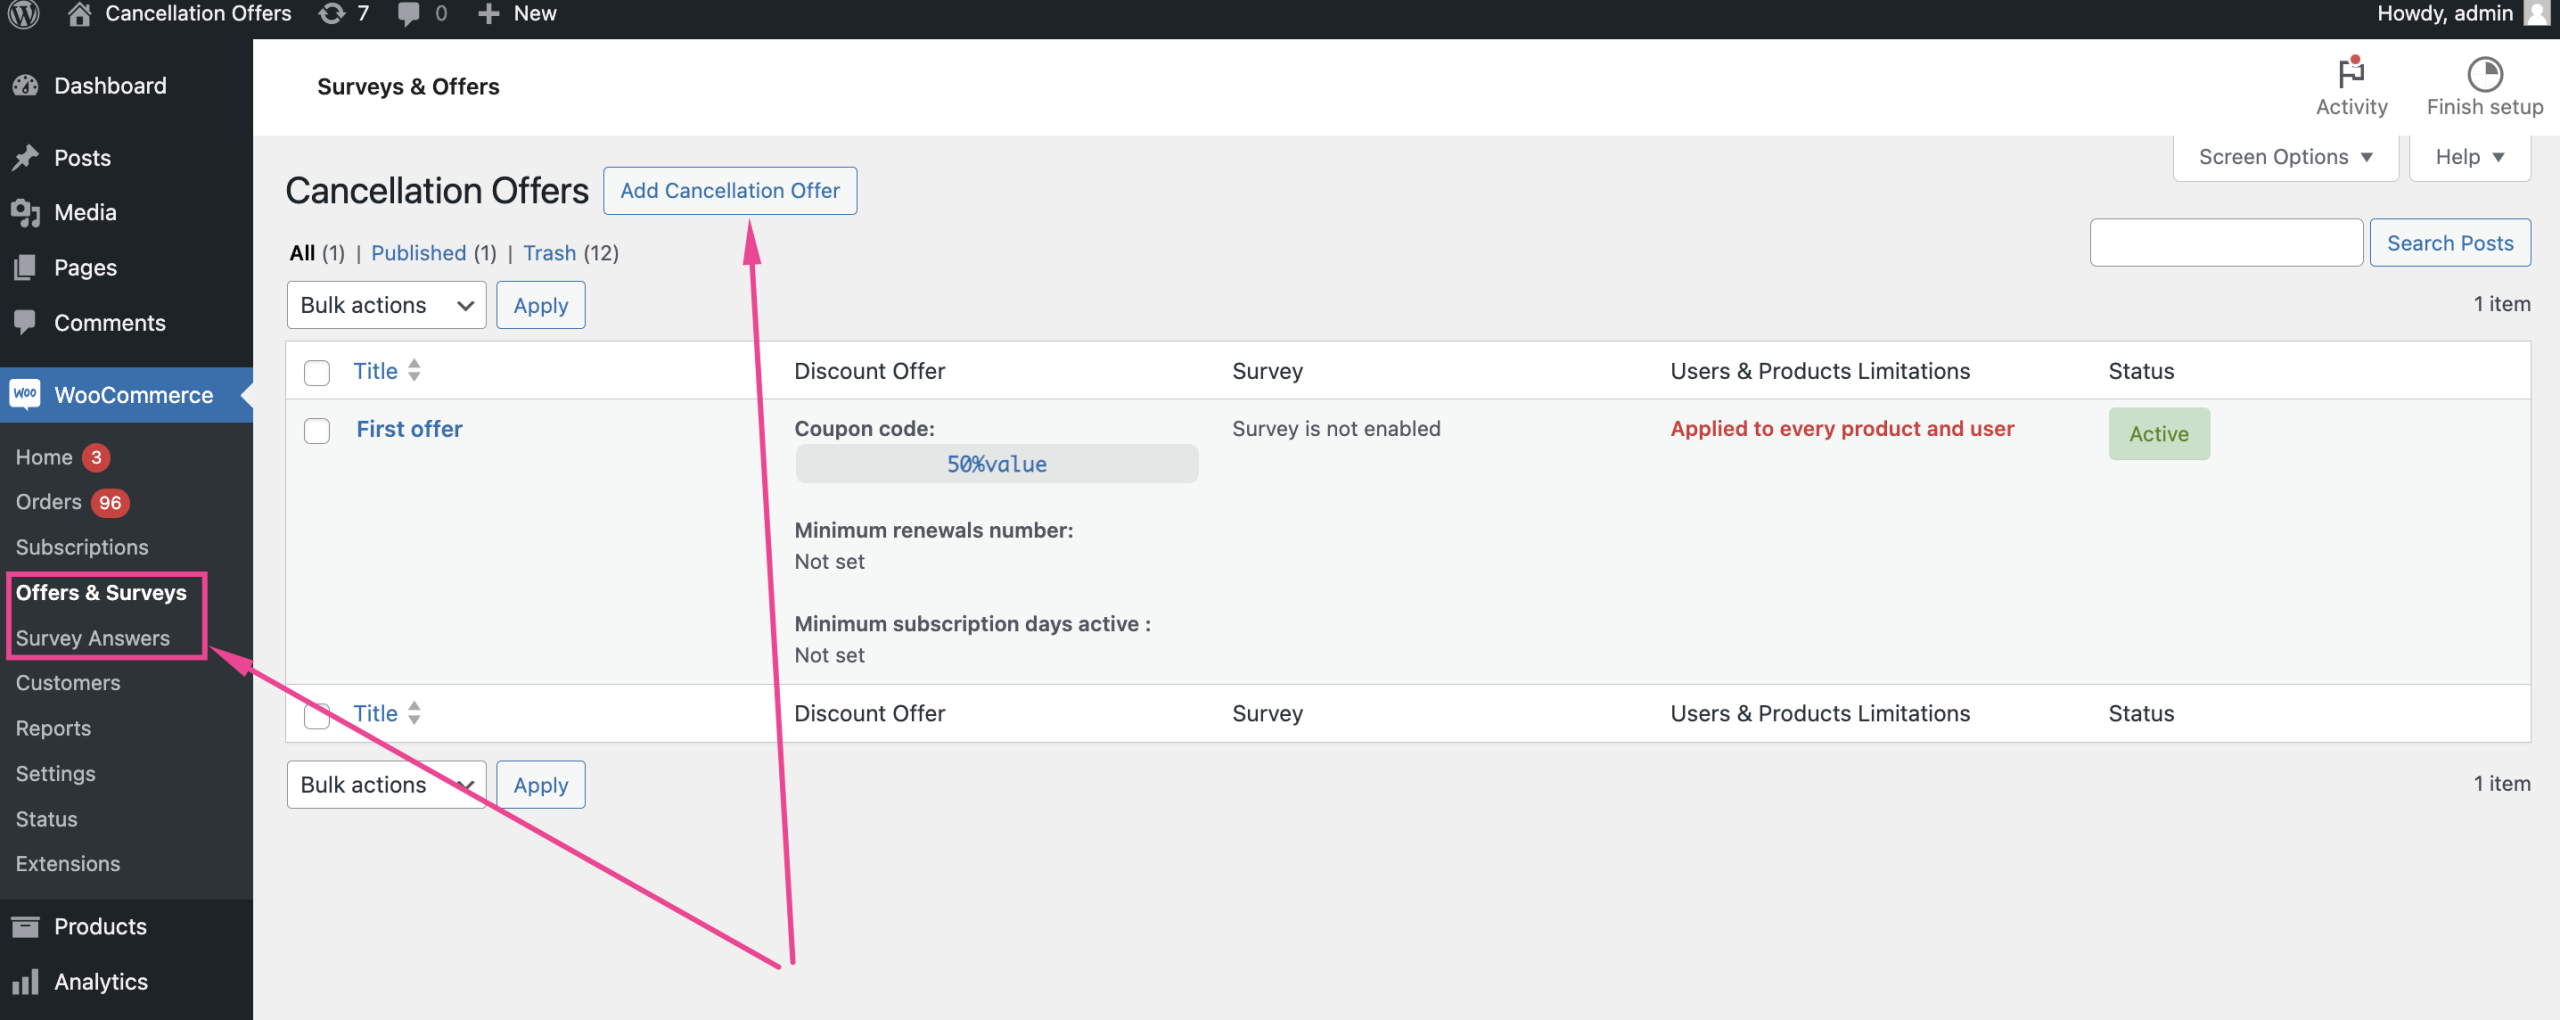
- Navigate to WooCommerce > Offers & Surveys to see all the created surveys and offers. This page provides an overview of your current retention strategies — you can quickly see the status of each offer and survey and whether they are active.
- To create a new survey and/or offer, click the Add Cancellation Offer button. This takes you to a form where you can set up a new survey and discount offer.
2. Survey Answers:
- Go to WooCommerce > Survey Answers to view all responses to your surveys. This page helps you understand why customers are canceling and how effective your discount offers are. You can see detailed information about each response, including the user, the subscription involved, the reason for cancellation, and whether the retention offer was accepted.
Version 1.2 New Feature – Skip Next Renewal Offer
The Skip Next Renewal feature provides an alternative to traditional discount offers. When creating a retention offer (the second step after creating a survey), you can now select what type of offer it should be: a discount offer (discounting the current subscription cost) or a skip renewal offer, here:
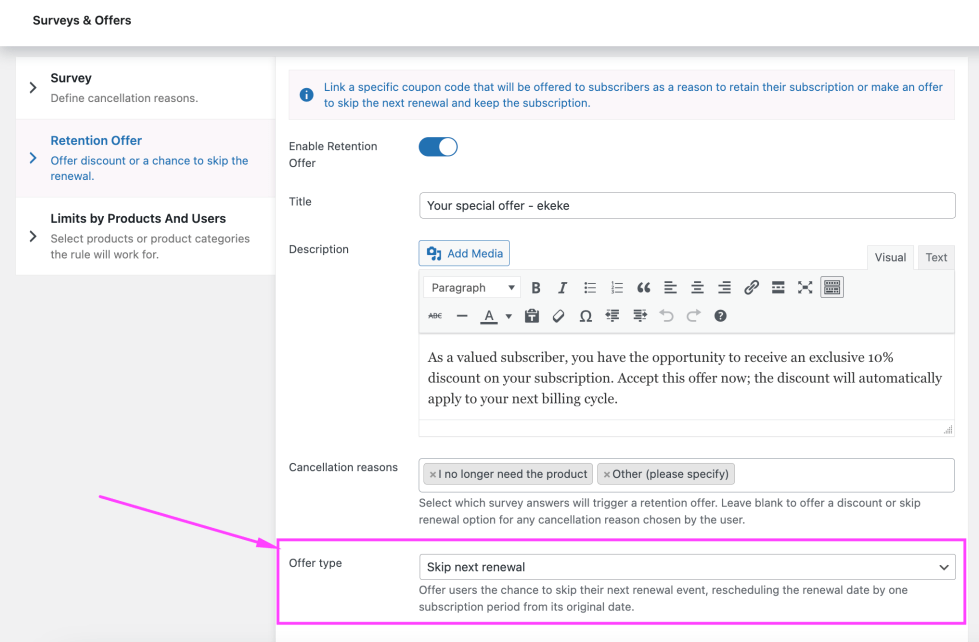
When you select the option to skip the next renewal as the retention offer, subscribers who accept it will see their billing date automatically deferred by one period, based on their subscription interval (e.g., monthly or weekly). For example, if a subscriber’s next billing date is October 30 and they accept your offer to skip, their renewal shifts to November 30.
In addition to the flexible discounting and survey options, this tool supports retention by addressing customers’ need for a temporary pause instead of an immediate cancellation.
You can choose between two retention options — offering a discount or allowing users to skip their next renewal. Both options share the same customizable settings, making it easy to manage either approach.
As of version 1.2, there’s also a setting to exclude users in the free trial period from receiving retention offers. This prevents offers from being extended to users who haven’t yet paid for a subscription. To apply this restriction, simply enable the option in the retention offer settings.
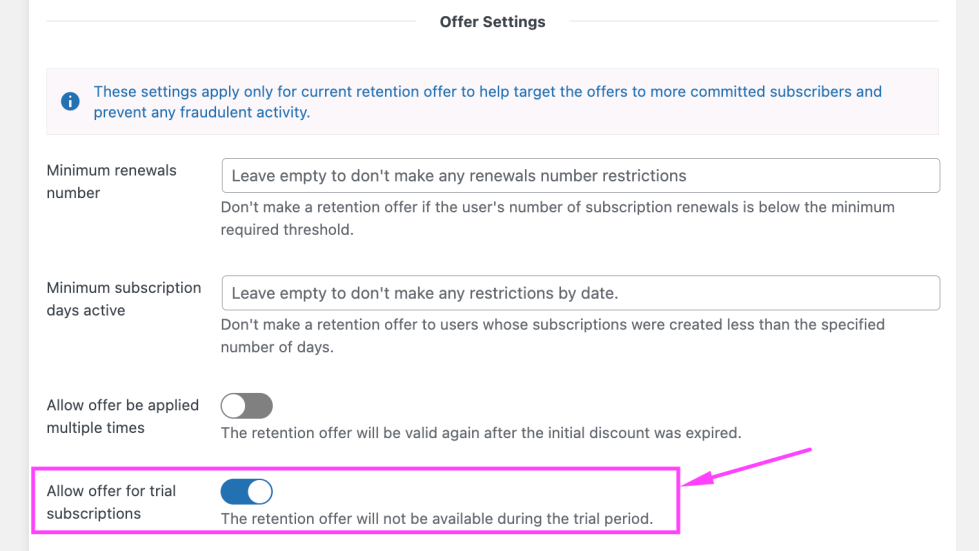
By reserving offers for paid subscribers, you ensure retention incentives are directed at users who have already invested in the service, making offers more meaningful and increasing their impact on long-term retention.
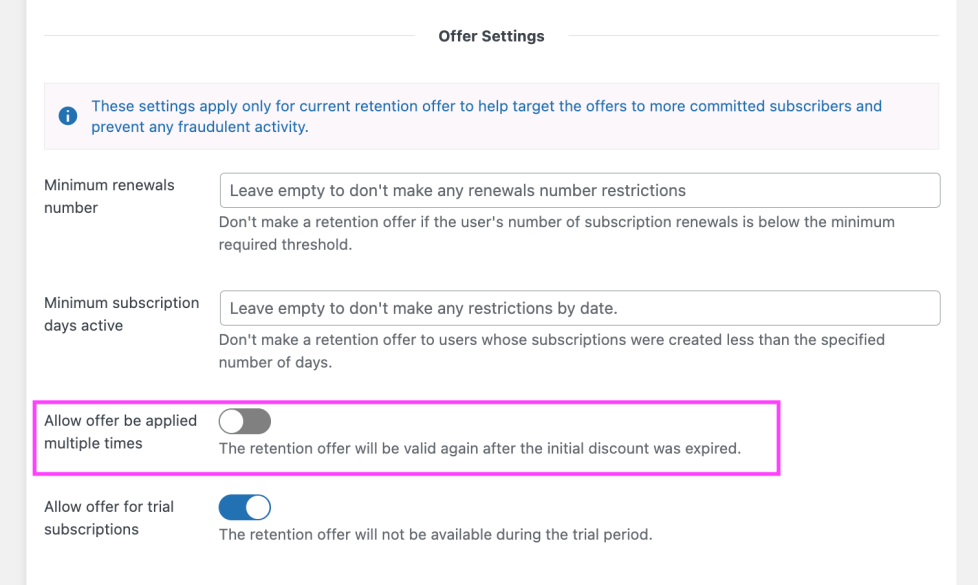
Note: if you enable the Allow offer to be applied multiple times feature, subscribers will receive the option to skip their next renewal each time they attempt to cancel, which can result in multiple renewal postponements. This may push the renewal date further into the future than intended. To limit users to a single skip and only one subscription period extension (e.g., one month), make sure this option in the offer settings is disabled:
Creating and Managing Offers and Surveys
You can create as many offers and surveys as you need, tailoring them to your business goals and subscriber needs. Here’s how you can use these features:
- Surveys Only: if your primary objective is to understand why users are unsubscribing, you can create surveys without linking them to discount offers. This approach lets you gather valuable feedback. If you notice a trend where users mention that the product doesn’t meet their expectations, you can use that feedback to improve the product’s features or provide better customer education on how to use it.
- Discount Offers Only: if your goal is to retain subscribers by offering incentives, you can create discount offers that appear when subscribers attempt to cancel. This method focuses on providing immediate value to encourage users to stay subscribed. For instance, offering a 20% discount on the next three renewals to users who find the product too expensive can effectively reduce churn and maintain your subscriber base.
- Combined Surveys and Offers: for a comprehensive approach, combine surveys with discount offers. This lets you first understand the reasons behind cancellations and then offer targeted discounts based on the feedback received. For example, you could create a survey for a premium product subscription asking why users want to cancel, and link it to a discount offer for users who find the product too expensive or found a better alternative. This dual approach helps you address specific pain points and gives users compelling reasons to stay subscribed.
You can also create separate surveys and offers for different types of products, or for users based on their role.
Creating a Survey & Cancellation Offer
- From your WordPress dashboard, go to WooCommerce > Offers & Surveys.
- Click the Add Cancellation Offer button to start creating a new survey and offer.
Next, you will find a 3-step form for creating the survey and discount offer.
Step 1: Create Survey
This step lets you design the survey shown to subscribers when they try to cancel their subscription.
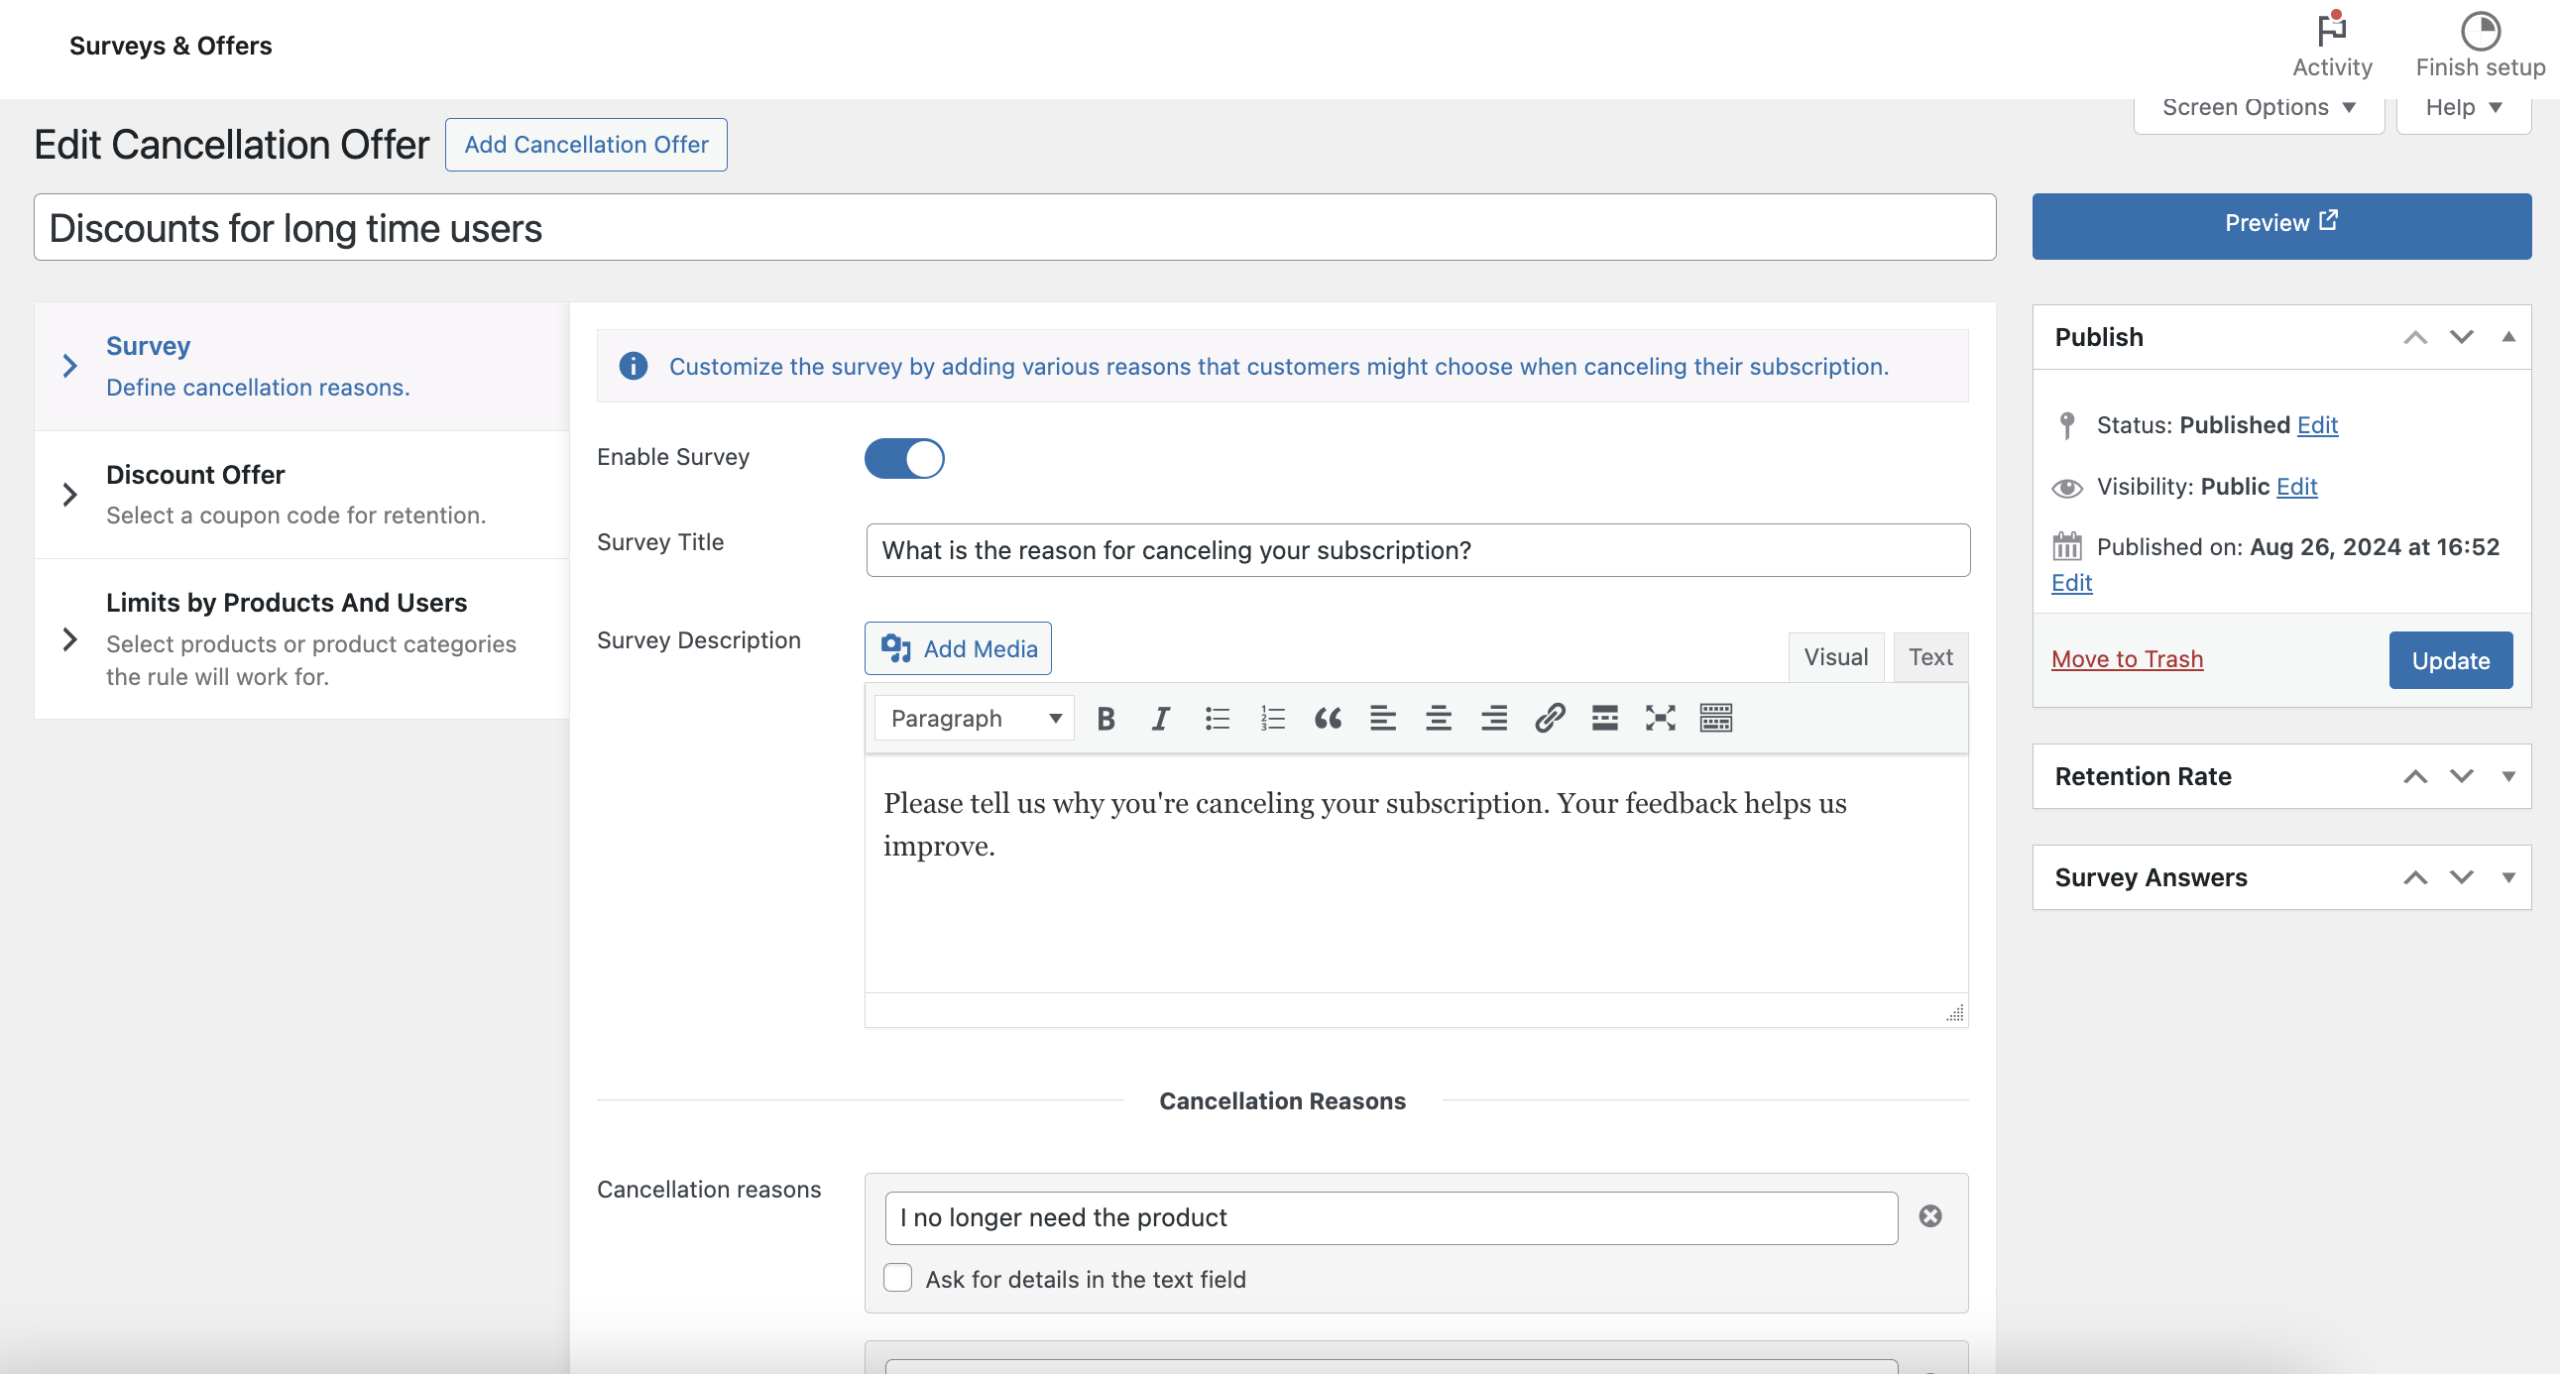
- Enable Survey: toggle this option to enable or disable the survey step. If disabled, users won’t see the survey when they attempt to cancel (but they can still see the discount offer, configurable in step 2).
- Survey Title: set a title for your survey. It’s displayed at the top of the popup when users attempt to cancel (default: “What is the reason for canceling your subscription?”).
- Survey Description: provide a description explaining the purpose of the survey. This helps subscribers understand why you’re asking for feedback (default: “Please tell us why you’re canceling your subscription. Your feedback helps us improve.”).
The Survey Description field offers a range of customization options for the message shown to users attempting to cancel. You can:
- Add and format text (bold, italics, headings, etc.).
- Insert media (images, videos) to enhance the content.
- Use HTML for advanced customizations.
- Align text, add formatted links, and set text color.
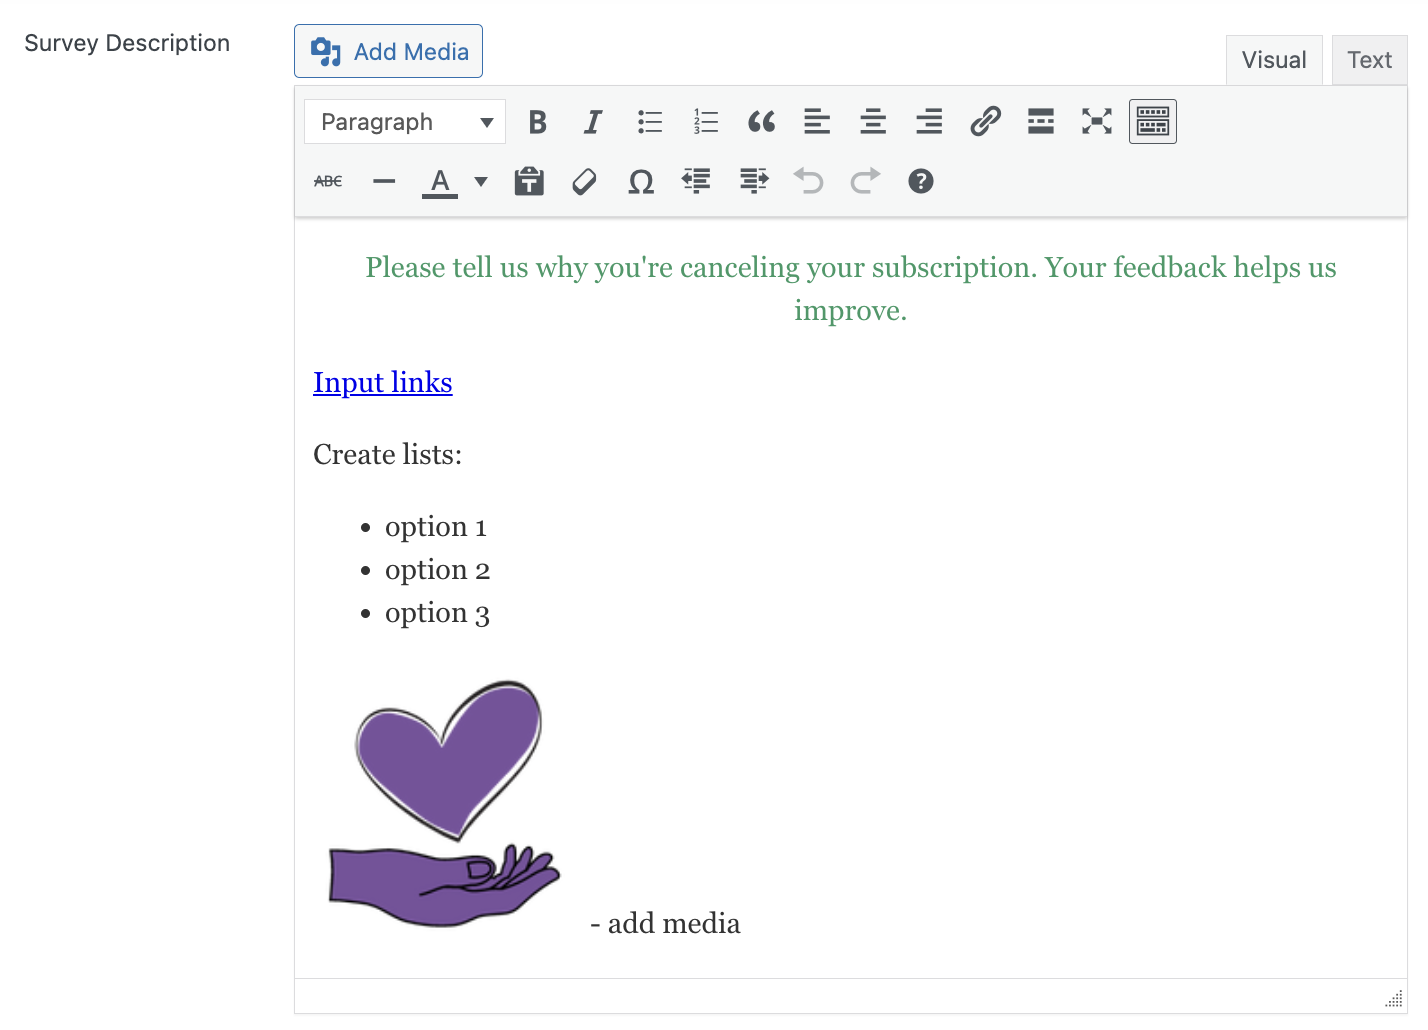
To see how the description looks within the context of your theme, update the survey & offer and use the Preview button to check the display and adjust as needed.
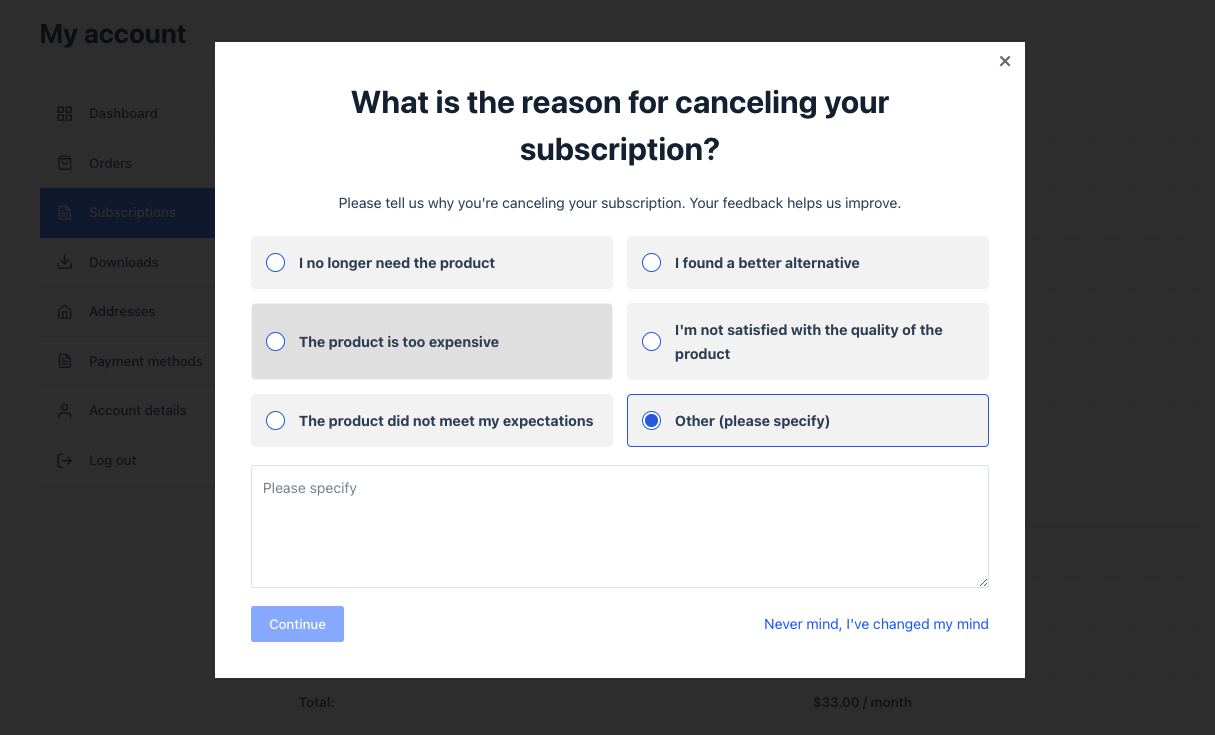
- Cancellation Reasons: you can add, edit, or delete reasons for cancellation — there’s no limit to how many you can add. Here are the defaults:
- I no longer need the product
- I found a better alternative
- The product is too expensive
- I’m not satisfied with the quality of the product
- The product did not meet my expectations
- Other (please specify)
- Ask for Details: each reason can have an additional text field. If selected, subscribers choosing that reason are prompted to provide more details.
Here’s how the survey with the default cancellation reasons looks when your clients try to cancel their subscriptions:
Step 2: Offer Discount
This step lets you set up a discount offer shown to subscribers based on their survey responses. The discount offer popup appears right after the user selects the relevant cancellation reason — or immediately when the user clicks ‘Cancel’ if you disabled the survey step.
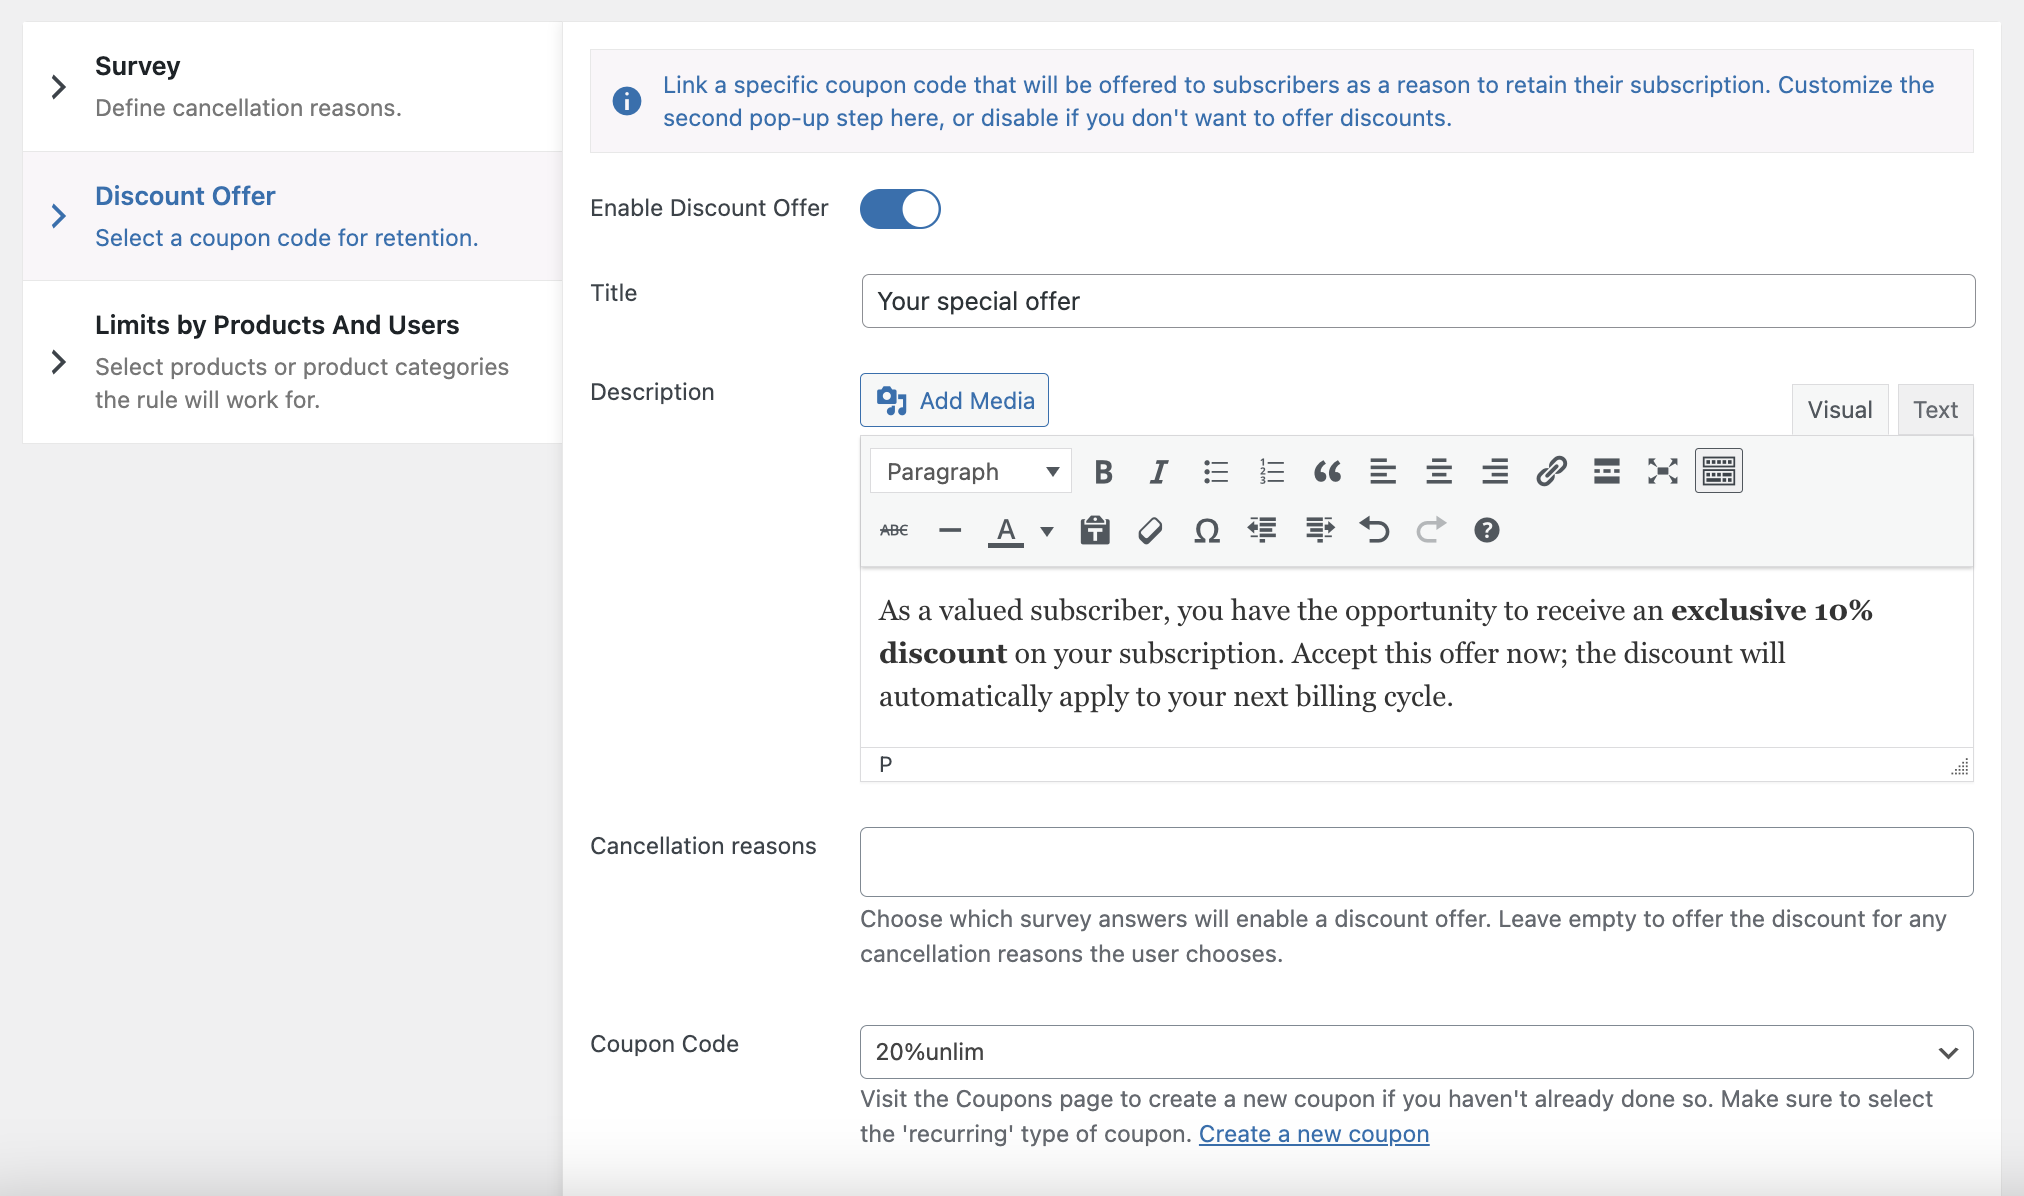
- Title and Description: set a title and description for the discount offer popup to clarify the offer’s value to the subscriber.
The Description field lets you fully customize the message shown when a discount is offered during the cancellation process. You can personalize the content by adjusting text formatting (such as bold or italics), embedding media, adding links, and modifying colors. Advanced users can even input custom HTML to fine-tune the design.
- Cancellation Reasons: select which reasons trigger the discount offer. For example, you might only want to offer discounts to subscribers who say the product is too expensive or that they found a better alternative. If you leave this field empty, the discount offer appears for any cancellation reason.
- Coupon Code: choose a coupon code that will be applied automatically when the offer is accepted. Make sure the coupon is of the ‘recurring’ type and has the desired discount settings. You can use all available coupon discount settings, including fixed amount or percentage discounts, and specify whether the discount applies for a certain number of renewals or for the entire lifetime of the subscription.
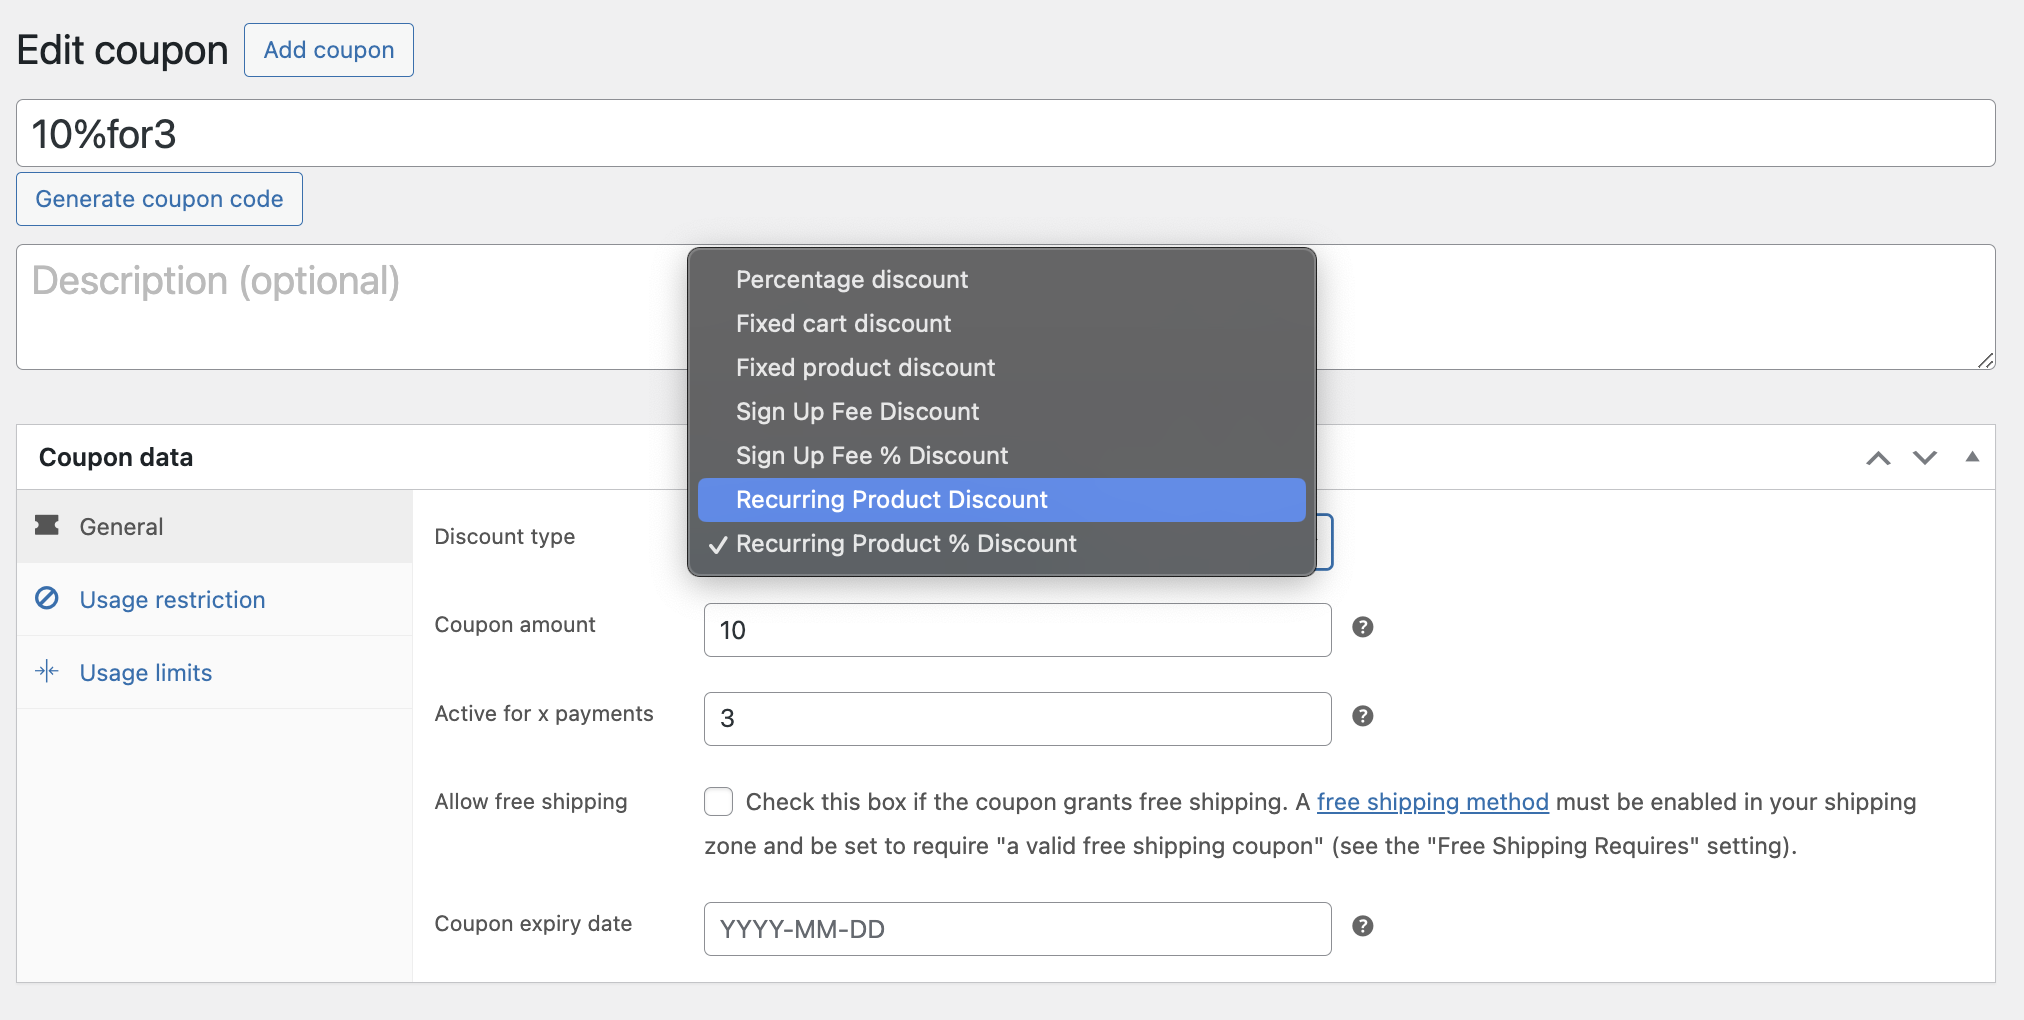
Important considerations:
Coupon Settings: verify that the coupon’s restrictions and limits don’t conflict with your offer setup. For example, if you exclude certain products from coupon usage, make sure those products aren’t included in the discount offer. Otherwise, the user will see the proposal to apply the discount to their subscription, but it will fail on application due to the coupon restrictions.
Examples of use:
- Fixed Amount Discount: offer a $10 discount on each renewal for the next three billing cycles.
- Percentage Discount: provide a 15% discount on all future renewals.
- Renewal Limits: set the discount to apply to the first three renewals only, encouraging long-term commitment.
- Lifetime Discount: offer a permanent 5% discount for the lifetime of the subscription.
Offer Settings
These settings apply only to the second step (the discount offer) and don’t affect the survey itself. They help you avoid fraudulent behavior from customers who might try to grab discounts right after subscribing to your product.
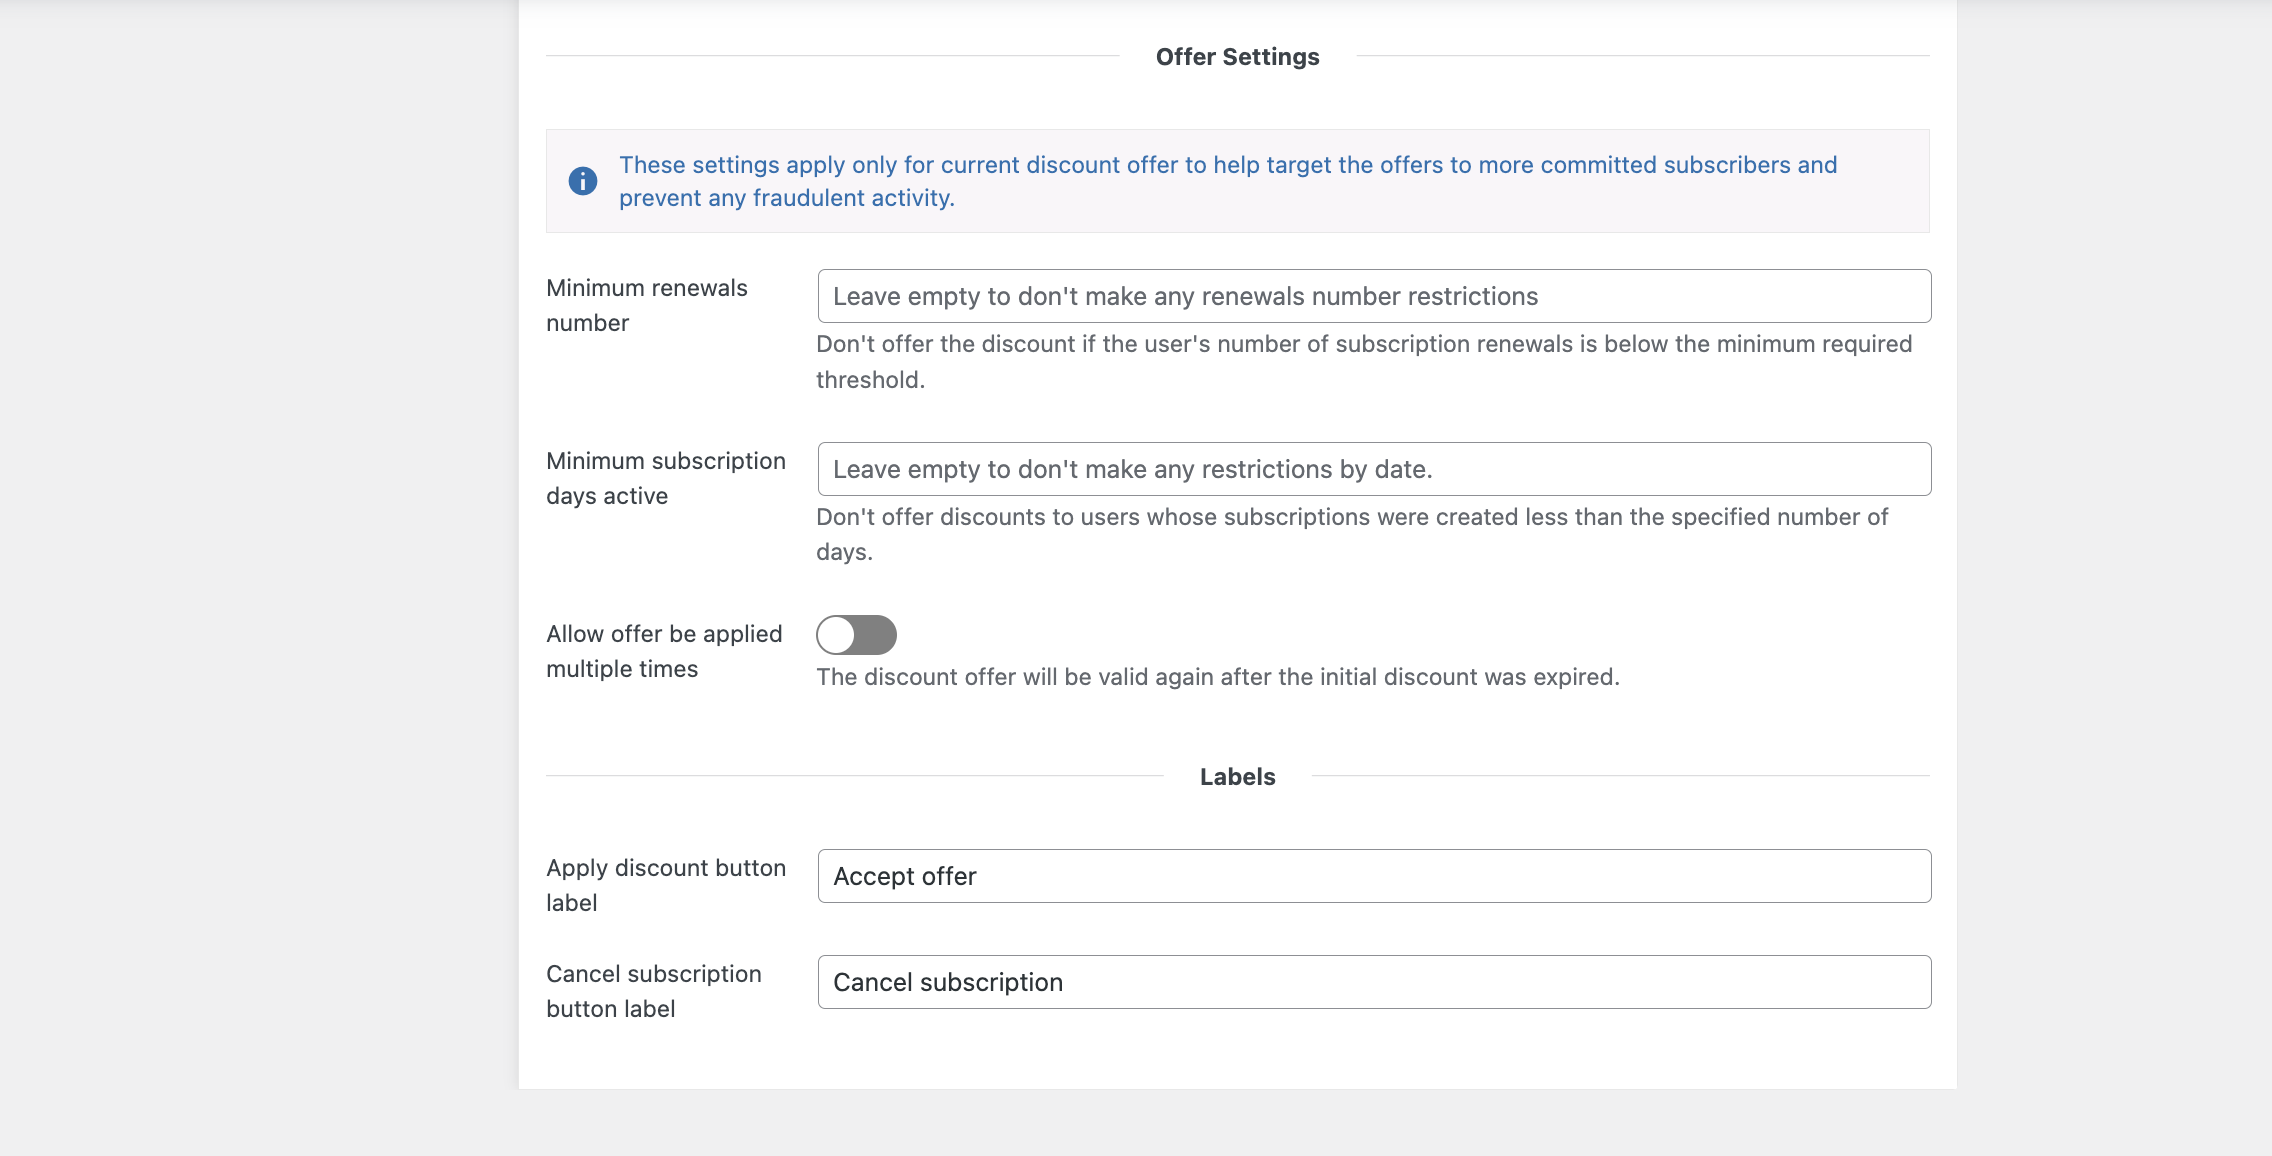
- Minimum Renewals Number: specify the minimum number of renewals a subscription must have for the offer to be valid. This prevents new subscribers from immediately canceling and receiving a discount.
- Minimum Subscription Days Active: set the minimum number of days a subscription must be active before the offer is available. This ensures the offer is only shown to more committed subscribers.
- Allow Offer to Be Applied Multiple Times: toggle this setting to allow the same subscriber to use the offer multiple times, which can be useful for long-term retention strategies. If it’s turned off, the user can receive the discount offer on subscriptions only once.
Step 3: Products & Roles
This step lets you limit the survey and offer to specific products, categories, or user roles.
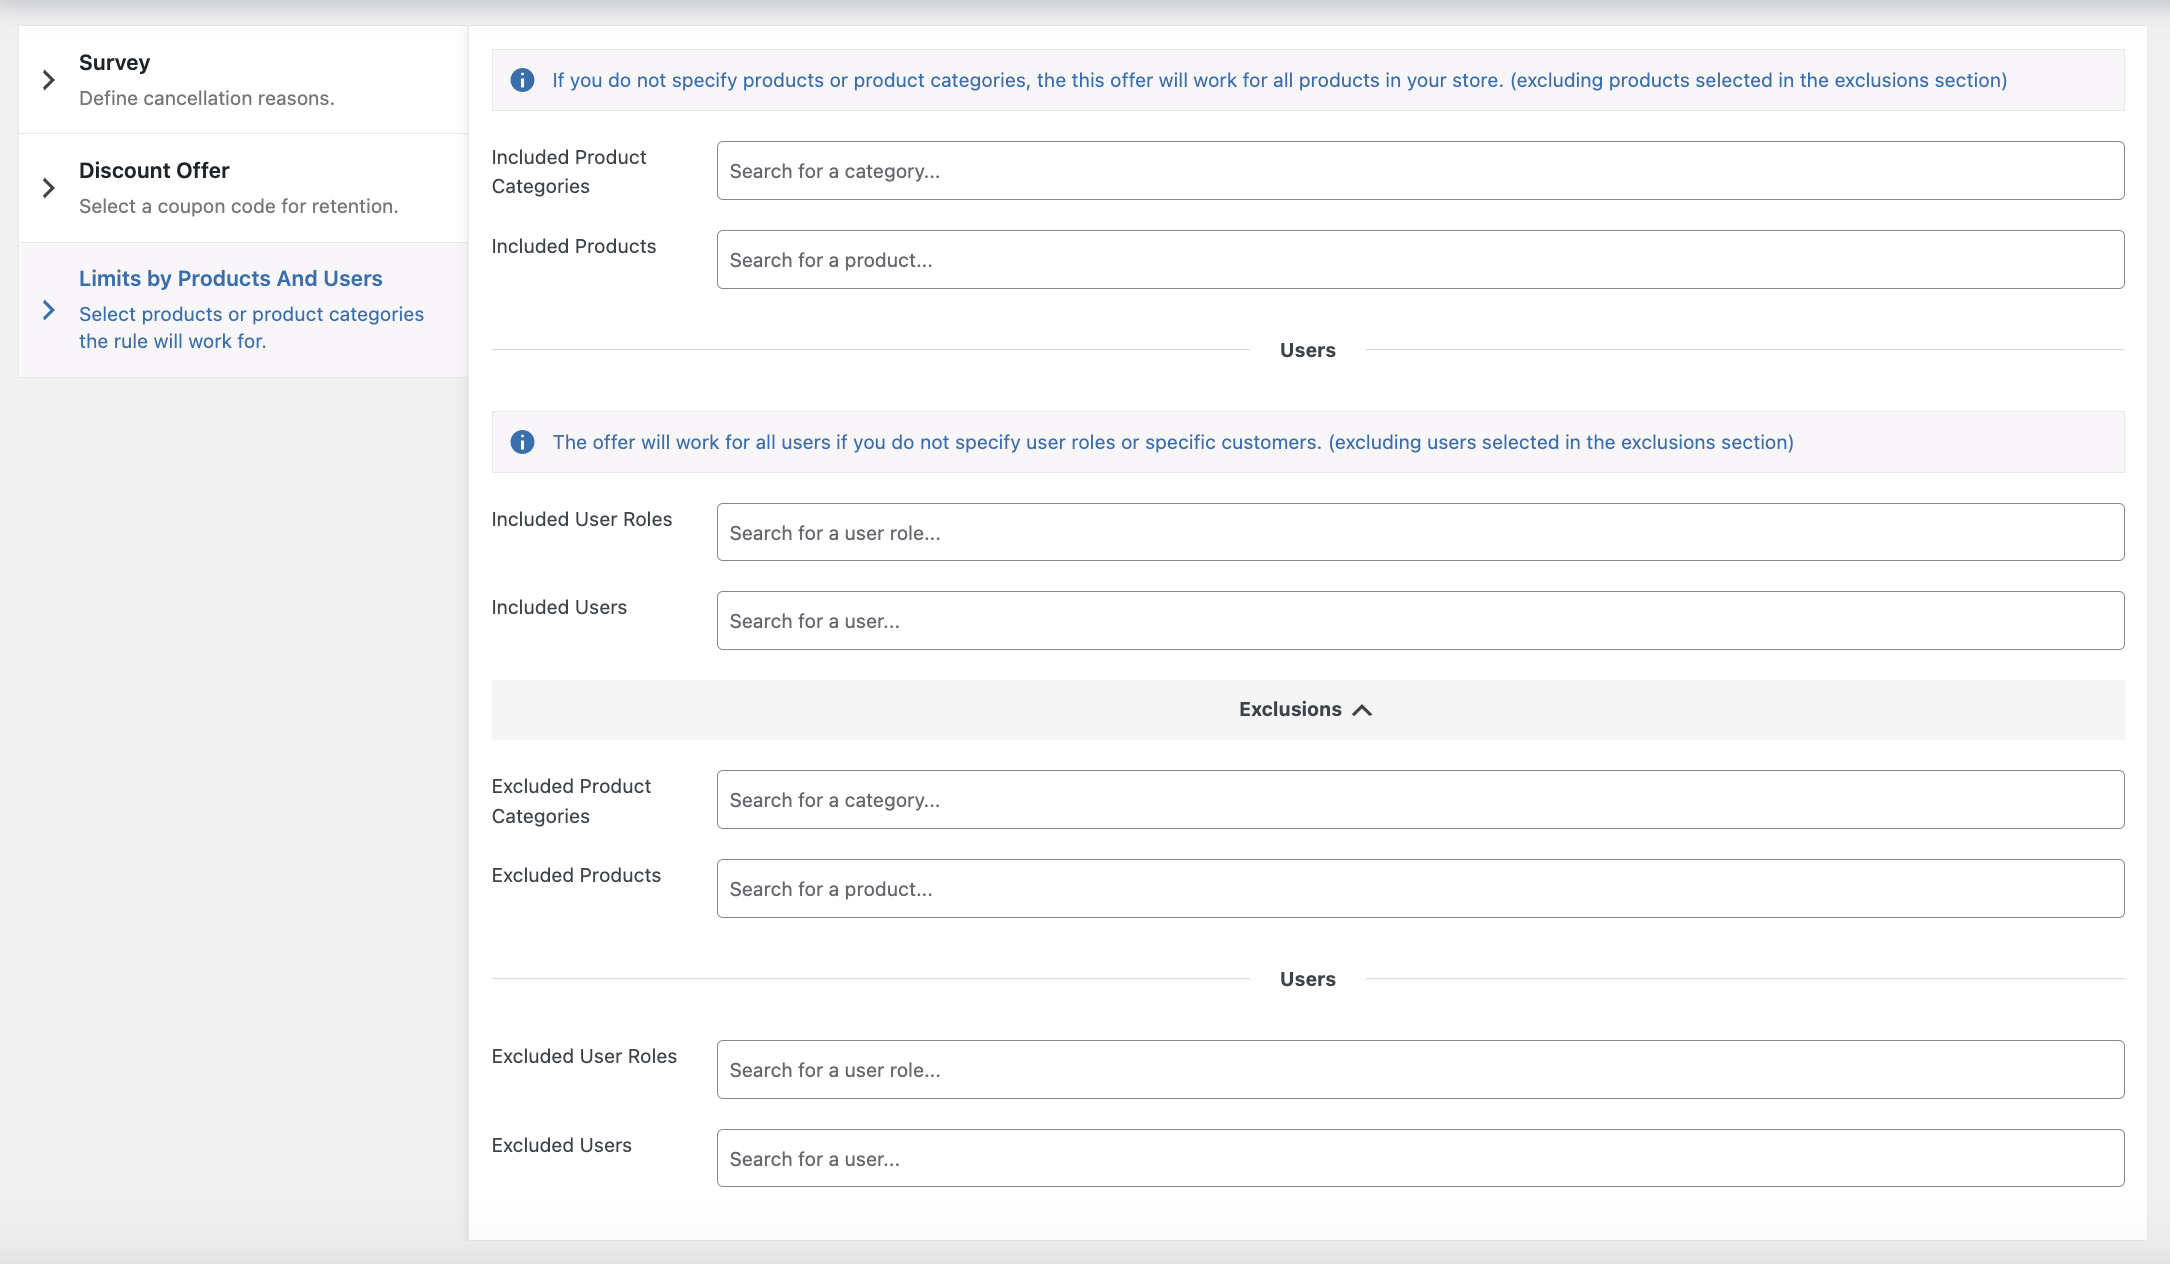
- Included Product Categories: select the categories the survey and offer apply to. If left blank, the offer applies to all products.
- Included Products: select specific products the survey and offer apply to — useful if you only want to target certain high-value products.
- Included User Roles: choose the user roles that will see the survey and offer. Helpful when you have different types of subscribers, such as regular customers and premium members.
- Included Users: select specific users who will see the survey and offer — useful for targeted retention campaigns.
- Exclusions: you can also exclude certain categories, products, user roles, and users from seeing the survey and offer.
If you want to target only premium subscribers of a high-value product, you can set the survey and offer to apply only to that product and user role. Conversely, you can exclude lower-tier products or user roles to focus your retention efforts on more valuable segments.
If you want to display different surveys for different types of subscription products, use this step to target only the desired products for the current survey and/or offer. This way, you can even create personalized surveys for each subscription in your store.
Step 4: Testing the Survey and Offer
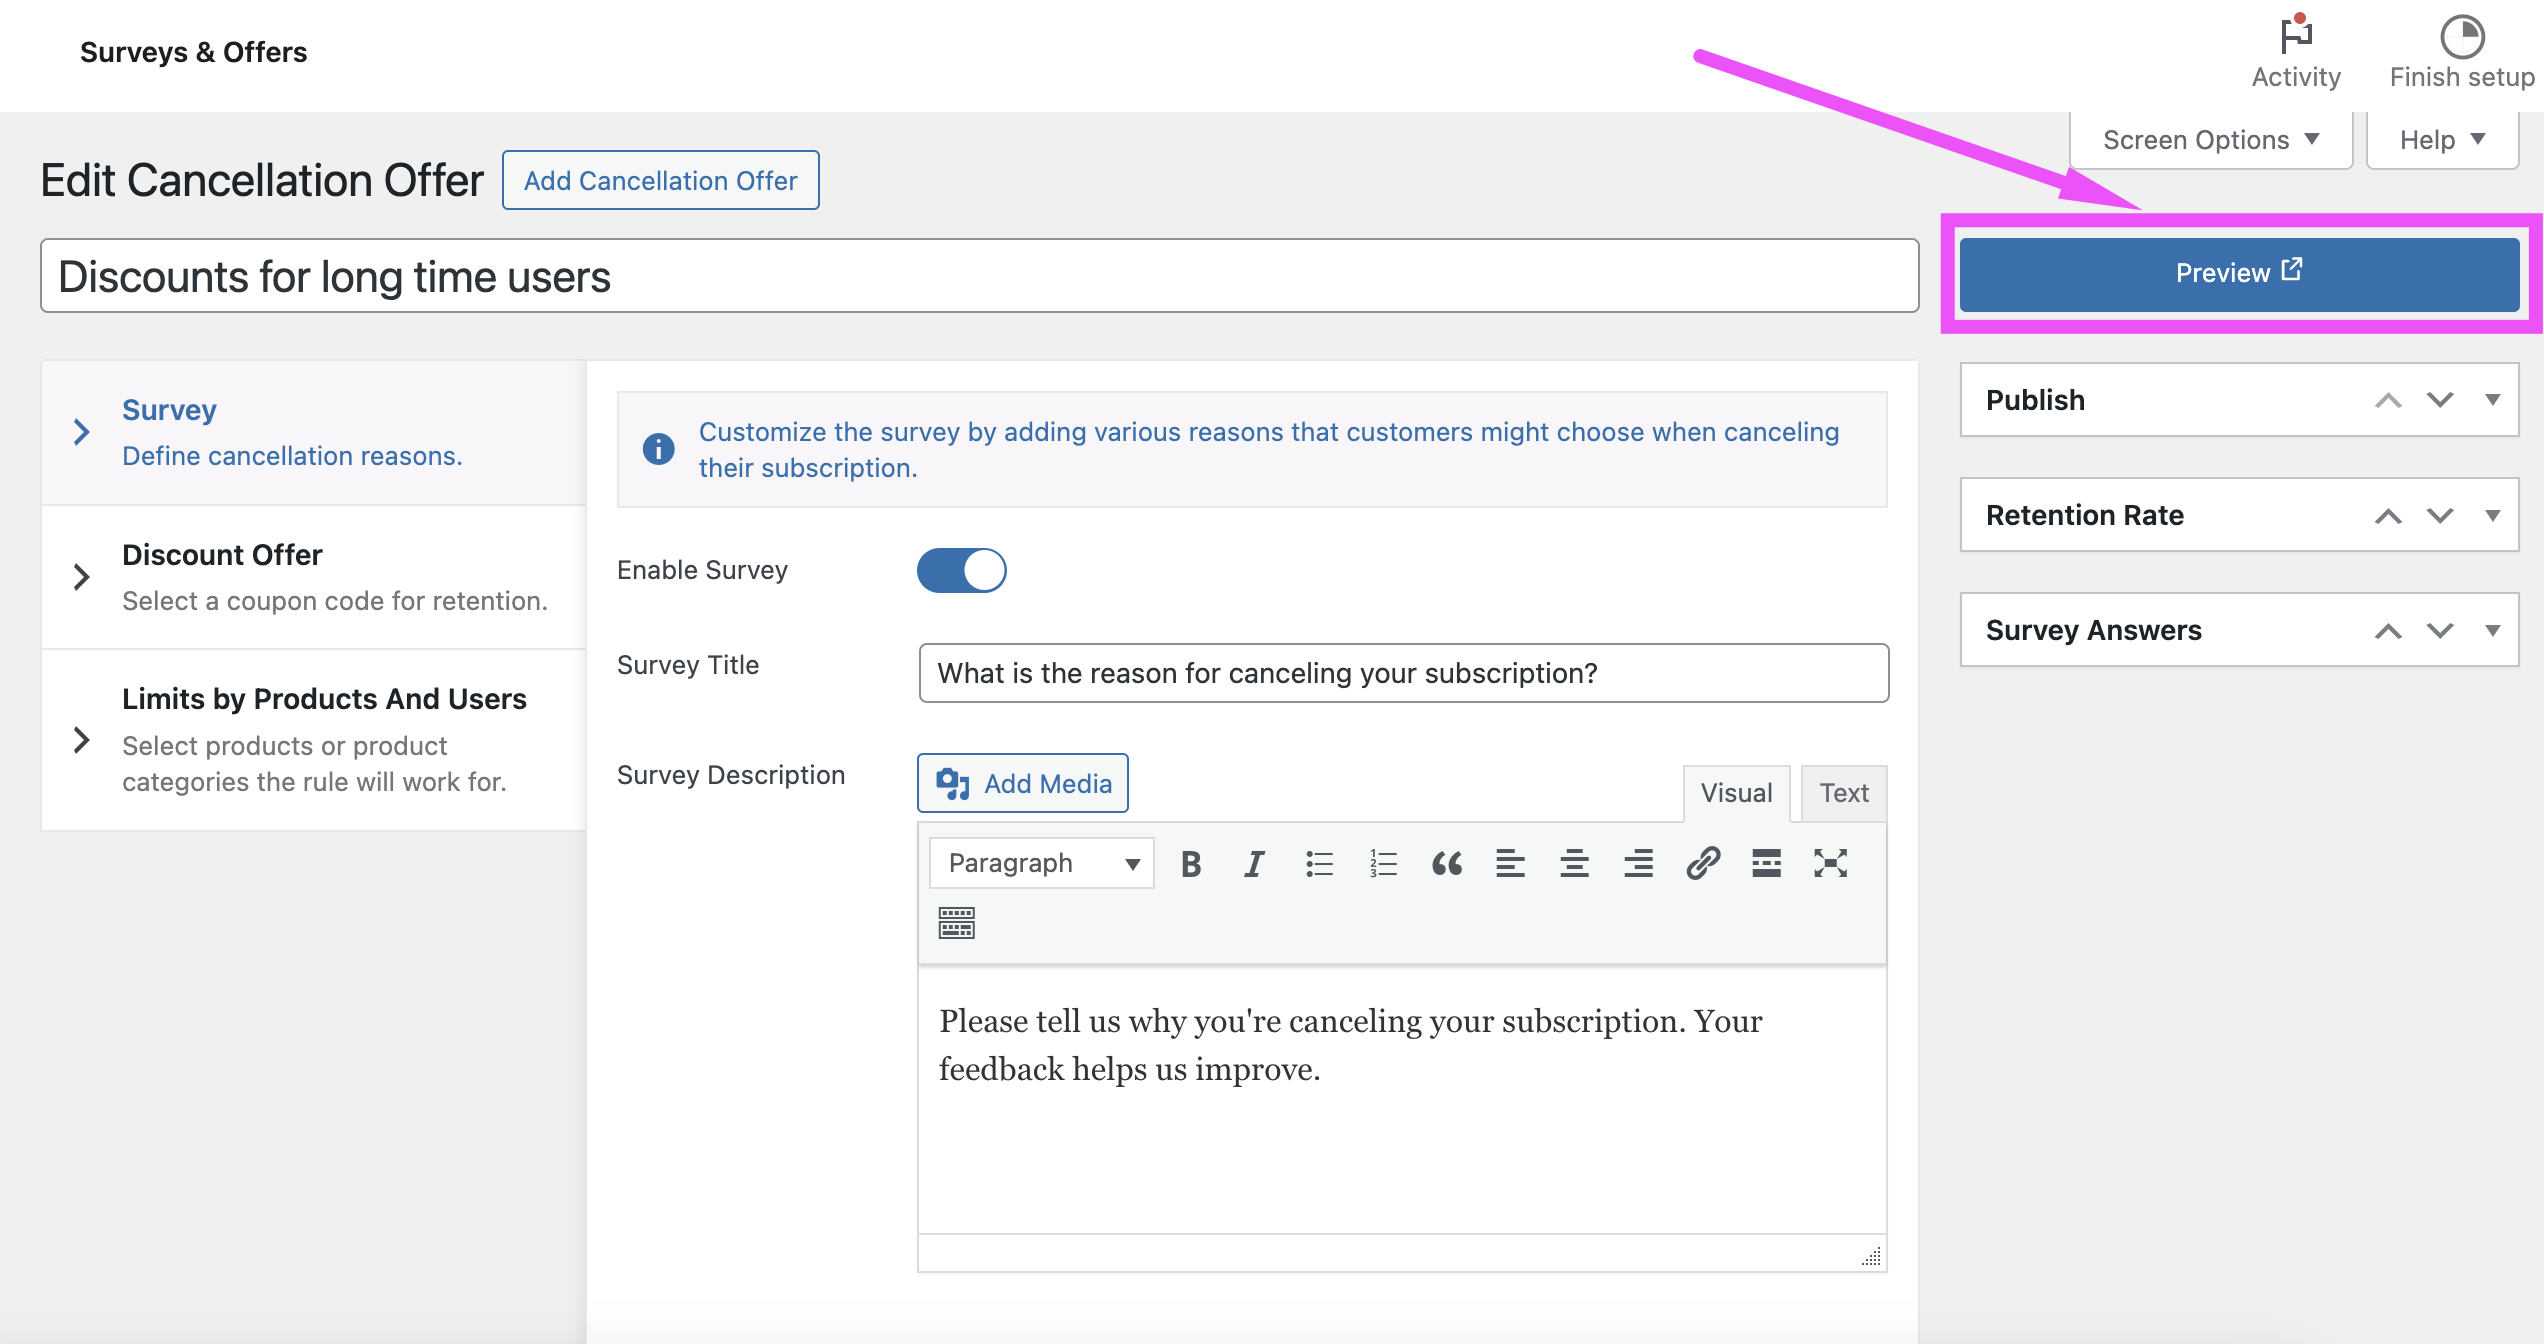
Once you’ve set up your survey and offer, it’s important to test how they will appear to users. Each survey and offer page includes a Preview button, letting you view both the first (survey) and second (offer) popups. Use it to make sure the display and wording of both popups look correct.
For further testing, create a test subscription to verify that all settings and restrictions (e.g., product inclusion/exclusion, subscription duration limits) work as expected.
This ensures everything functions smoothly before going live.
Managing Survey Answers
Navigate to WooCommerce > Survey Answers.
This page provides detailed insights into why subscribers are canceling and how effective your retention offers are.
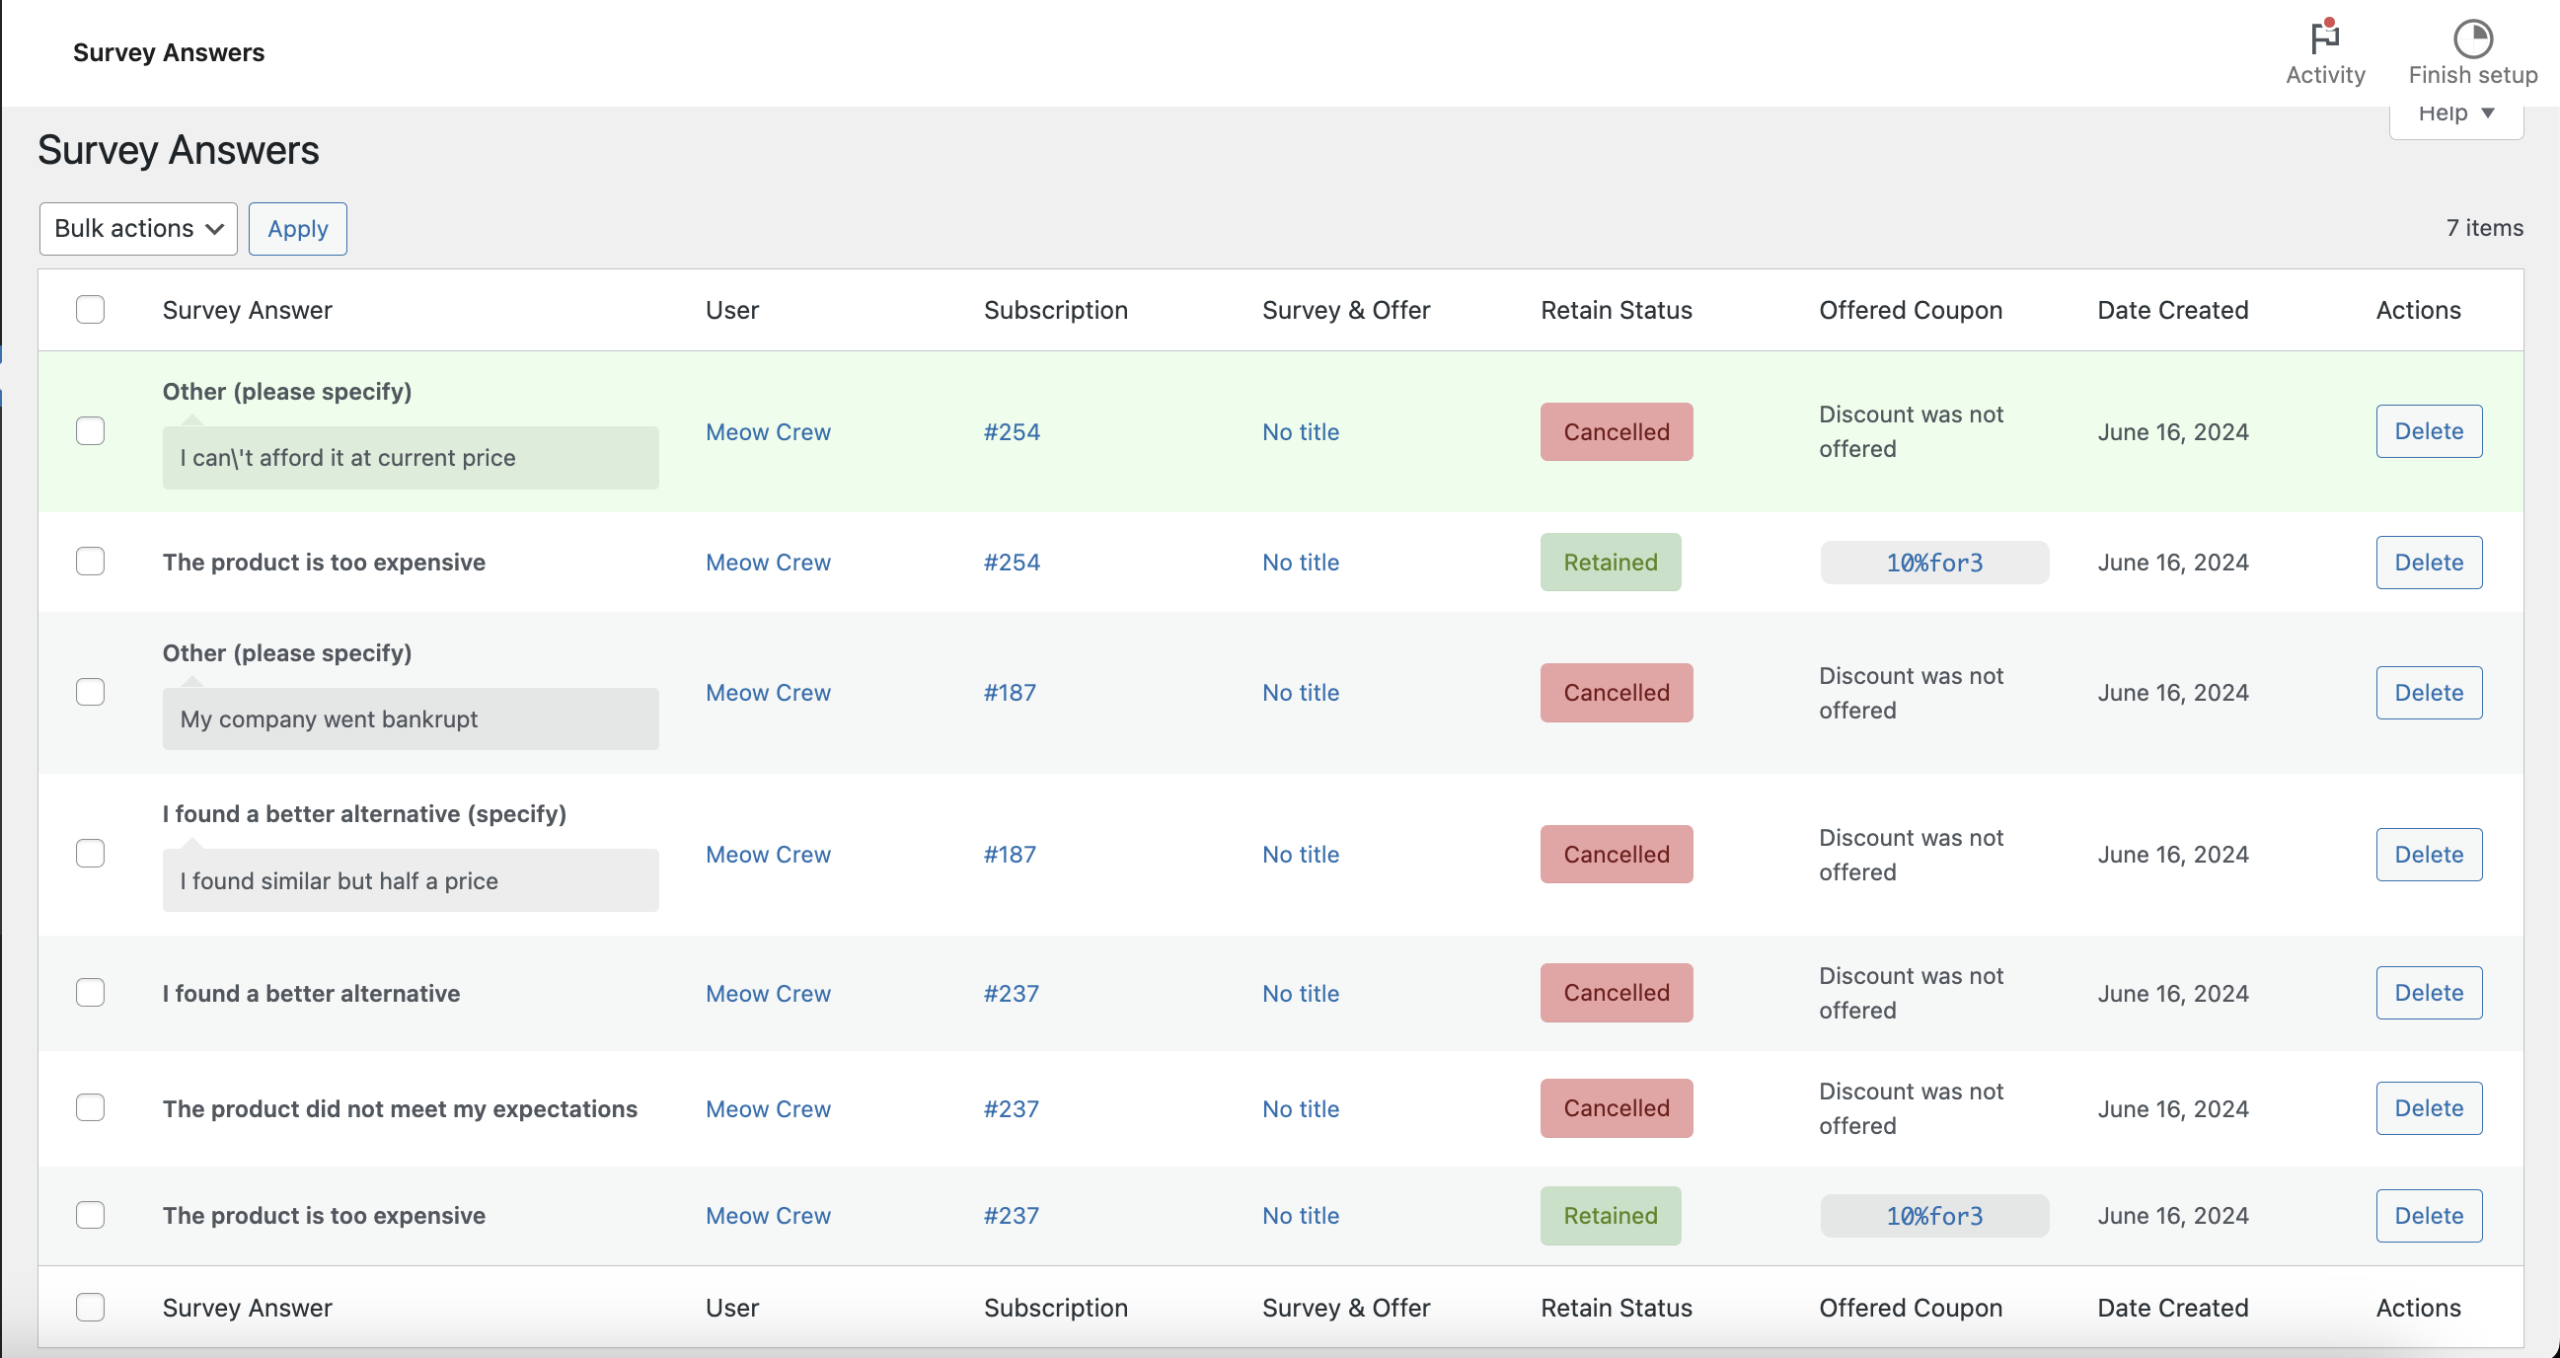
- Survey Answer: displays the selected cancellation reason and any additional comments provided by the subscriber.
- User: shows the user who completed the survey, with a link to their account for further details.
- Subscription: provides a link to the subscription that was canceled or retained.
- Survey & Offer: links to the specific survey and offer presented to the user.
- Retain Status: indicates whether the subscription was canceled or retained based on the offer.
- Offered Coupon: shows the coupon offered to the user, with a link to customize it if needed.
- Date Created: displays the date the survey was completed.
- Action: lets you delete the survey response if it’s no longer needed in the database.
Survey responses are also recorded in the subscription’s Order Notes, providing a detailed log of the cancellation and retention process.
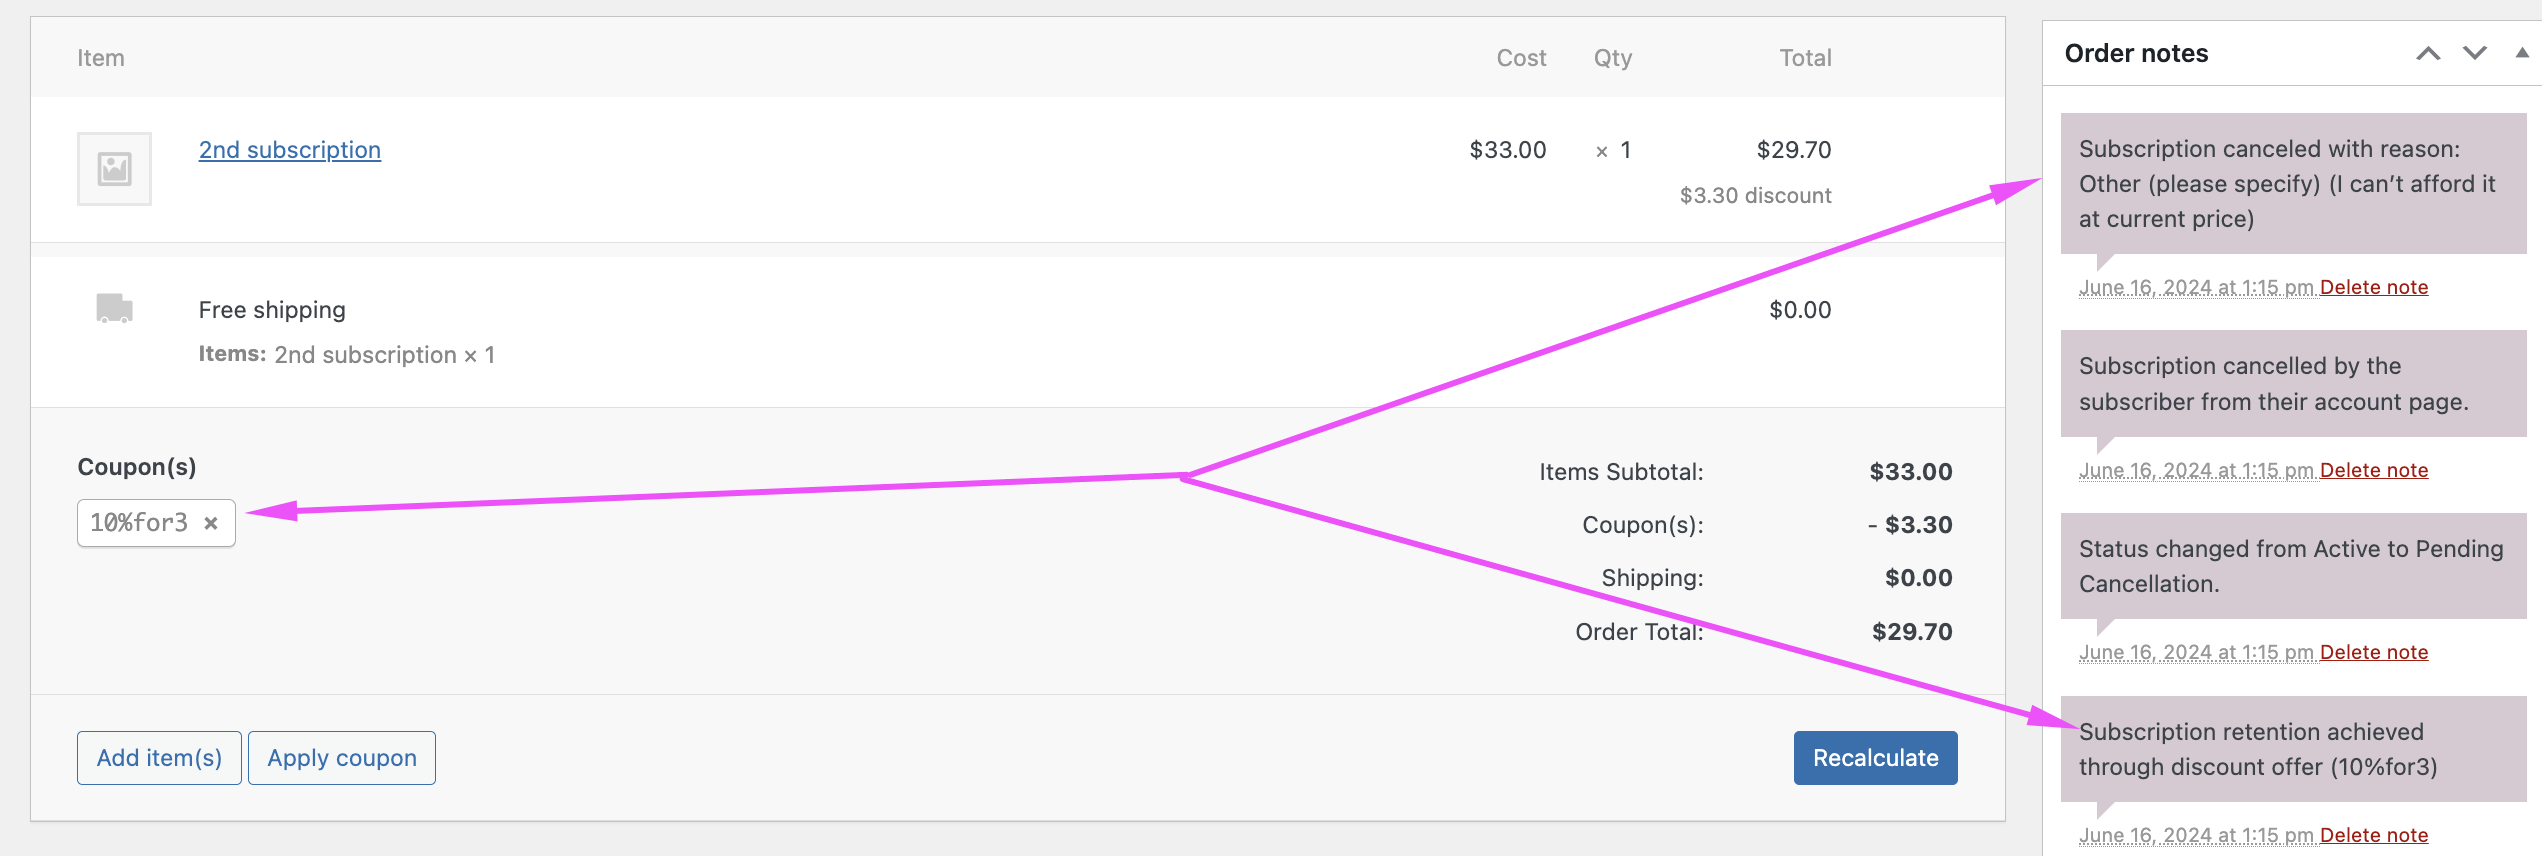
You can also see the coupon applied to the user’s subscription and — as with any coupon code — remove the discount.
By analyzing survey answers, you can identify common cancellation reasons and adjust your products, pricing, or offers accordingly. For instance, if many users cancel because they found a better alternative, you might consider enhancing your product features or offering competitive discounts.
Surveys and Offers Analytics
Each survey and offer features detailed retention statistics to help you assess its effectiveness. On the survey and offer edit page, you’ll find the Retention Rate metabox, which includes two key metrics:
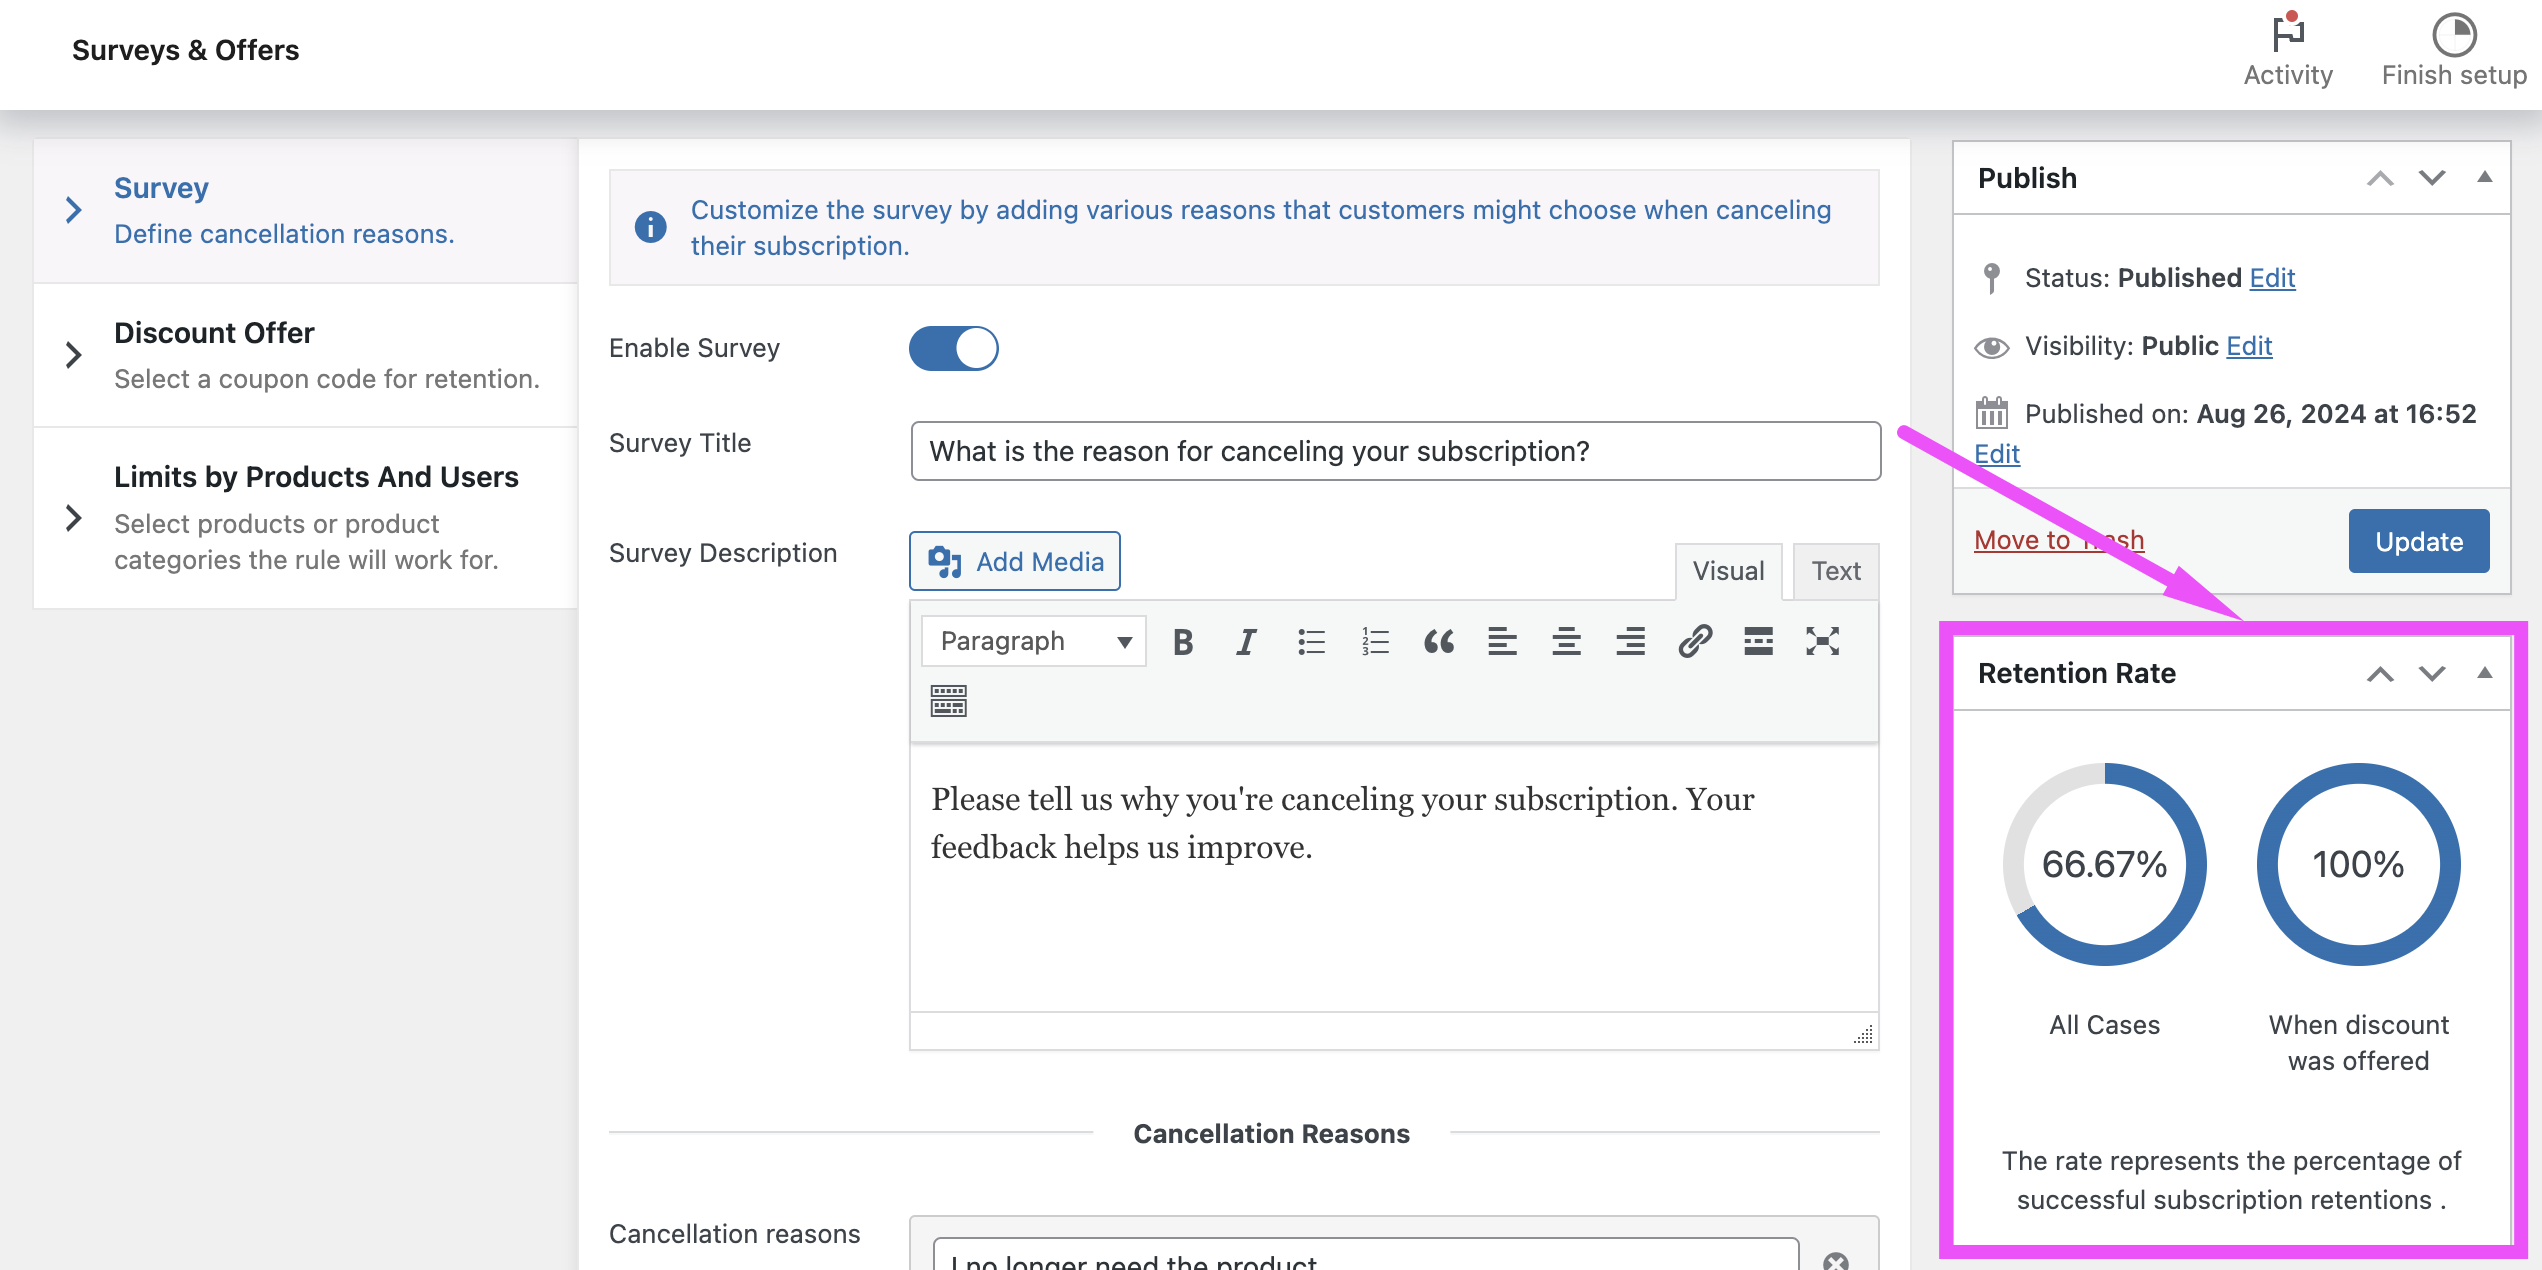
1. All Cases: the percentage of successful retentions across all instances where users attempted to cancel their subscriptions. It includes cases where the discount offer wasn’t displayed. A discount might not be shown if:
- The survey was created without an associated discount offer.
- The user selected a cancellation reason that doesn’t qualify for a discount.
- The user has already received this discount previously.
- The user’s subscription doesn’t meet specific requirements, such as a minimum number of renewals or a minimum active subscription duration.
2. When Discount Was Offered: the percentage of successful retentions specifically for cases where the discount offer was shown to the user. Retention is considered successful if the user didn’t cancel their subscription after seeing the discount offer.
Additionally, on the survey and offer edit page, you can view the Top Cancellation Reasons for each survey. This feature highlights the most common reasons customers consider canceling, providing valuable insight into customer concerns.
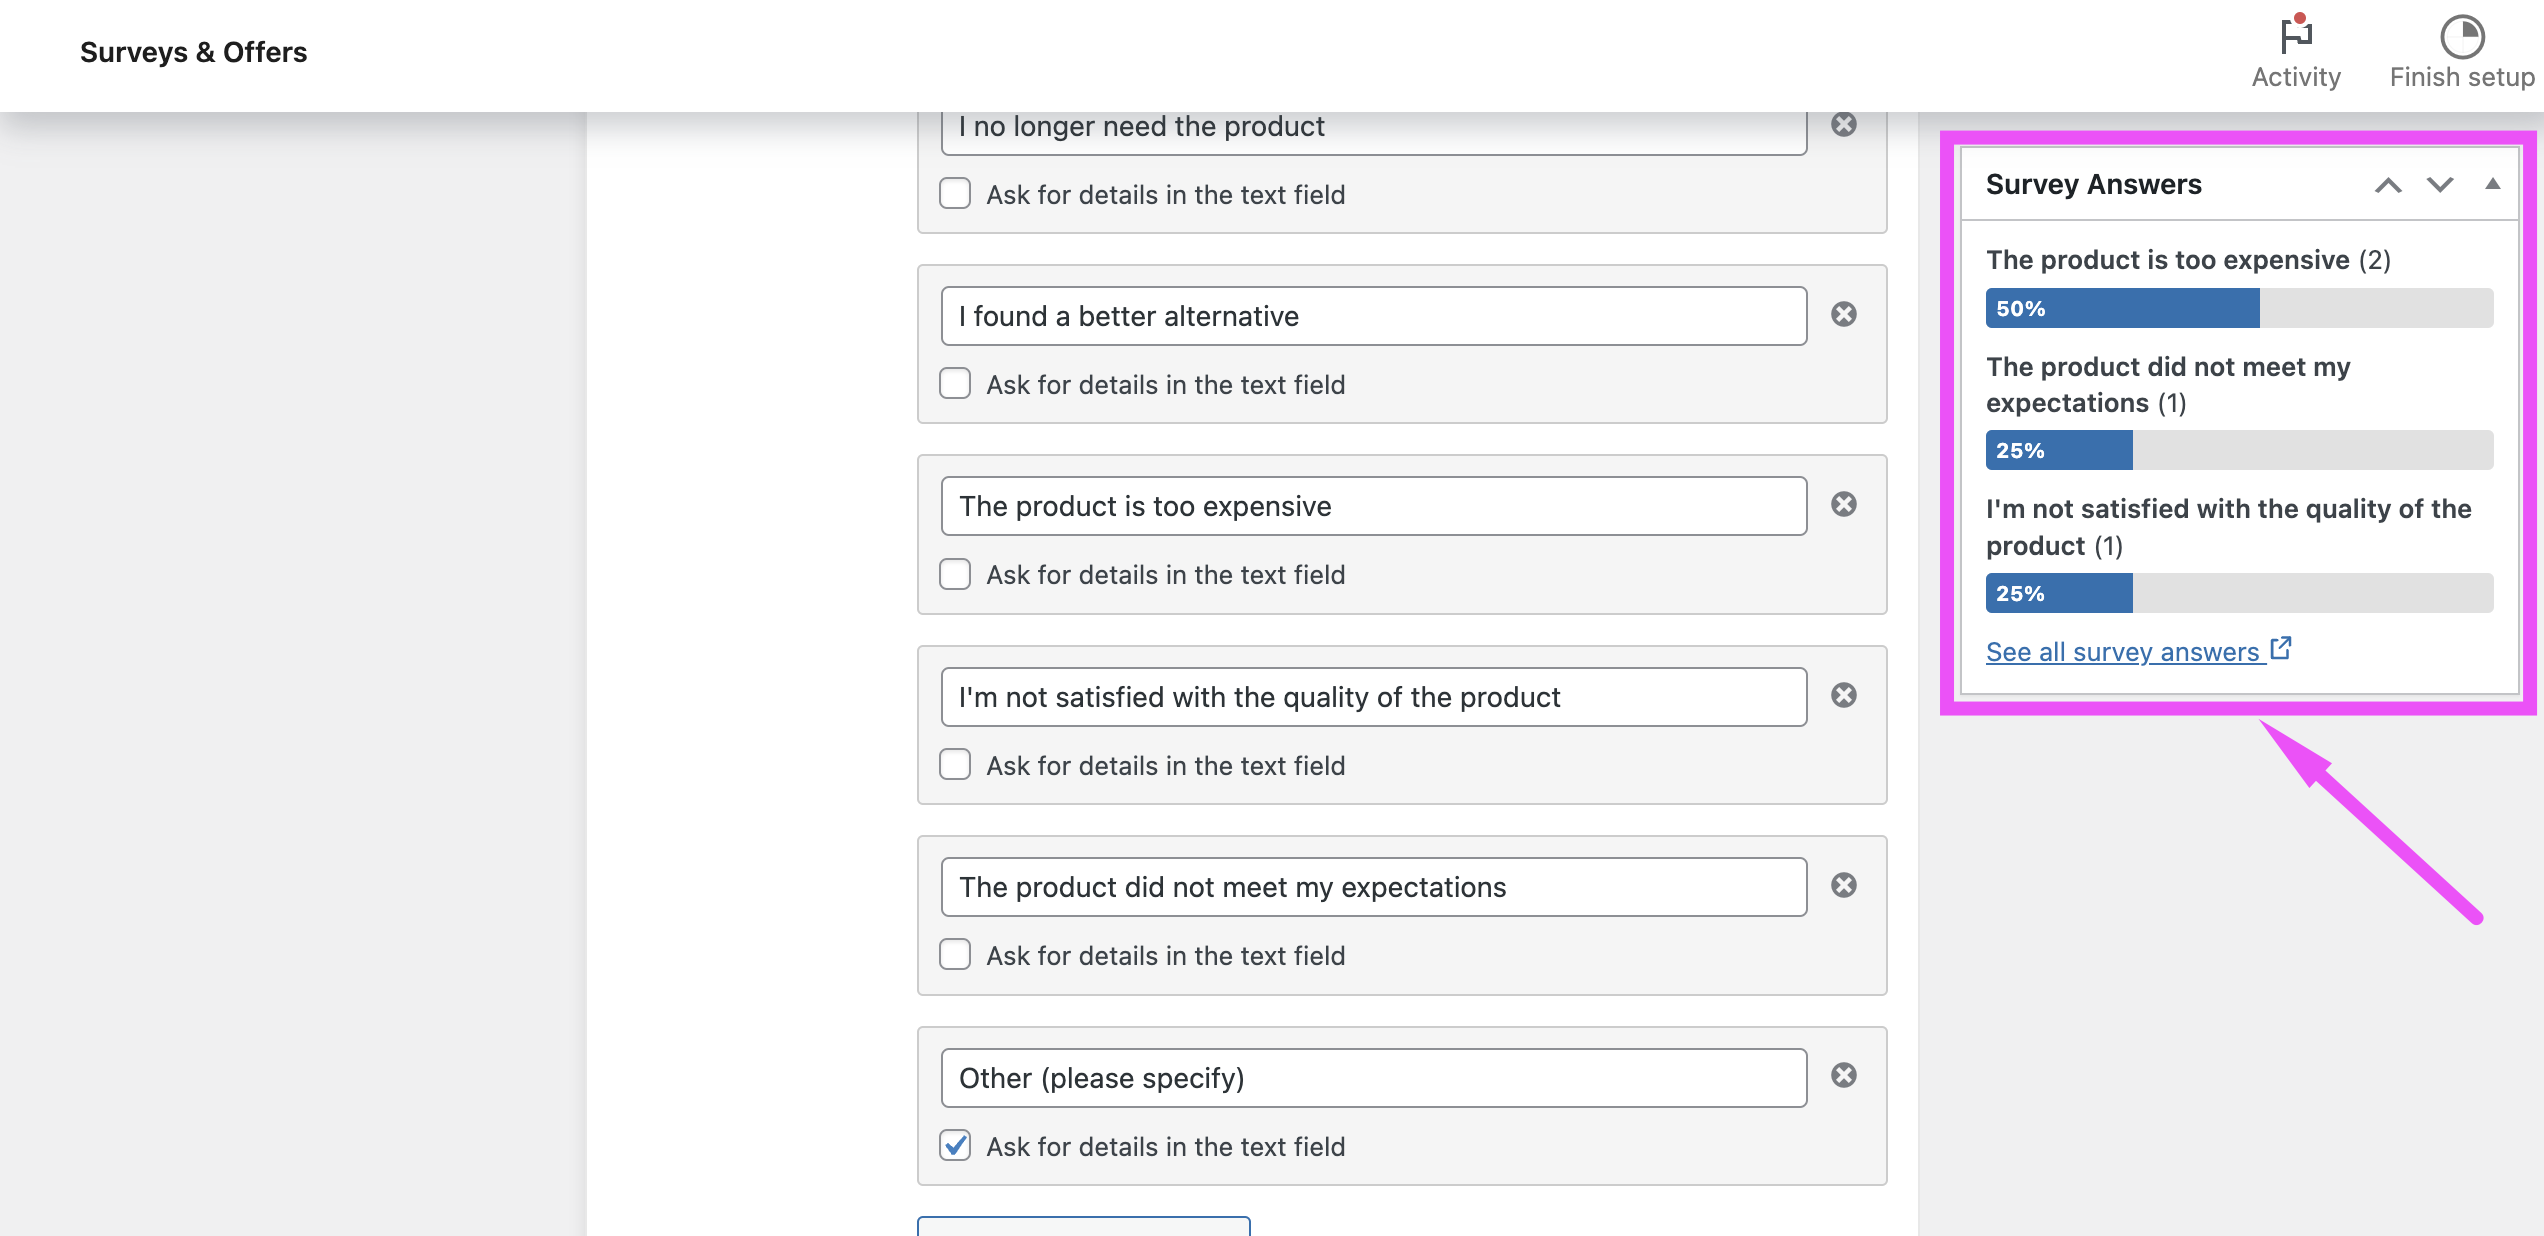
For more detailed analysis, the Survey Answers page lets you filter responses by specific surveys and retention status. This makes it easy to track how different surveys and offers are performing and identify where your retention strategies might need adjustment.
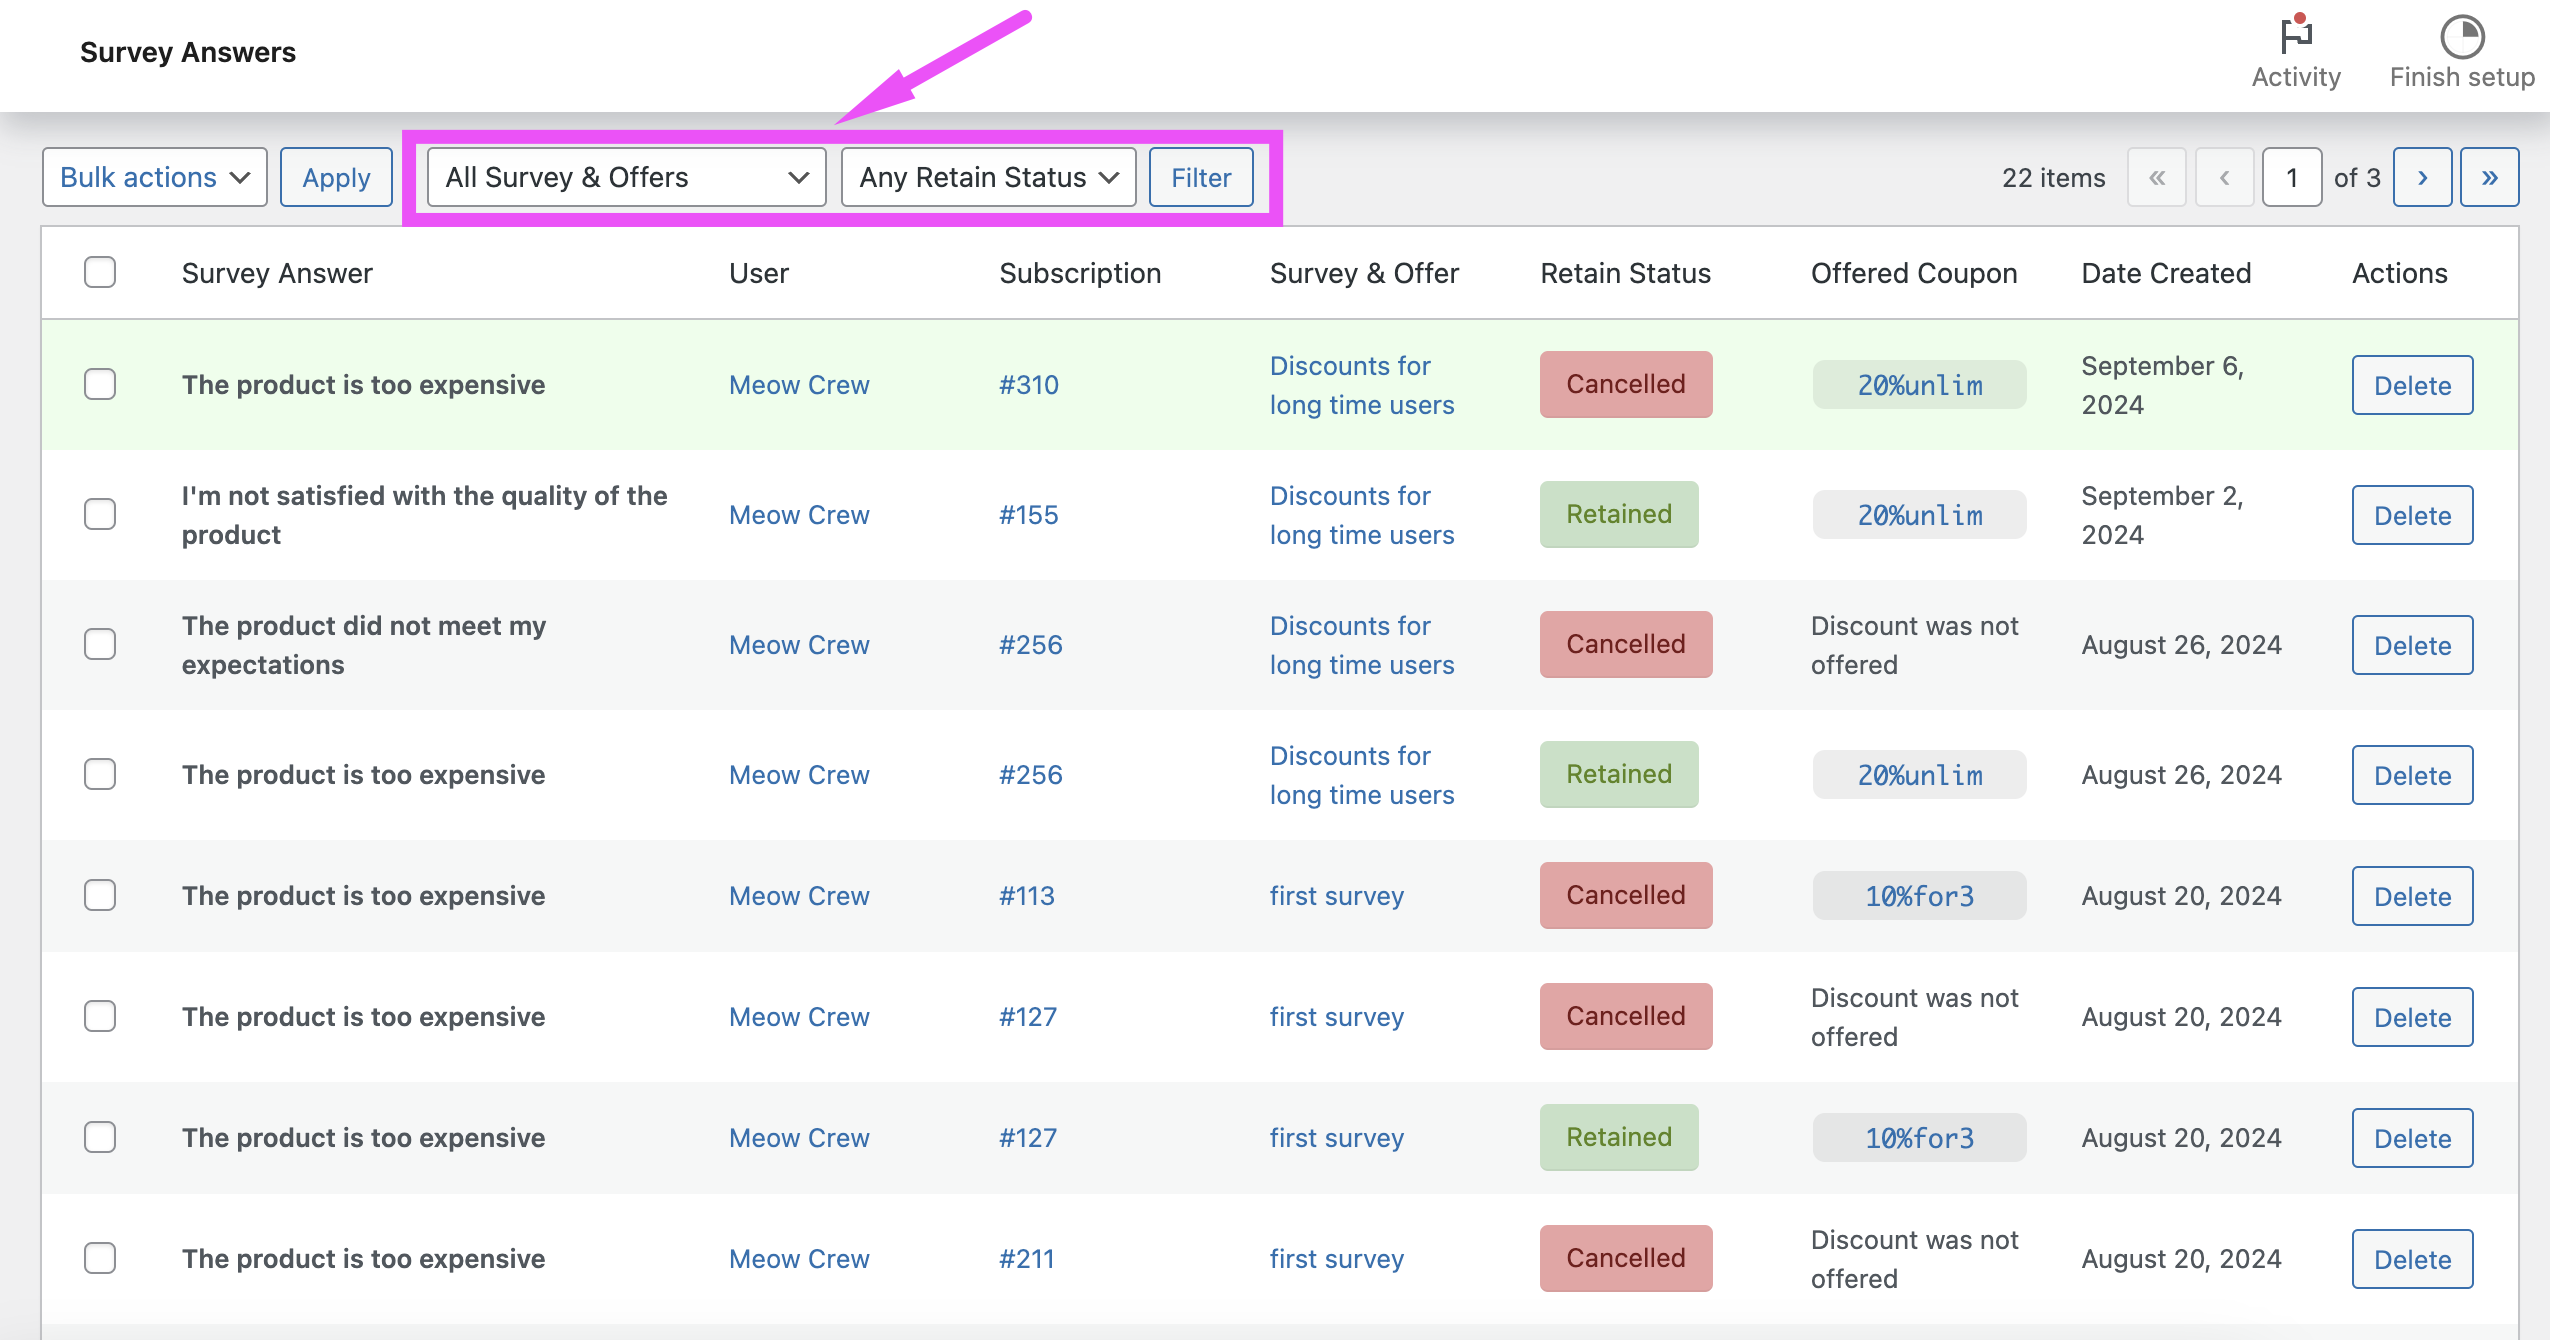
This detailed breakdown helps you make the most of the analytics features to maximize customer retention through targeted surveys and offers.
Plugin Settings
Go to WooCommerce > Settings > Subscriptions (scroll to the bottom).
The plugin doesn’t have many settings for now; the only thing you can configure is the Accent Color.
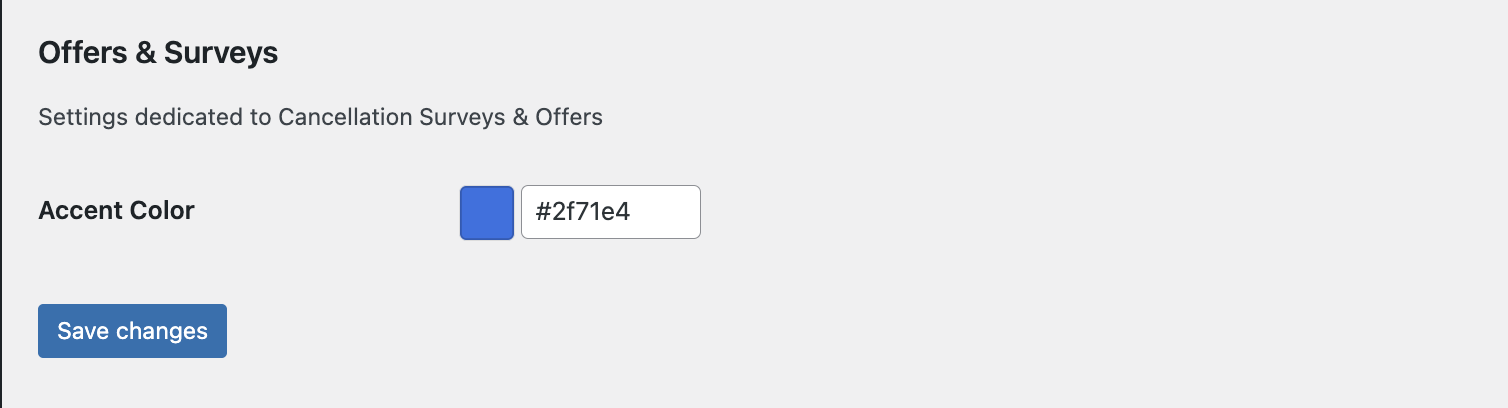
Accent Color: use the color picker to select an accent color for the radio buttons in the survey and offer popup. Choose a color that aligns with your brand’s color scheme to create a cohesive, professional look for the popups.
Here’s how it affects the frontend:
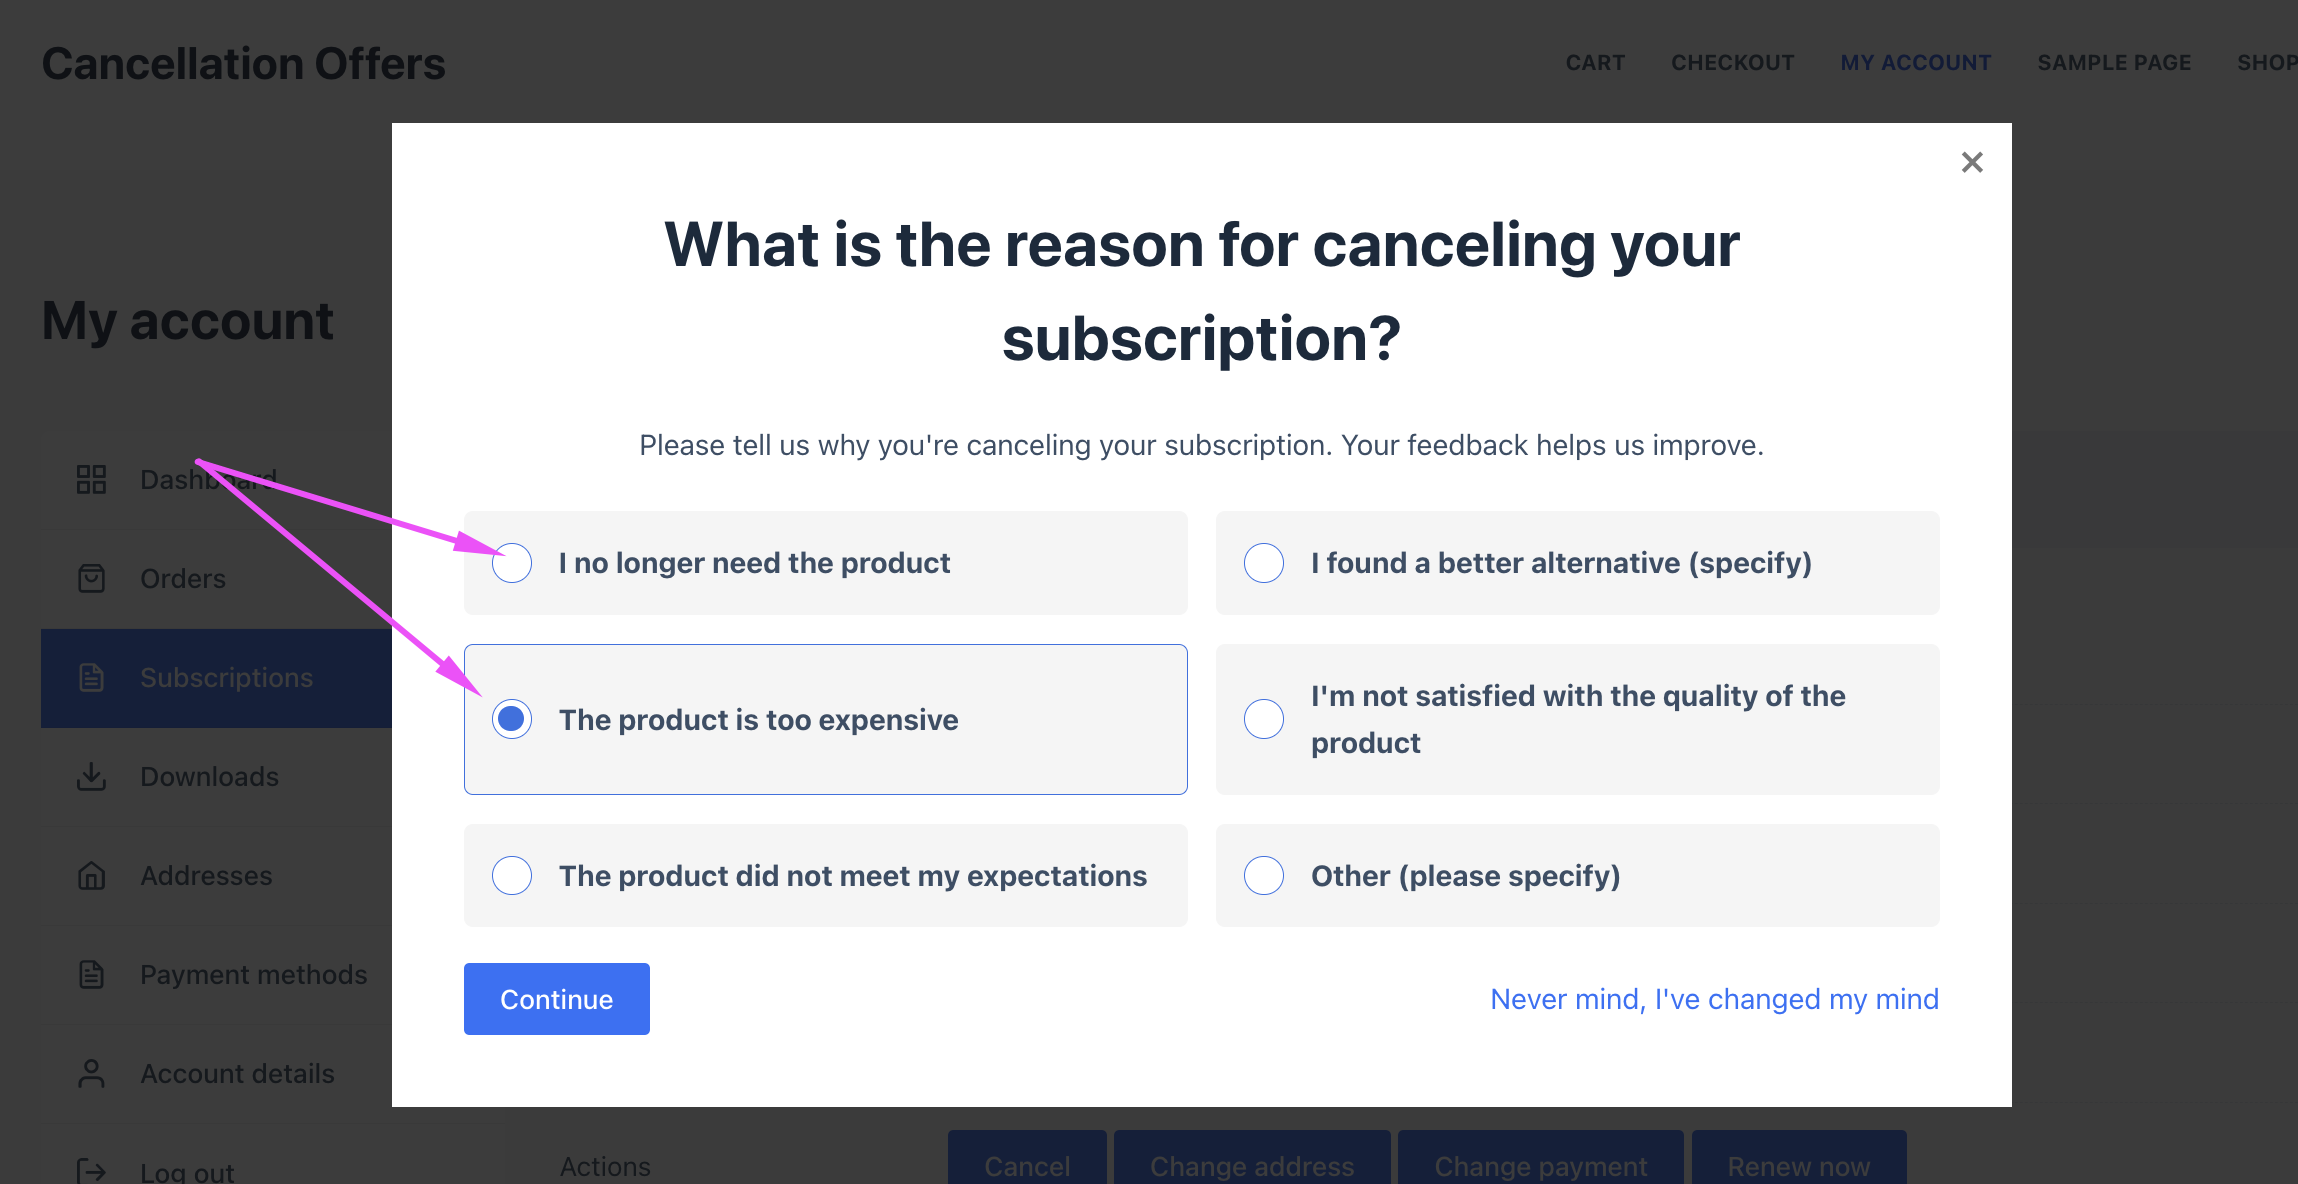
Please note that all design elements rely on your theme — its colors, the default look of radio buttons, text areas, fonts, and so on.
Frontend View
How the survey and offer popups appear to users. When a subscriber tries to cancel their subscription, a popup appears with the survey and discount offer steps you’ve configured. This includes:
Survey Popup: asks the user to provide a reason for cancellation, with options for additional details if specified.
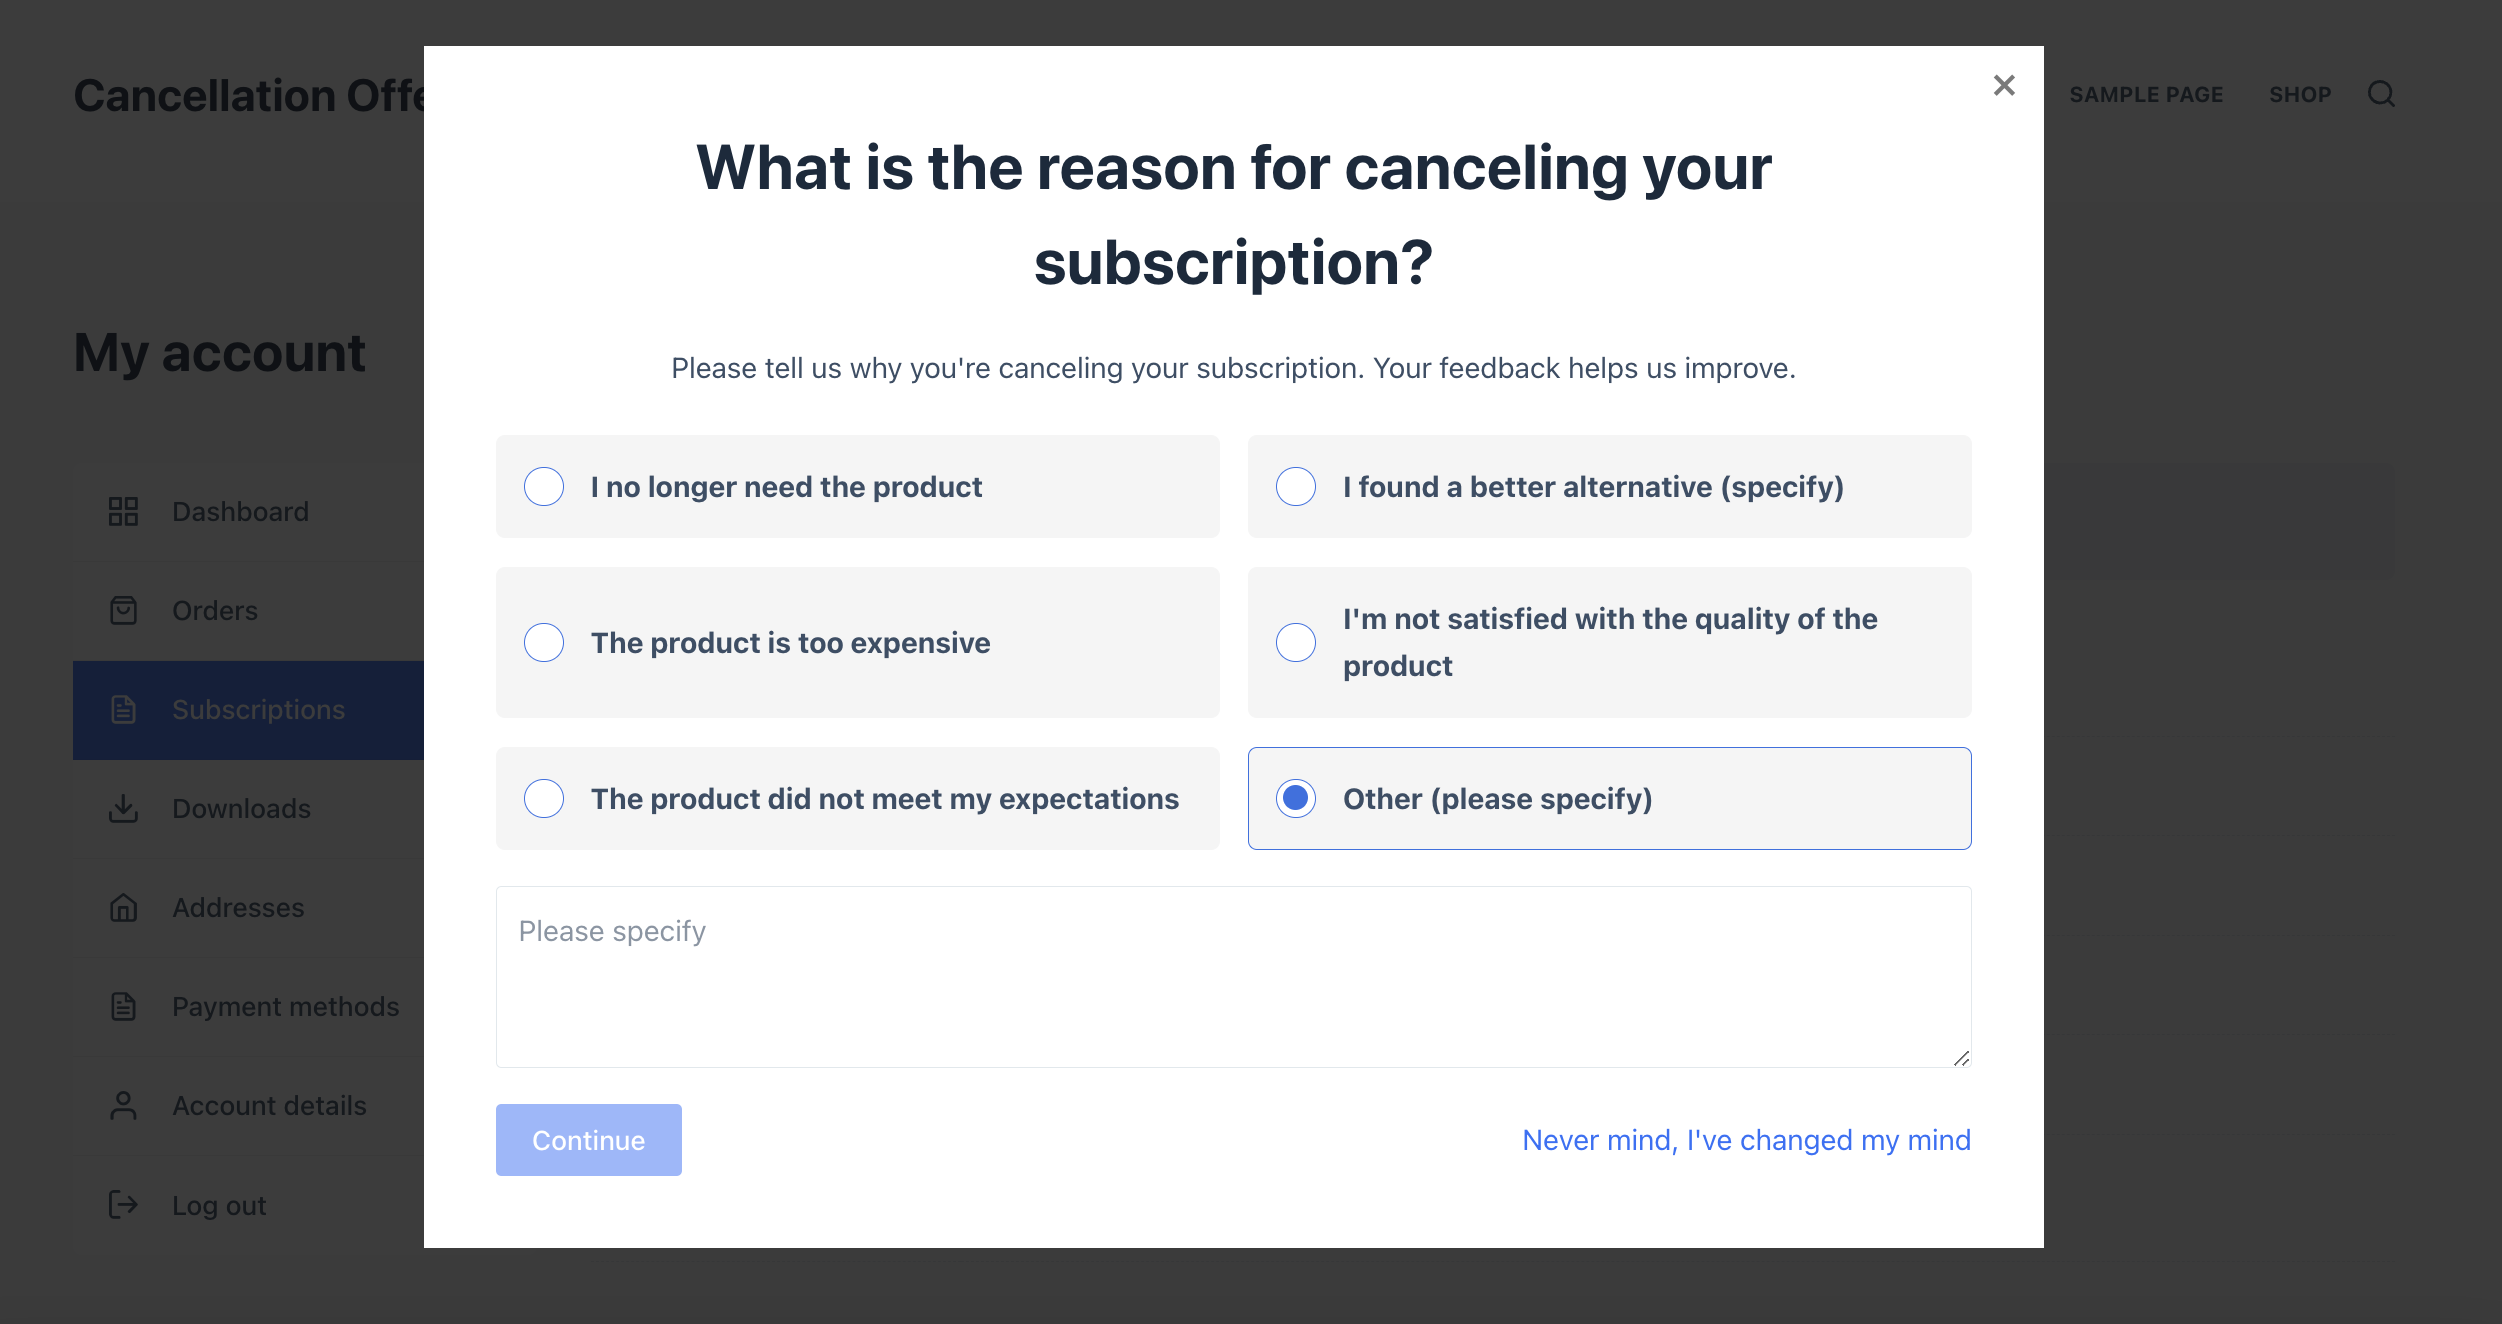
Offer Popup: if the survey response meets the criteria for a discount offer, a second popup appears with the discount details, encouraging the subscriber to stay.
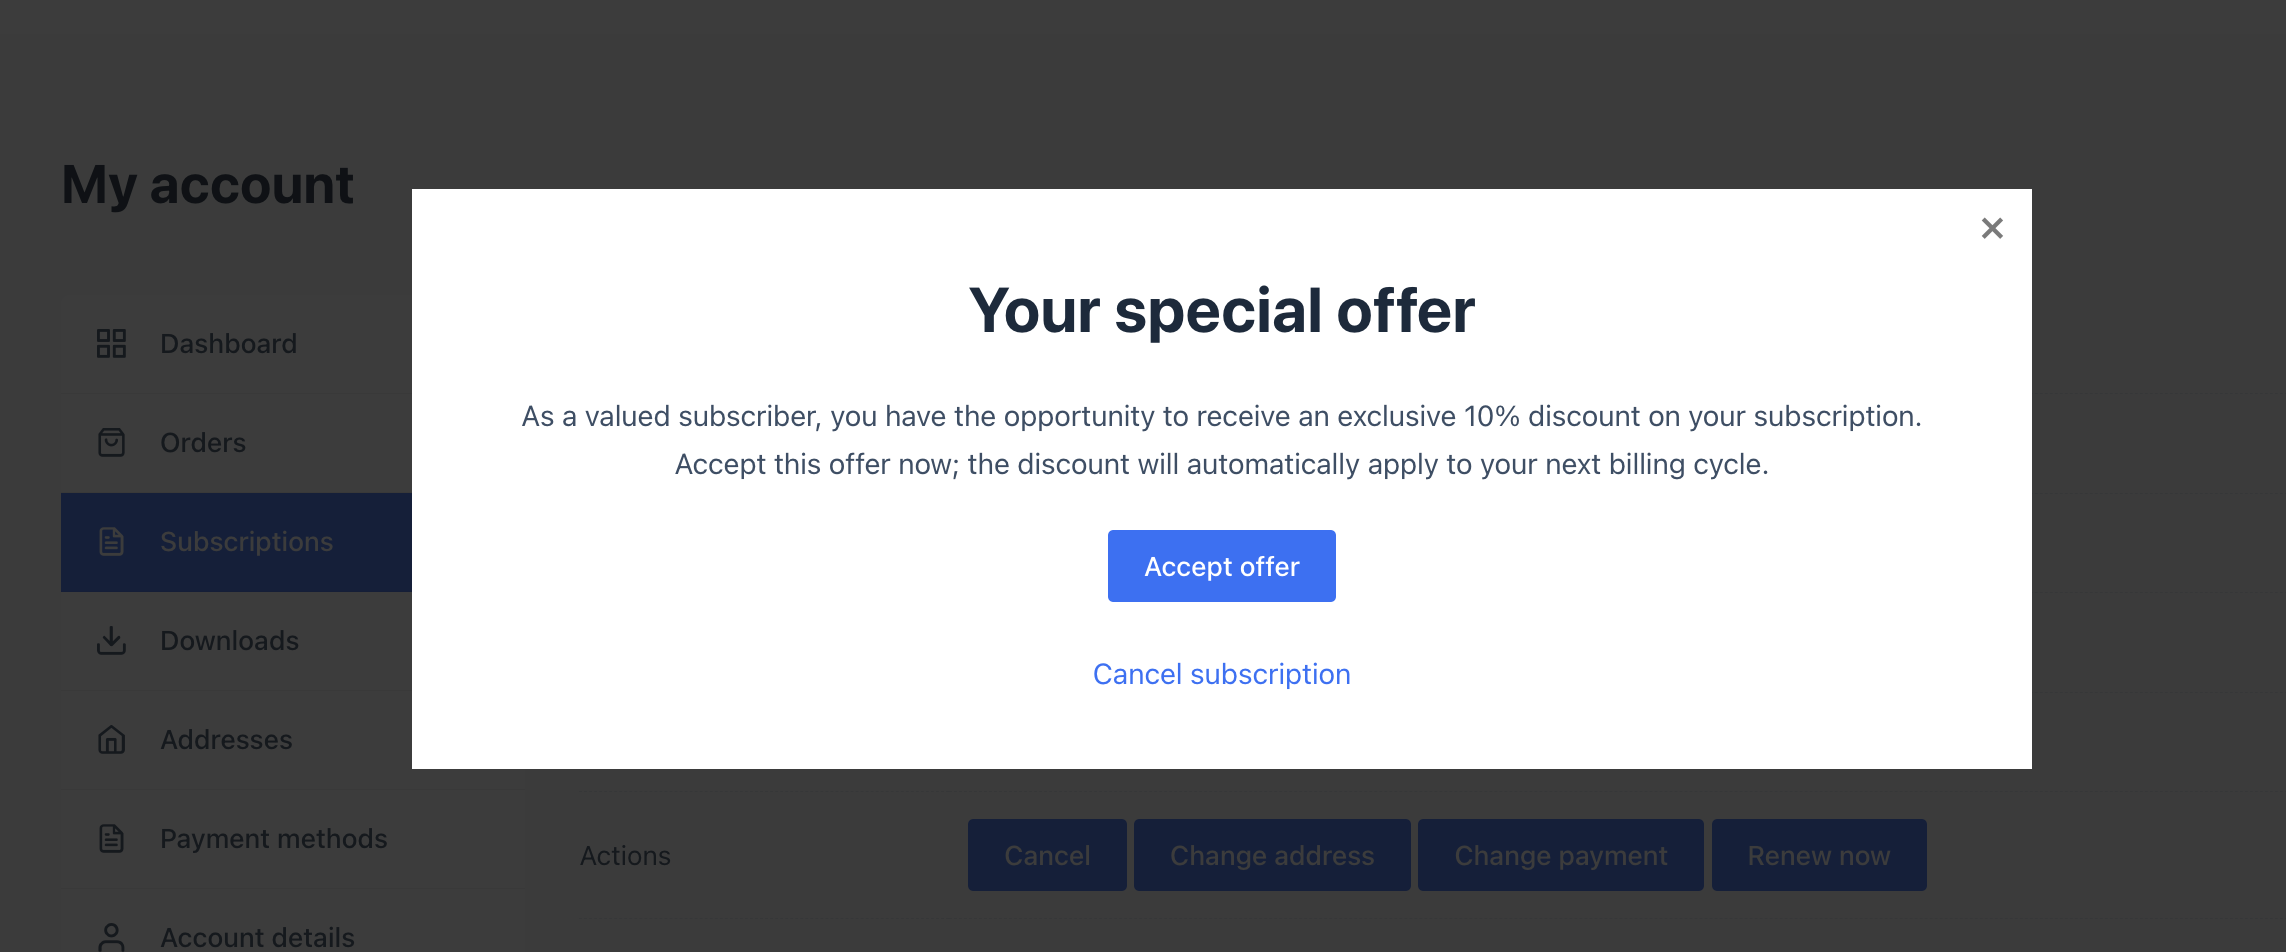
For example, a subscriber trying to cancel due to high costs might see a survey asking for their reason. If they select “The product is too expensive,” the next popup might offer a 20% discount for the next three months — an immediate incentive to stay subscribed.
For Developers
Using Hooks for Customization
The Cancellation Survey and Offers for WooCommerce Subscriptions plugin provides several hooks that let you customize the content displayed in the cancellation survey and discount offer popups. Using these hooks, you can add custom text, images, videos, and other content to enhance the user experience.
Survey Popup Hooks
This is the first popup, shown when a user tries to cancel their subscription. It contains the survey questions you added in the wp-admin panel. As shown in the screenshot below, there are 5 locations where you can place your custom data using the hooks provided by the plugin.
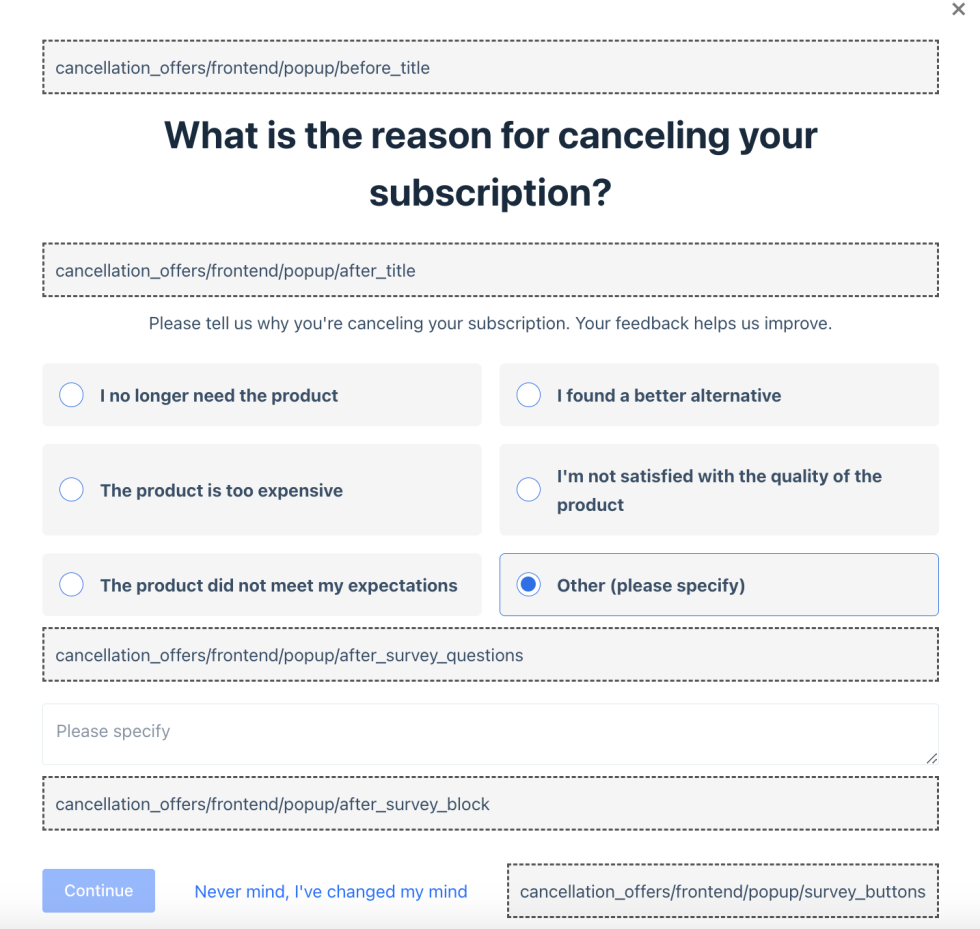
cancellation_offers/frontend/popup/before_title– before the title in the survey popup.cancellation_offers/frontend/popup/after_title– after the title of the survey popup.cancellation_offers/frontend/popup/after_survey_questions– after all survey questions.cancellation_offers/frontend/popup/after_survey_block– after the entire survey block, which includes the extended text fields (the ask-for-details option).cancellation_offers/frontend/popup/survey_buttons– where the survey buttons are displayed (you can add more buttons with their own logic).
Discount Offer Popup Hooks
The second popup — the Discount Offer Popup — is displayed when a user selects one of the survey options that enables the discount offer. As shown in the screenshot below, there are 4 locations where you can place your custom data using the hooks provided by the plugin.
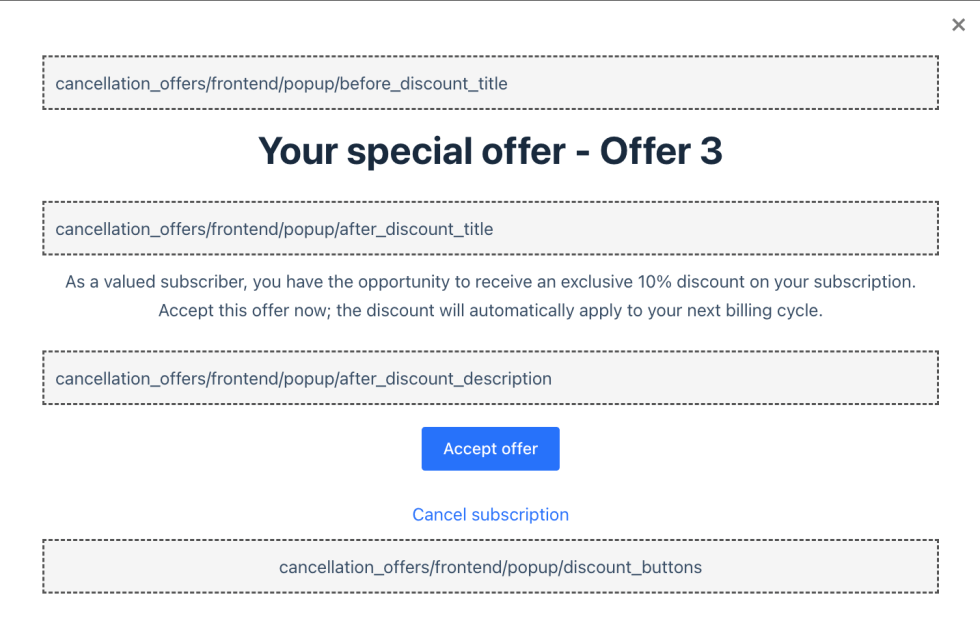
cancellation_offers/frontend/popup/before_discount_title– before the title in the discount offer popup.cancellation_offers/frontend/popup/after_discount_title– after the title in the discount offer popup.cancellation_offers/frontend/popup/after_discount_description– after the discount description text.cancellation_offers/frontend/popup/discount_buttons– where the discount offer buttons are displayed.
Below are examples of using these hooks to display custom content, such as text, images, and videos (you can output any other data as well).
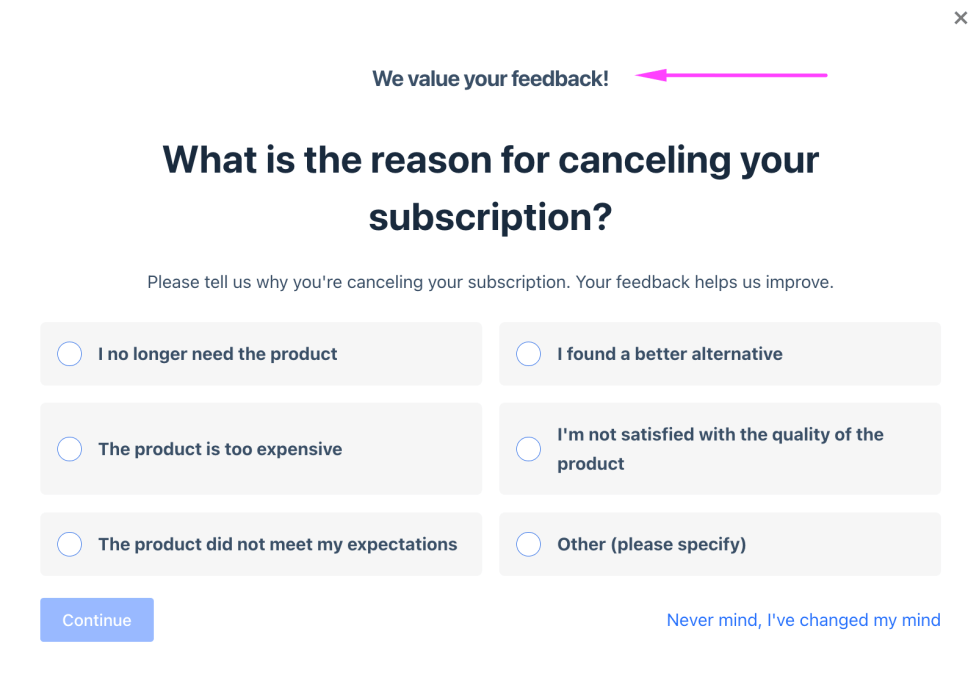
Example 1: Adding Custom Text Before the Survey Title
Hook: cancellation_offers/frontend/popup/before_title
Code:
function custom_message_before_title() {
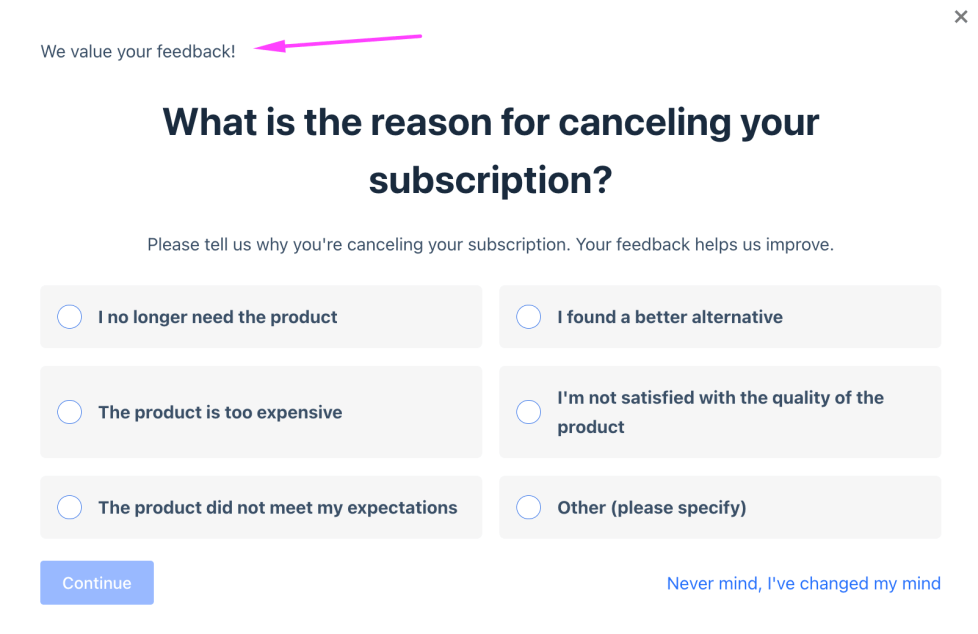
    echo '<p class="custom-message">We value your feedback!</p>';
}
add_action('cancellation_offers/frontend/popup/before_title', 'custom_message_before_title');
The result will look something like this (depending on your theme style):
If this doesn’t look pretty enough, you can add some CSS to make it noticeable, center it, etc. The code may look like this:
// Function to display the custom message
function custom_message_before_title() {
    echo '<div class="custom-message-container">';
    echo '<p class="custom-message">We value your feedback!</p>';
    echo '</div>';
}

// Hook the function to the specific hook
add_action('cancellation_offers/frontend/popup/before_title', 'custom_message_before_title');

// Function to add custom CSS to style the message
function add_custom_message_css() {
    echo '
    <style>
        .custom-message-container {
            text-align: center;
            margin: 20px 0;
        }
        .custom-message {
            font-size: 20px;
            font-weight: bold;
        }
    </style>';
}

// Hook the CSS function into wp_head to ensure it's loaded
add_action('wp_head', 'add_custom_message_css');
And the result will be much better:
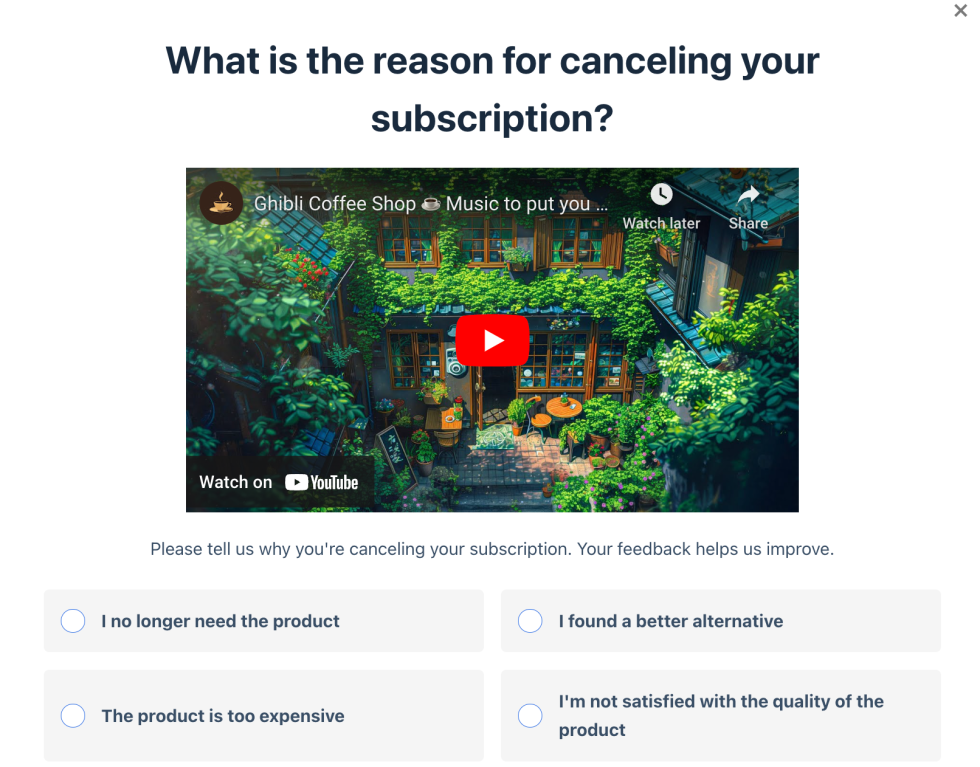
Example 2: Embedding a Video After the Survey Title
Hook: cancellation_offers/frontend/popup/after_title
Code:
function custom_video_after_title() {
    echo '<div class="custom-video-container">';
    echo 'https://some/footage';
    echo '</div>';
}
add_action('cancellation_offers/frontend/popup/after_title', 'custom_video_after_title');
This is how the video looks in the popup:
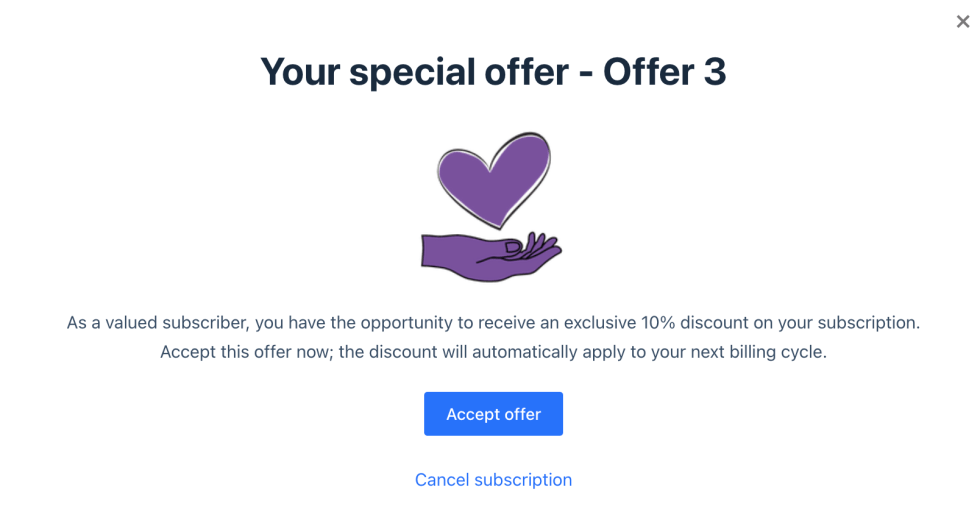
Example 3: Adding a Custom Image to the Discount Offer
Hook: cancellation_offers/frontend/popup/after_discount_title
Code:
function custom_image_after_survey_questions() {
    echo '<div class="custom-image-container">';
    echo '<img src="https://example.com/path/to/your/image.jpg" alt="Custom Image">';
    echo '</div>';
}
add_action('cancellation_offers/frontend/popup/after_discount_title', 'custom_image_after_survey_questions');
It looks like this (when you upload your custom image and use its path):
By leveraging these hooks, you can easily customize the content of the survey and discount offer popups. Whether you want to add informative messages, engaging videos, or eye-catching images, the hooks provided by the plugin give you the flexibility to enhance your users’ experience.
Frequently Asked Questions
1. How can I make sure discount offers don’t apply to new subscribers who are trying to take advantage of the discounts right after subscribing?
To prevent new subscribers from immediately canceling and receiving a discount, set specific conditions in the Offer Settings:
- Minimum Renewals Number: specify a minimum number of renewals that must occur before the discount offer is valid.
- Minimum Subscription Days Active: set the minimum number of days a subscription must be active before the offer is available, so only more committed subscribers see the offer.
- Allow Offer to Be Applied Multiple Times: toggle this setting to control whether the same subscriber can use the offer multiple times. If turned off, the user receives the discount offer only once per subscription.
2. Can I use different surveys and offers for different subscription products?
Yes — you can create specific surveys and offers for various subscription products. In the third step of creating a survey and offer, you can target specific product categories, individual products, user roles, and specific users. This lets you create personalized surveys and offers tailored to each subscription product in your store.
3. How do I link a WooCommerce coupon to a cancellation offer?
- Create the coupon code using the ‘recurring’ type. Use any of the available coupon discount settings, including fixed amount or percentage discounts, and specify whether the discount applies for a certain number of renewals or for the entire lifetime of the subscription.
- In the Offer Discount step, select a coupon code from the dropdown menu. Make sure the coupon is of the ‘recurring’ type and has the desired discount settings.
- Verify that the coupon’s restrictions and limits don’t conflict with your offer setup. For example, if you exclude certain products from coupon usage, make sure those products aren’t included in the discount offer.
4. How can I track the effectiveness of my surveys and discount offers?
The plugin keeps a database of all the answers so you can track how well your surveys and discount offers perform:
- Navigate to WooCommerce > Survey Answers to view all responses to your surveys. This page shows detailed information about each response, including the user, the subscription involved, the reason for cancellation, and whether the retention offer was accepted.
- Survey responses are also recorded in the subscription’s Order Notes, providing a detailed log of the cancellation and retention process.
5. Can I customize the survey questions and discount offers to better suit my business needs?
Yes — the plugin allows for extensive customization. In the Create Survey step, you can add, edit, or delete cancellation reasons, and each reason can have an additional text field prompting subscribers for more details.