
Installation
Free version:
- Download the plugin from wp.org – https://wordpress.org/plugins/conditional-logic-for-woo-product-add-ons.
- Go to: WordPress Admin > Plugins > Add New and Upload Plugin. Choose a file (for the file you downloaded in step 1).
- Install Now and Activate Plugin.
- Double-check if you have WooCommerce Product Add-ons plugins activated, it’s required for Conditional Logic to work.
Premium version:
- Download the Premium plugin from the email you received after purchase or visit https://users.freemius.com/login, and enter your credentials to access the buyer dashboard, where you can find the premium version of the plugin and license key.
- Before installing the Premium version of the plugin, please disable the Free version if you still run it.
- Go to: WordPress Admin > Plugins > Add New and Upload Plugin. Choose file (for the file you downloaded in step 1).
- Install Now and Activate Plugin.
- Double-check if you have WooCommerce Product Add-ons plugins activated, it’s required for Conditional Logic to work.
In case you see an error saying:
Fatal error: Cannot declare class ComposerAutoloaderInit00e8679be6824c83a88ea5e130babba2, because the name is already in usePlease double-check if you still have the Free version activated, deactivate it, and then try starting the Premium plugin once more.
Configuration
The very first thing you need to do is ensure you have Product Add-ons by WooCommerce installed and configured.
Create add-ons fields on a product level or general add-ons.
After all fields are ready (or if you have set them before plugin installation), you can start setting conditions for them.
Update Add-ons fields
To identify the right fields and their options, Conditional Logic assigns slugs to each field. That’s why you have to update your add-on fields first.
If you don’t update the field, you will see a notice when trying to set up conditions:

When you see that warning, all you have to do is to once more click on the “Update” button to re-save the add-on or product:

Setting up conditional logic step by step
When the product/add-on is updated, you can set up your conditions.
Conditional logic can be used for each add-on field. And all fields and their options can be used as conditions, except for the ‘Heading’ type of field, because it is plain text and not an option.
Now go and select the field for which you want to set up conditions.
If you see the following fields, you have enabled conditional logic:

The first field you can see is field visibility. It has two options:
- Show this field if
- Hide this field if
This controls what you want to do with the chosen field.
If you want it to be hidden by default and display only when certain conditions are met – choose ‘Show this field if’.
If you want it to be visible but hidden when certain conditions are met – choose ‘Hide this field if’.
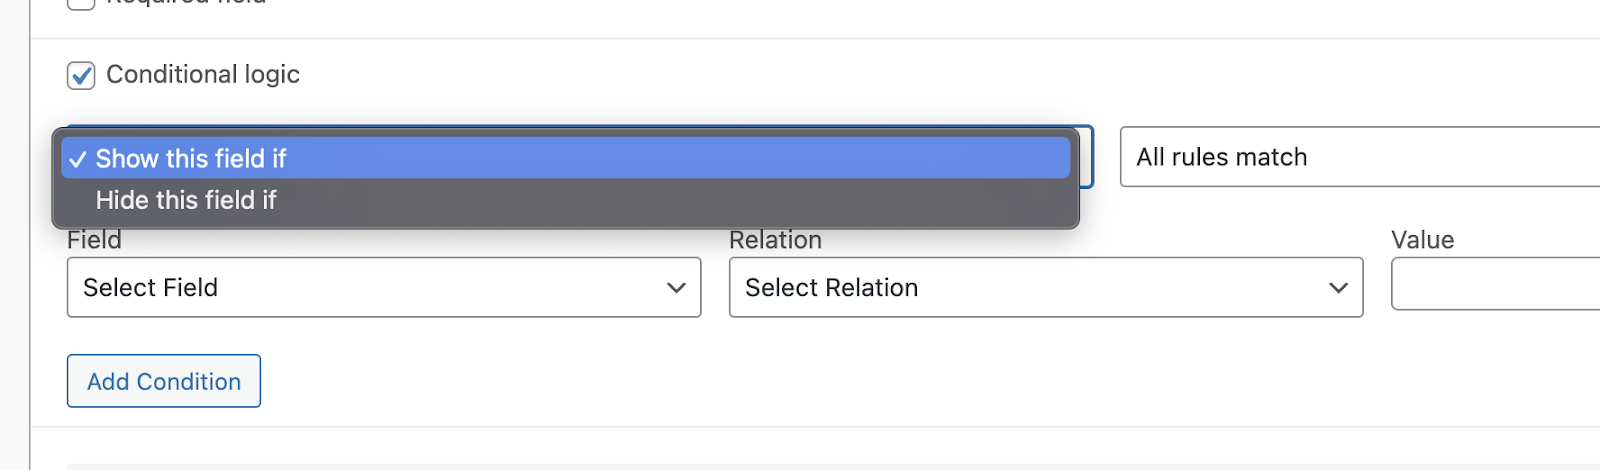
Since you can add unlimited conditions, the next setting you see here is ‘when to apply conditions, and there are two options as well:
- Any rules match
- All rules match
You should use the option ‘Any rules match’ if you have one or several conditions, and it would be enough if any of them are met.
And in case you have two or more conditions, and you need all of them to match to show/hide this field – use ‘All rules match’.

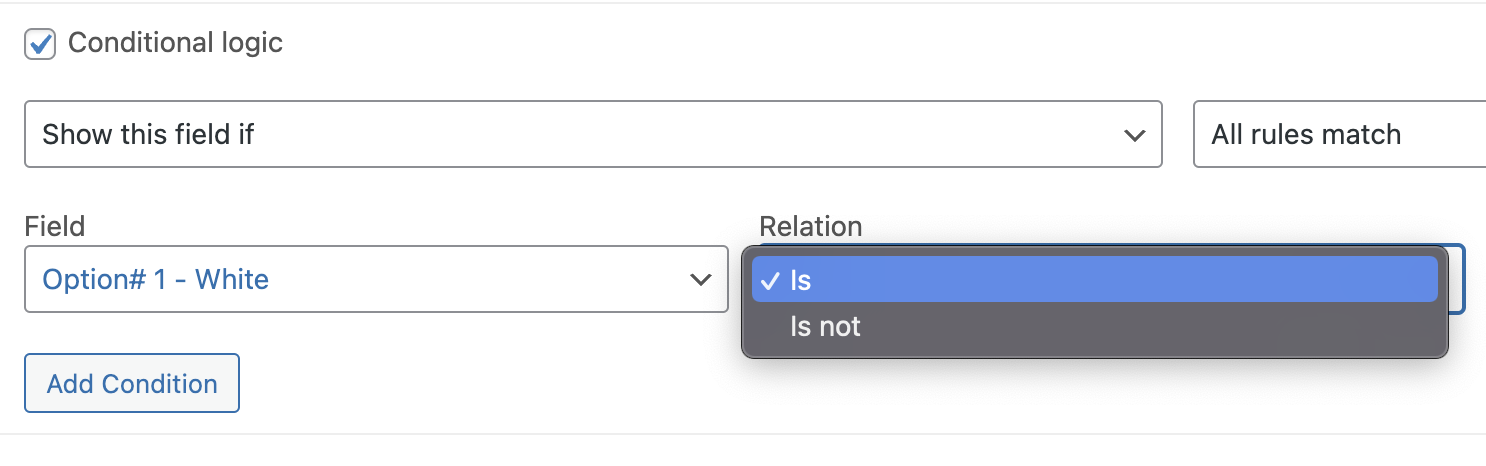
The next thing you need to choose is the ‘field’ that the condition will refer to check if the conditions are true or not.
There you can see all fields that this add-on currently has:

If the type of field is Multiple Choice or Checkbox, you will see all of their options listed. As shown in the example, the field ‘Color’ has three options: white, silver, and gold. Each of these options can be used as part of a condition. Note that each option has its option number and label; the label is the name of your option, and the number represents the option’s position in the order within the interface. If you change the order of options inside the field, please adjust your conditions accordingly.
The only type of field you won’t see here is ‘Heading’ because there’s no way to set conditions for it.
The next step is to select the relation between the field and the value to set the condition.
Each type of field has its type of relations.
Multiple choice and Checkboxes types can be conditioned as:
- Is checked – when the customer selects the option you set in ‘field’
- Is not checked – when the customer selects or checks anything besides the option you set in the ‘field’
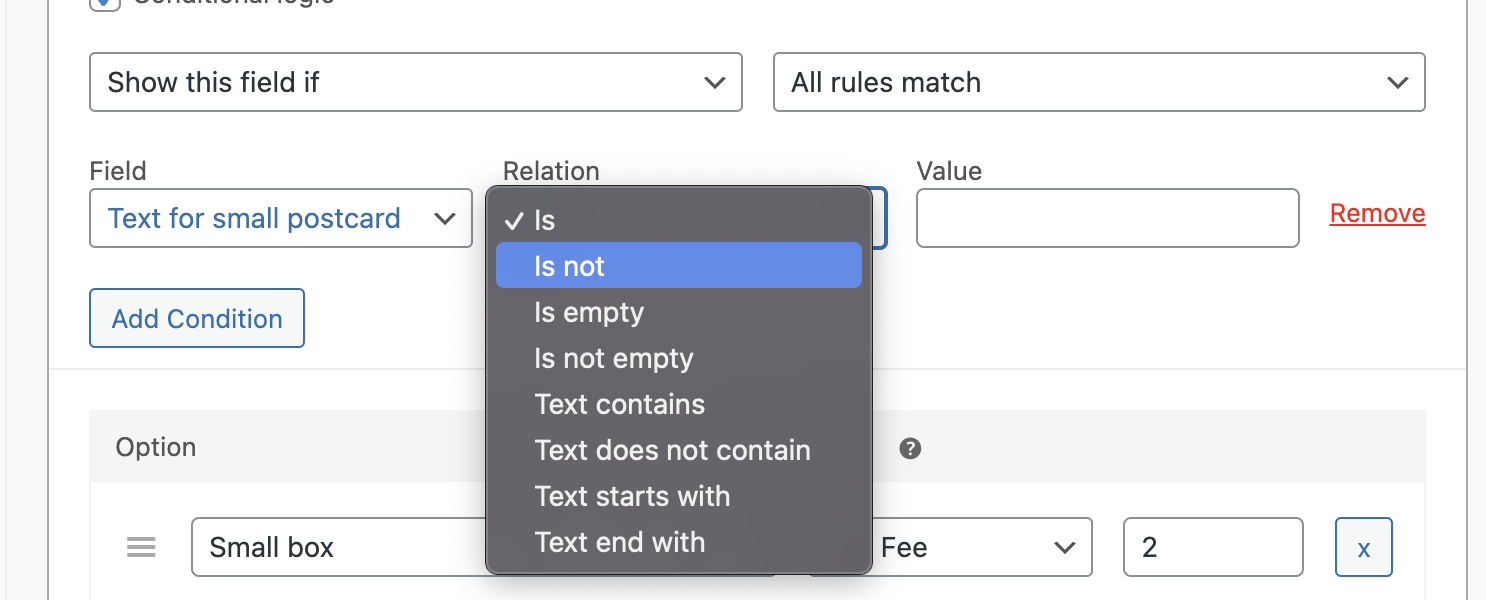
Short Text and Long Text have the following conditions:
- Is – text entered by a customer must fully comply with your value (which you should set on the next step)
- Is not – text entered by a customer should not be the same as your value
- Is empty – the customer does not enter any text in the selected field
- Is not empty – customer enter any text in the selected field
- Text contains – text entered by a customer must contain your value anywhere in the text
- Text does not contain – text entered by a customer should not contain your value anywhere in the text
- Text starts with – text entered by the customer starts with your value exactly
- Text ends with – text entered by the customer ends with your value
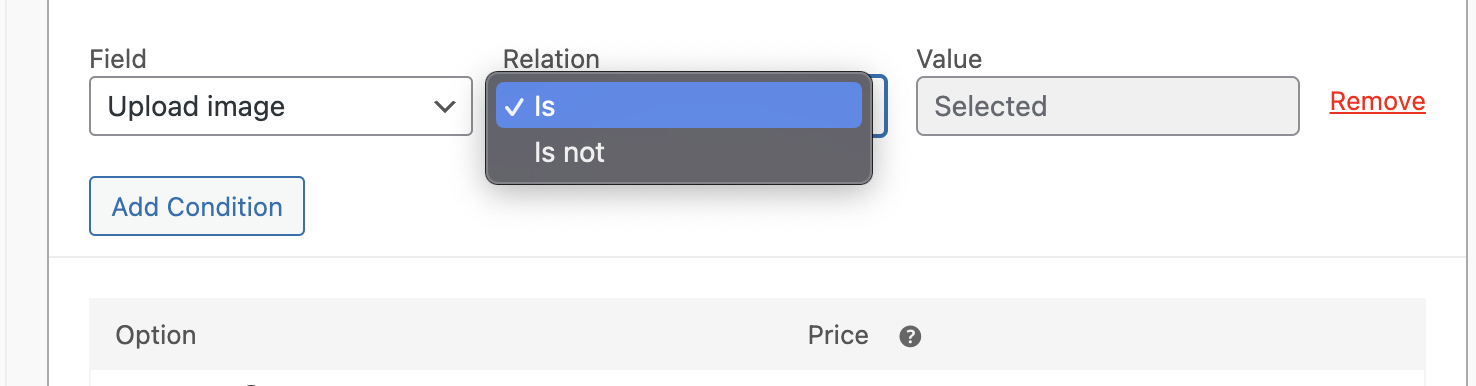
File upload may be:
- Is selected – if the customer has chosen a file to upload
- Is not selected – if the customer has not chosen a file to upload yet
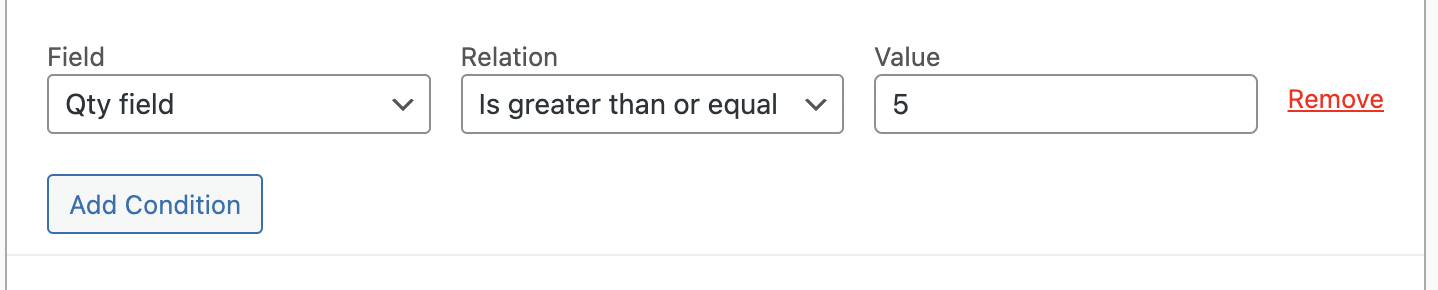
Customer Defined Price and Quantity are a numeric types of fields, and their conditions may be:
- Is – price entered by customer or quantity is equal to value you set in next field
- Is not – price entered by customer or quantity is anything besides the value you set in the next field
- Is greater than – price entered by customer or quantity is greater than the value
- Is less than – price entered by customer or quantity is less than the value
- Is greater than or equal – price entered by customer or quantity is greater than or equal to value
- Is less than or equal – price entered by customer or quantity is less than or equal to value

After you set the relation to the field, it’s time to put the value to finish conditional logic.
Values also depend on the type of field and the kind of relation chosen.
Multiple choice and Checkboxes can only be set to Is or Is not state, and there is only one va to be set – Checked:
- Checked – means the conditions are met when this field and this option is selected by the customer.

Short Text and Long Text have multiple relation types, and multiple values can be set.
- Is and Is not value should 100% match the value set by the customer for the condition to work.

- Is empty and Is not empty don’t have a value field. The relations are pretty self-explanatory.

- Text contains and Text does not contain value means the text you enter into the value field should appear anywhere in the text entered by the customer

- Text starts with, and Text ends with – set value to any word or phrase that should be in the very beginning or end of the text entered by the customer

File upload type of field presents only two types Is selected and Is not selected therefore, you cannot set the value to anything else because there is no other state:
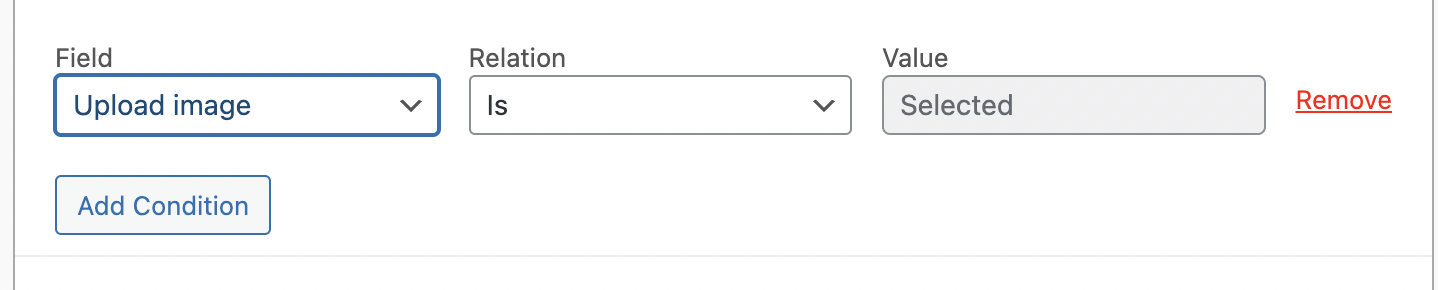
And if the user has uploaded or hasn’t done so – the condition is met or not.
Since Customer Defined Price and Quantity are numeric types of fields – their values can only contain numbers.
- Is or Is not a – here, you should place the exact number, and if the value you set is equal to the price or quantity entered by the customer
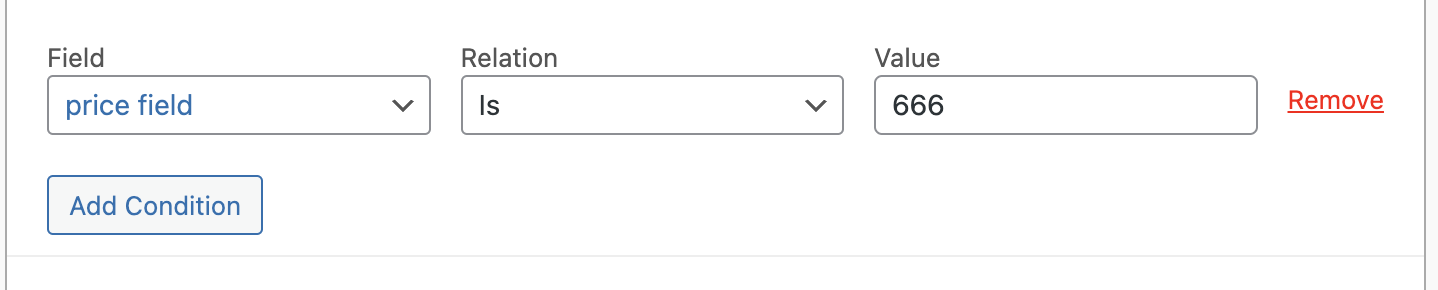
- Is greater than or Is less than condition is met when value placed here and customer sets price or quantity to a number greater or less

- Is greater than or equal and Is less than or equal – works the same as the previous option but also includes the price or quantity value to be equal to your value.
Conditional Logic works smoothly with all the other settings you have in Add-ons, like description, limit ranges, and required fields.
How does it work with required fields?
When you apply conditions to the required field, it works this way:
If the conditional logic is set to ‘Show this field if’ and the condition is met – the customer will be required to fulfill this field.
If the conditional logic is set to ‘Show this field if’ and the condition is not met – the customer will not see the field and will not be forced to fulfill it.
If the conditional logic is set to ‘Hide this field if’ and the condition is met – the customer will not see the field and wouldn’t need to fulfill it to add the product to the cart.
If the conditional logic is set to ‘Hide this field if’ and the condition is not met – the customer will be required to fulfill this field.
Use cases
Use case – adding packages, postcards, and gift wrap with dependencies
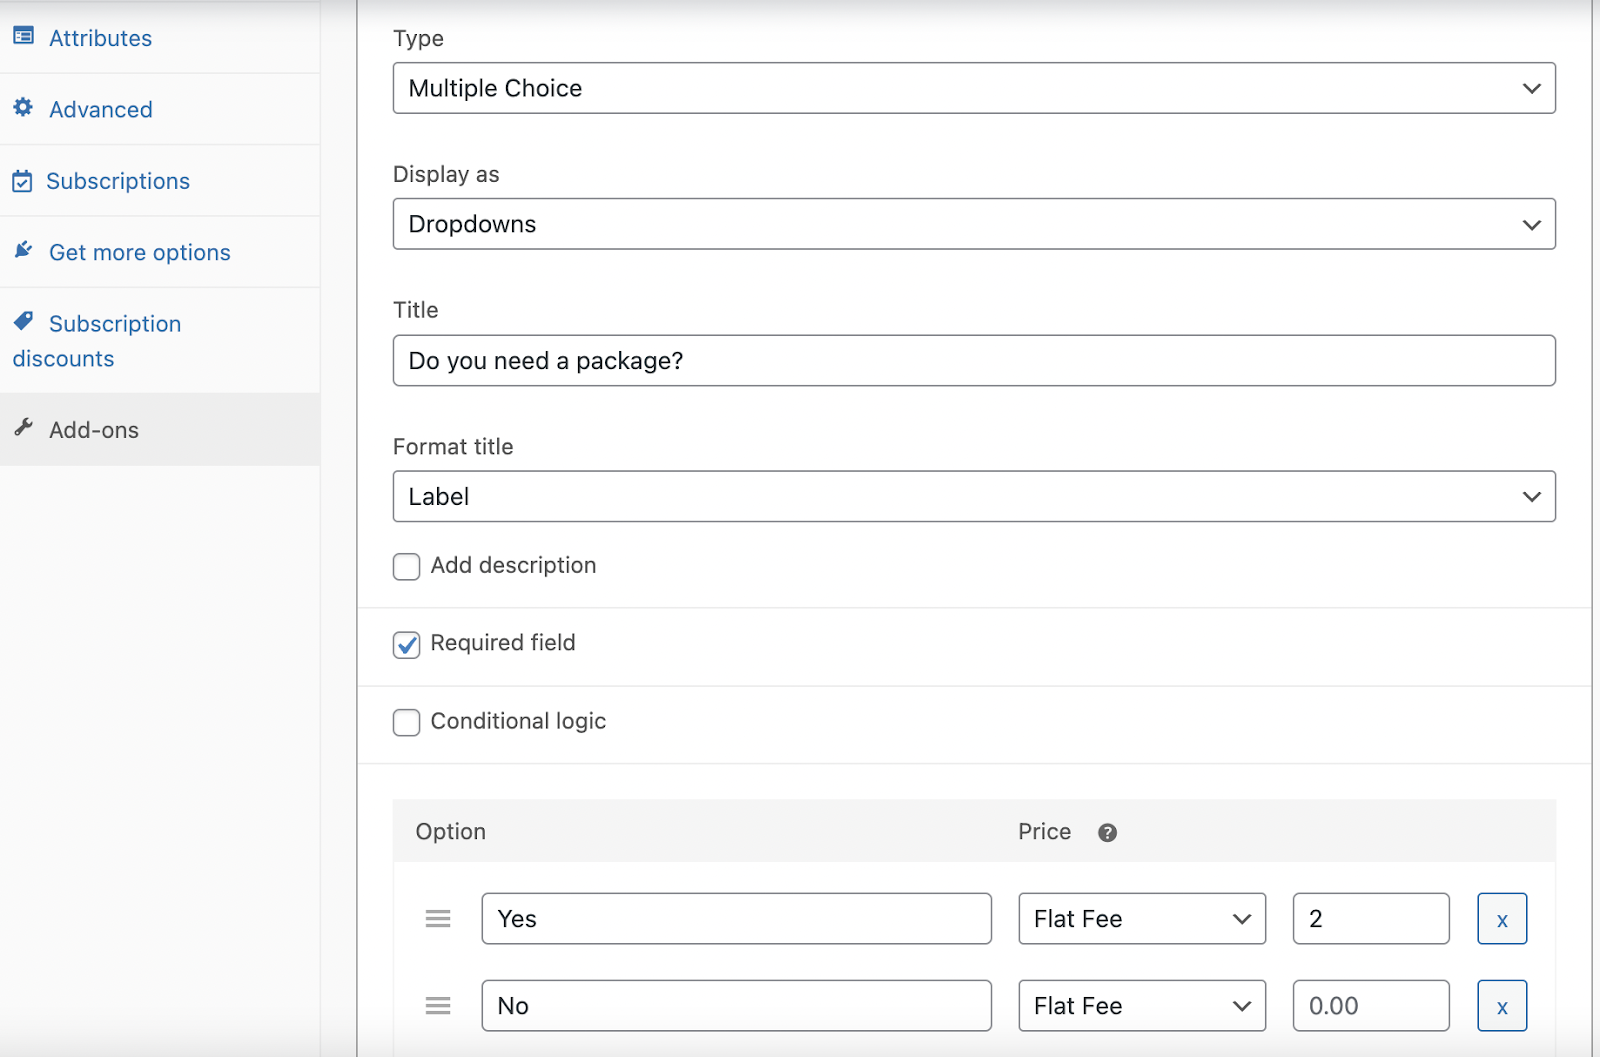
Let’s say you have Product Add-ons to choose the packages and postcards, which depend on whether the user needs the package and the package size.
You have the required field to add a package, which may be either yes or no:
Then you have the field to choose the size of the package – small or large. And you need this field to be displayed only if the user has chosen ‘yes’ in the first field:
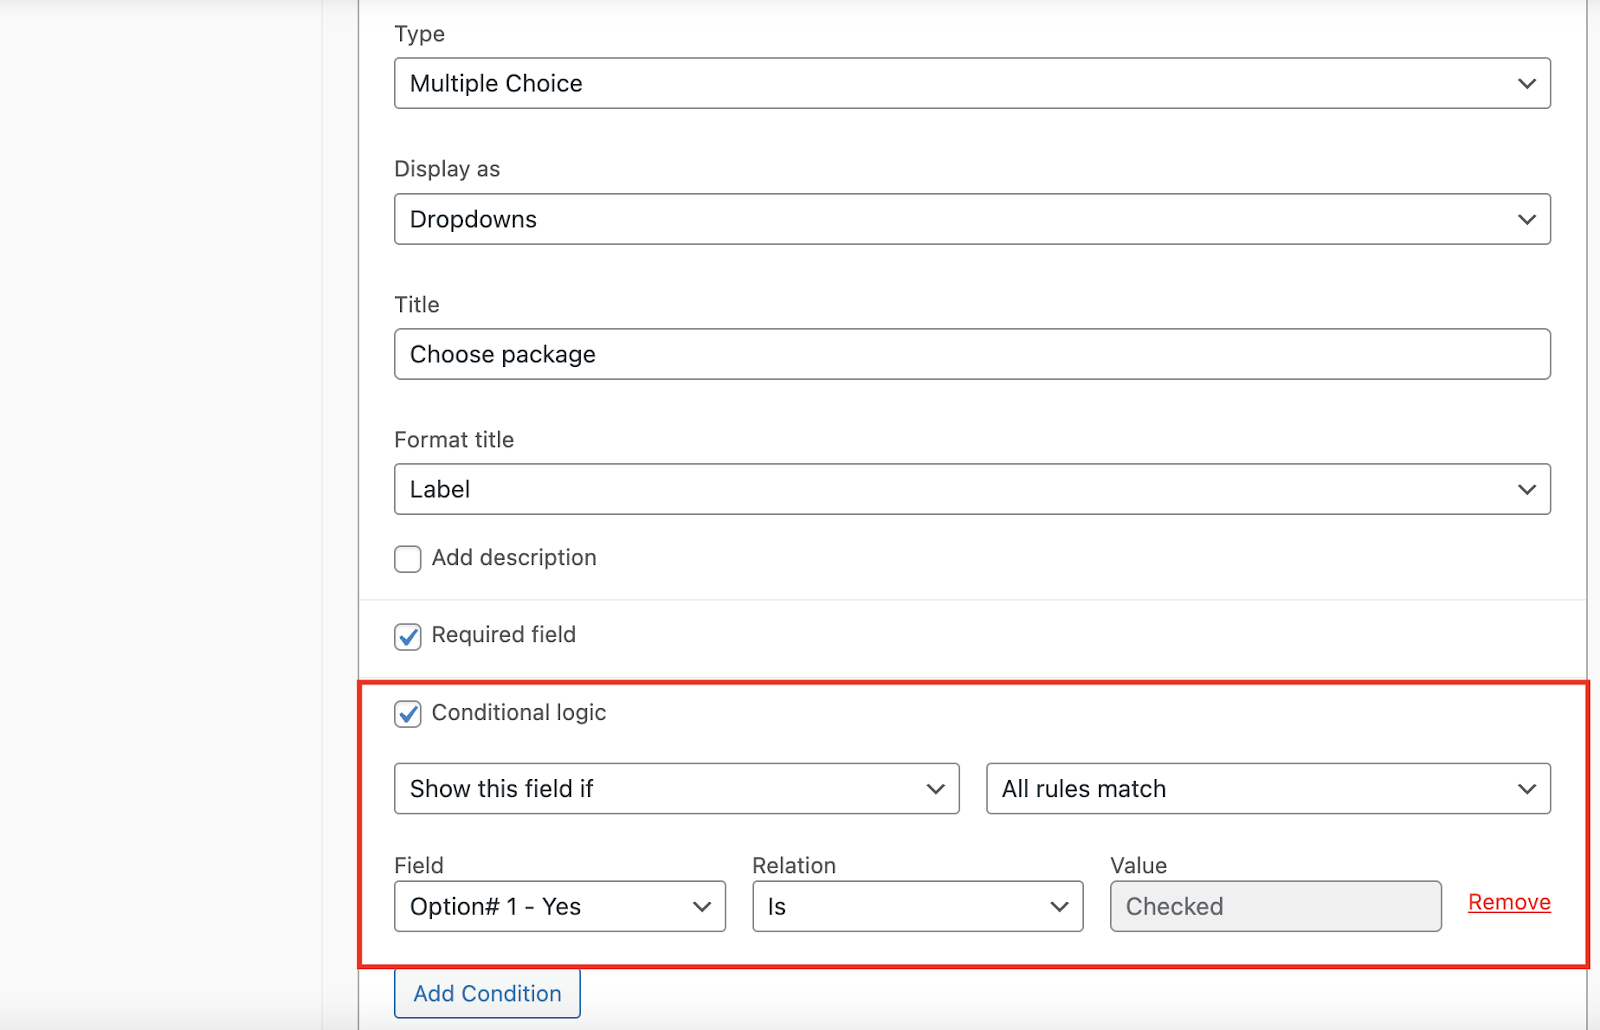
You can see the condition – If in the field ‘Do you need a package?’ the user chooses the option ‘Yes’, then this field will be displayed and will be required as well.
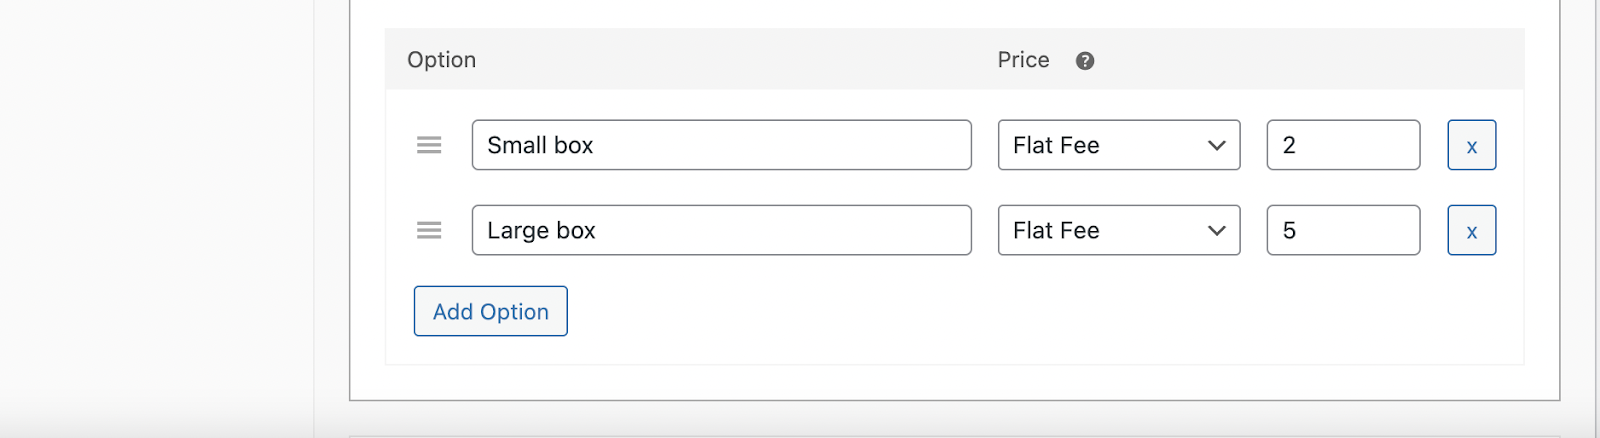
You have 2 types of packages here – large and small in this field:
Next, you need to add a postcard, but a postcard also depends on the type of package. So you want to offer bigger and more expensive postcards for bigger packages. Therefore you create two separate fields for the postcard.
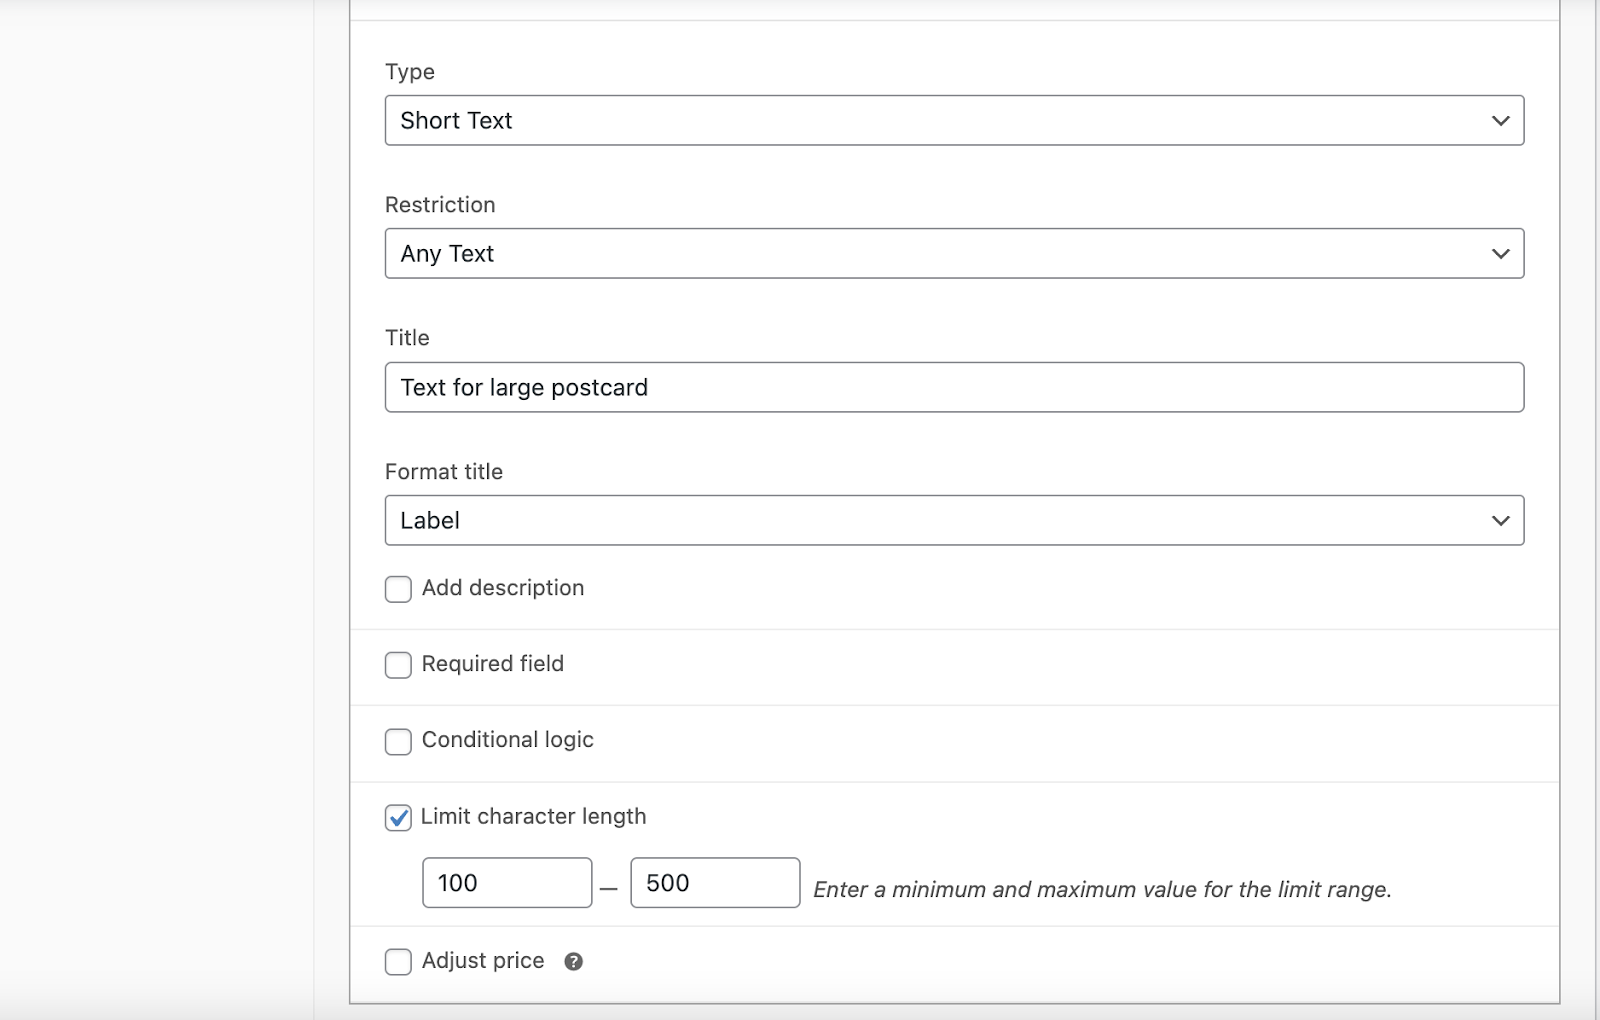
Short text type of field for a small postcard and limit it to 100 characters:

And the second field for large postcards is limited to 500 characters:
Then you need to set up conditional logic to show those fields only for appropriate packages.
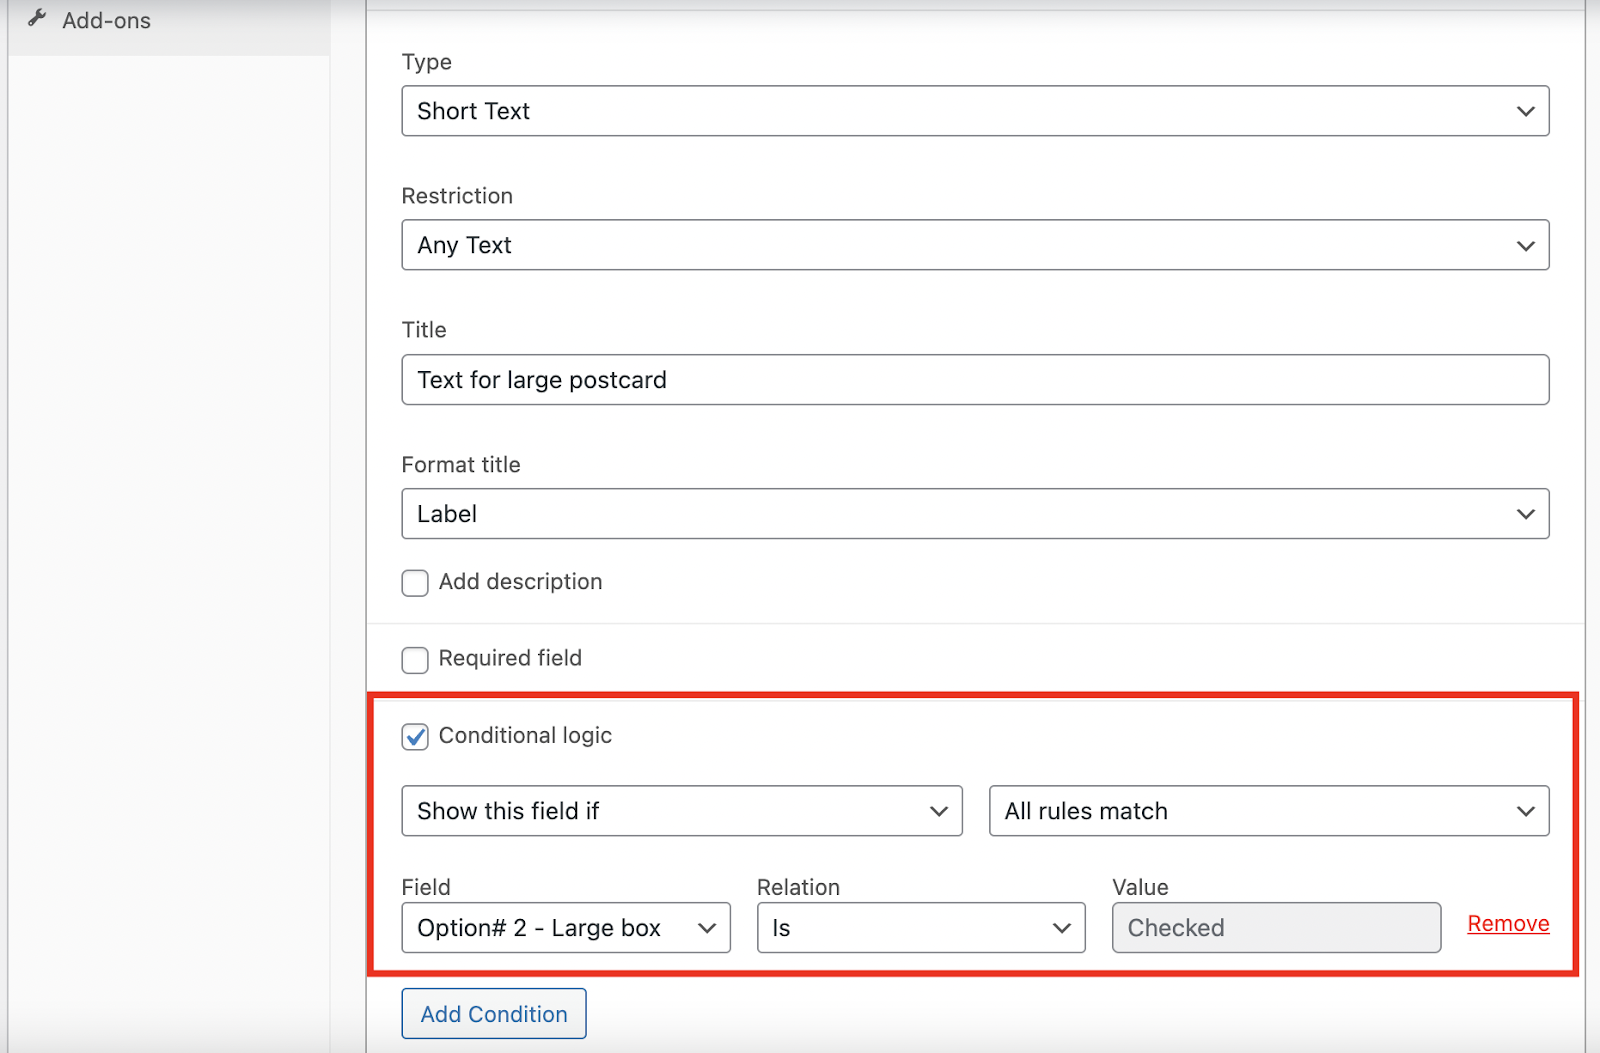
So ‘small postcard’ should be displayed only when the user chooses ‘Small box’ in the second Add-on field:

And do the same for the large postcard – show postcard text only when the large box is picked:
Then if you want to offer a gift wrap, if the customer goes the whole path:
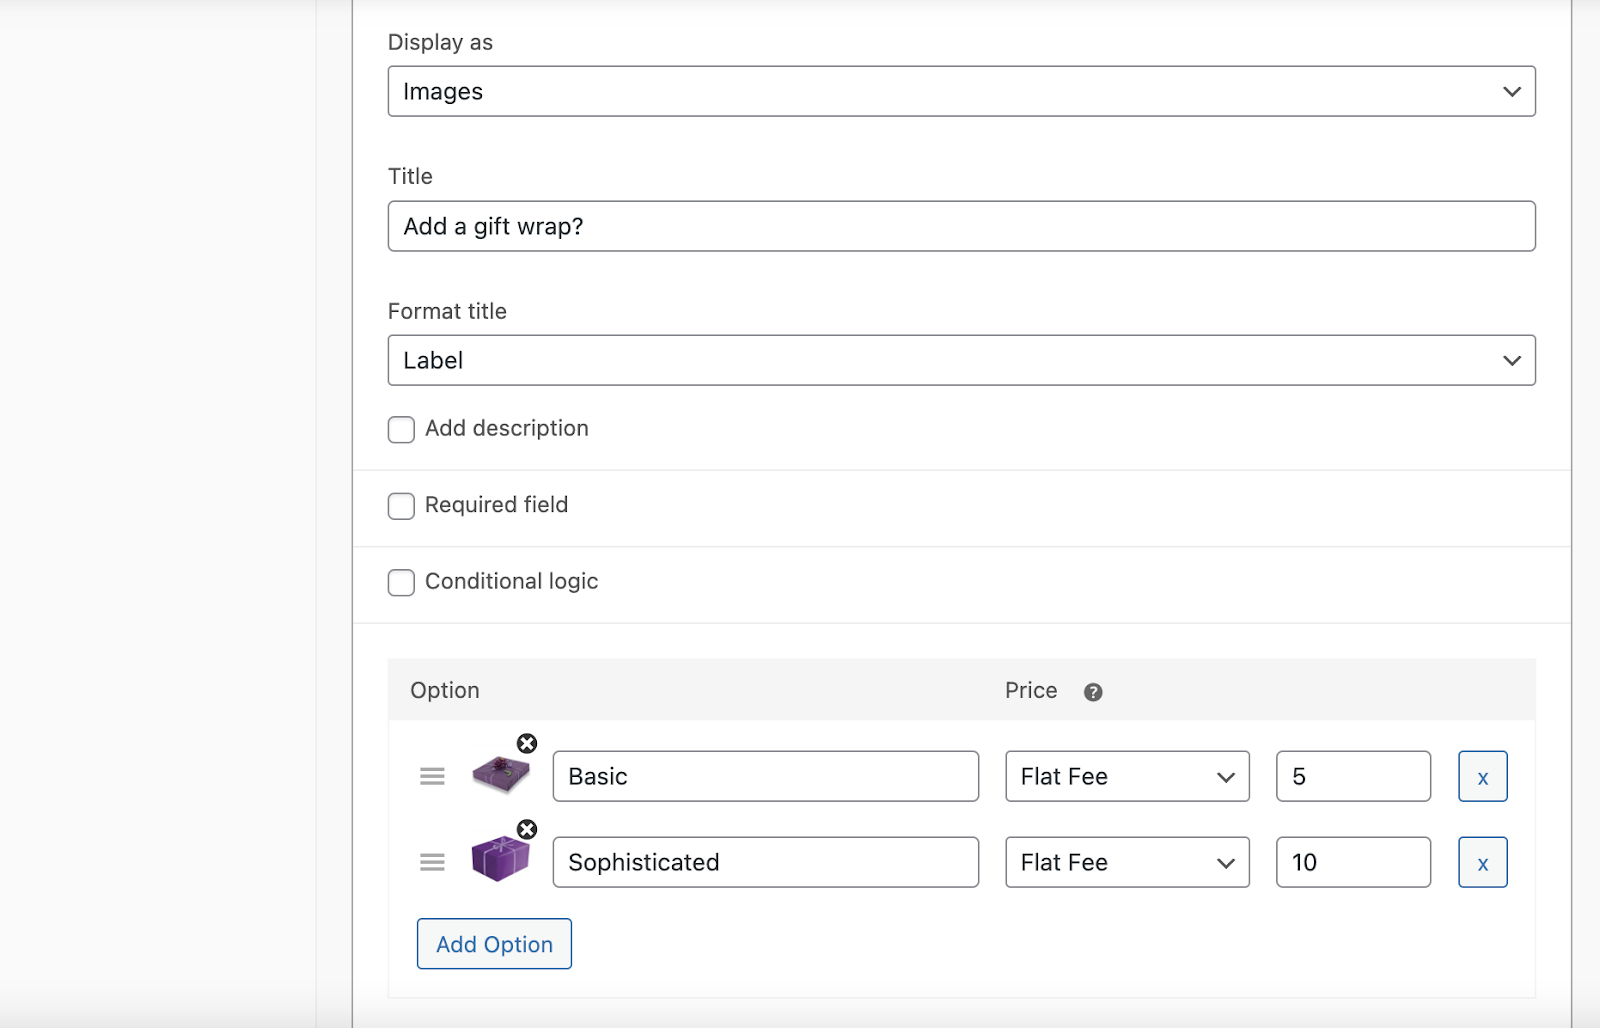
To make that field appear after the user picks up the package size and writes down text for the postcard, you can add the condition to display the current field only if the user has fulfilled either of the postcards:

You can see that conditions will be successful if any of those postcard fields are fulfilled.
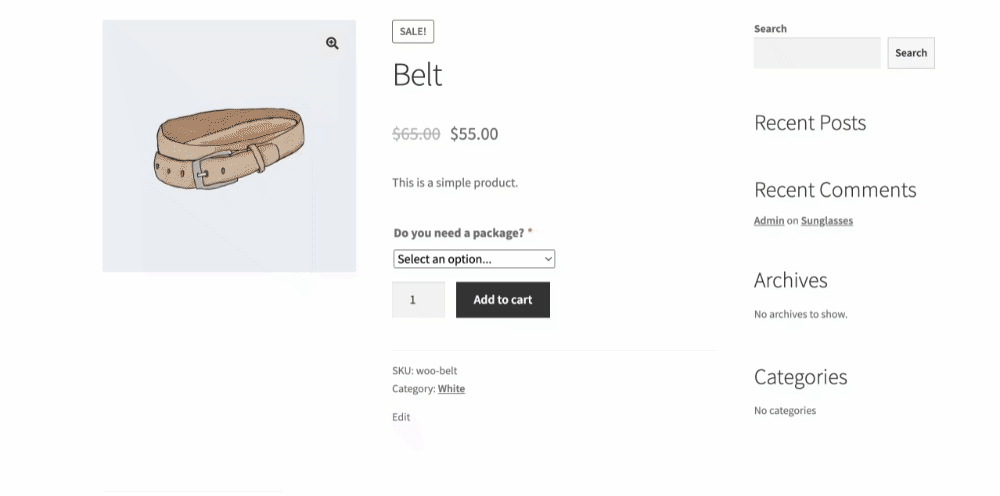
As a result, you will see how add-on fields appear on the product page when conditions are met:
FAQs
Is there any type of field conditional logic can’t be applied to?
- Conditional logic can be applied to any default Product Add-ons field. As well as, all of the fields and their options can be used as conditionals.
Are there any limits to the number of conditions set to one field?
- No, as long as they contradict each other. Eg, you can not use the ‘All rules match’ type and then set two options of multiple choice because the output of that field is always one chosen option.
When trying to add the conditional logic, I see an error saying “Please update (re-save) the post to set up conditional logic”.
- That means you haven’t yet updated the add-on or product. Conditions need to assign a special slug to each field and its options, and that happens only when you update the add-on or product after installing the plugin.
What addons plugins can be used along with this conditional logic?
- The Conditional Logic for WooCommerce Product Add-ons is designed to work only with official Product Add-ons. You won’t be able to set up conditional logic without that plugin.
